1. Introduction
This document is designed for persons who are planning to set up a Techila Distributed Computing Engine (TDCE) environment in Amazon Web Services (AWS) EC2. If you are unfamiliar with the Techila terminology used in this document, please refer to Introduction to Techila Distributed Computing Engine.
Screenshots and dialogs in this document are from Microsoft Windows 7. Depending on your system, the appearance of screens might be different.
The structure of this document is as follows:
Preparation contains a list of prerequisites that must be met before proceeding with setting up a TDCE environment in Amazon Web Services EC2.
Deploying the Techila Server in Amazon Web Services EC2 contains instructions for deploying the Techila Server in Amazon Web Services EC2.
Deploying Techila Workers in Amazon Web Services EC2 contains instructions for deploying Techila Workers in Amazon Web Services EC2.
Installing Bundles contains instructions for installing Bundles on the Techila Server. These Bundles are required if you are planning on using MATLAB, R, Python or Perl in your computational tasks.
Adding End-Users contains instructions for adding End-Users to the Techila environment.
Components Created During the Deployment Process contains a description of Amazon Web Services EC2 components that are created when deploying the Techila Server and Techila Workers in Amazon Web Services EC2.
Removing Components from Amazon Web Services EC2 contains instructions on how shut down the Techila Server and Techila Workers. Also contains instructions on how to remove all cost incurring TDCE components from Amazon Web Services EC2. Note that performing the steps described in this Chapter will also remove all data from the Techila Server meaning the state of the Techila Server will be lost.
2. Preparation
Before proceeding, please verify that you have the following components available:
-
Techila License package
-
Techila Deployment Tool for Amazon Web Services EC2 (delivered in a zip file named
awsinstaller.zip)
For the remainder of this document "Techila Deployment Tool for Amazon Web Services EC2" will be referred to as "Techila Deployment Tool".
If you do not have a Techila License package, please contact your Account Manager or Techila Support at support@techilatechnologies.com.
The Techila Deployment Tool is available in the Techila Extranet located at the following address:
If you do not have access to Techila Extranet, please contact your Account Manager or Techila Support at support@techilatechnologies.com to request for Techila Extranet access.
2.1. Ensuring that Java is available
In order to launch the Techila Deployment Tool, Java needs to be installed on the computer you are using. Java Platform, Standard Edition 6 (or newer) Java Development Kit (JDK) or Java Runtime Environment (JRE) are supported.
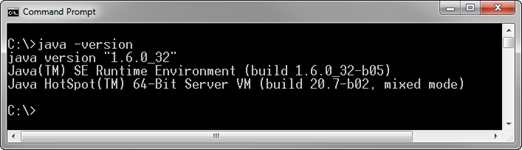
When Java is installed and available from the command line, Java version can be verified with the following command. Please note that executing the command requires that the Java installation path is listed in the PATH environment variable.
java -version
2.2. Extracting the Techila License file
The Techila License file will be needed when deploying the Techila Server in Amazon Web Services EC2. Please follow the steps below to extract the Techila License file to your computer:
-
Locate the Techila License package. In the figure below, a Techila License package is located in the directory
C:\TechilaLicense.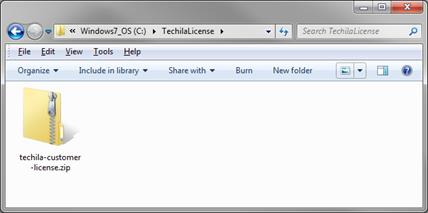 Figure 2. The Techila License is delivered in a zip file.
 -
Extract the Techila License package. After extraction, a Techila License file will be available as illustrated below. This file will be imported to the Techila Server later during the deployment process.
 Figure 3. A Techila License file can be recognised from the
.licensesuffix.
2.3. Downloading and Extracting the Techila Deployment Tool
The Techila Deployment Tool is available in the Techila Extranet and is delivered in a zip file called awsinstaller.zip.
-
Login to the Techila Extranet located at:
-
Navigate to "Administrator Downloads" and download the file
awsinstaller.zip.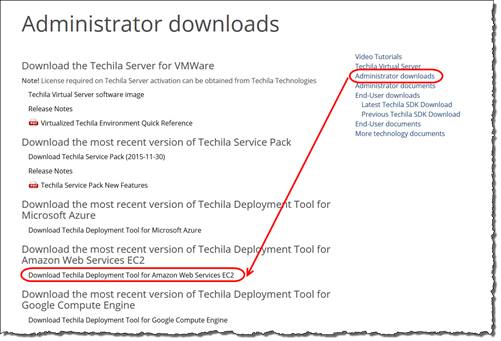 Figure 4. Downloading the Techila Deployment Tool
 -
After downloading the file, locate the zip file on your computer. In the figure below, the zip file is located in the directory
C:\Downloads.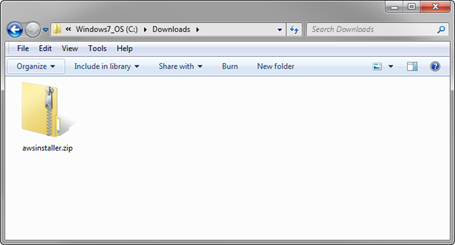 Figure 5. The Techila Deployment Tool is delivered in a zip file.
 -
Extract the
awsinstaller.zippackage to a directory that does not require administrative privileges for creating files. This is required, because the Techila Deployment Tool will create files in the current working directory.After extraction, the Techila Deployment Tool (awsinstaller.jar) will be available as illustrated below.
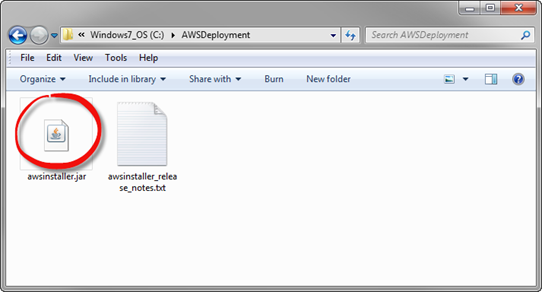 Figure 6. The Techila Deployment Tool
3. Deploying the Techila Server in Amazon Web Services EC2
This Chapter contains instructions for deploying the Techila Server in Amazon Web Services EC2. Instructions for removing the Techila Server can be found in Removing the Techila Server.
-
Navigate to the directory that contains the Techila Deployment Tool (awsinstaller.jar) and launch the application.
When using a file manager, the application can be launched by double clicking on the
awsinstaller.jarfile icon.When using a command prompt, the application can be launched using command
java -jar awsinstaller.jar.Note! If you are unable to launch the application from the command line, please verify that your PATH environment variable contains the location of your Java installation.
Note! The
awsinstaller.jarapplication will create files in the current working directory, which means that the application must have write access to the directory. Ensure that the directory containing theawsinstaller.jarfile does not require administrative privileges rights for creating files. Figure 7. In this example, the file
awsinstaller.jarthat contains the Techila Deployment Tool is located in directoryC:\AWSDeployment. The application can be launched by double clicking the file icon. -
After launching the Techila Deployment Tool, click the
Open AWS Consolebutton. This will open the AWS Management Console sign-in page in your web browser.In the following steps, the AWS Management Console will be used to add a new AWS User, including security credentials for the User. These security credentials will then be linked with the Techila Deployment Tool, which will enable you to use the Techila Deployment Tool to manage the AWS EC2 environment.
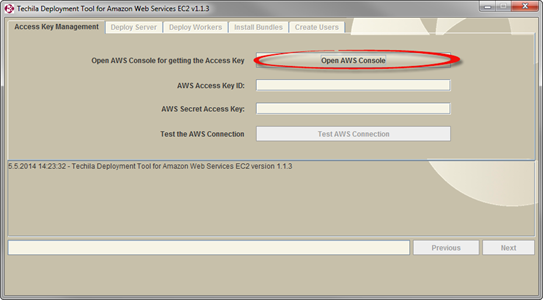 Figure 8. Click the highlighted button.
 -
Click the
Sign in to the AWS Consolebutton to sign-in. Figure 9. Signing in is required in order to access the AWS Management Console.
 -
Sign in using your login credentials.
Note! In order to login by using your Amazon account, your account needs to be signed up for AWS.
Note! In order to login using your AWS IAM (Identity and Access Management) User credentials you will need to sign in using your "IAM User Sign-In URL". This URL can be retrieved from the AWS Management Console.
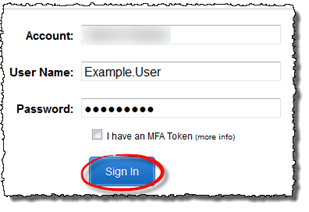 Figure 10. Sign in to the AWS Management Console using your login credentials. In this screenshot, signing in will be done as "Example User", which is an IAM User.
 -
After signing in, click
Identity & Access Management(IAM).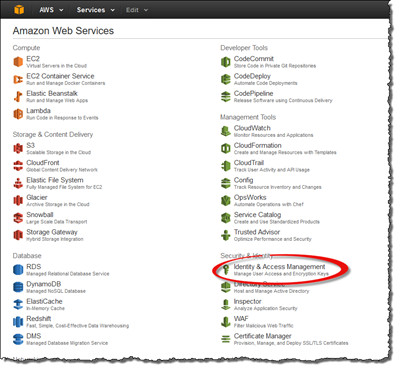 Figure 11. Open the IAM view to manage access credentials.
 -
Select
Usersand click theCreate New Usersbutton. Figure 12. Adding a new User.
 -
Enter the User name and tick the checkbox for
Generate an access key for each User. After filling the fields, click theCreatebutton.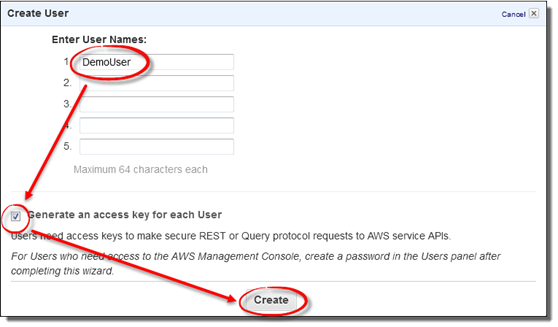 Figure 13. Filling out the User name.
 -
After adding the User, User security credentials can be accessed. Click the
Show User Security Credentialsoption.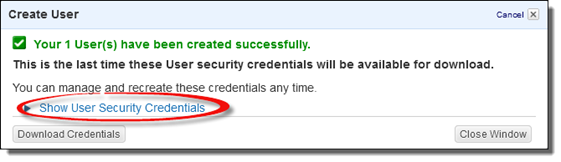 Figure 14. View the security credentials.
 -
After displaying the security credentials, copy the information to the Techila Deployment Tool.
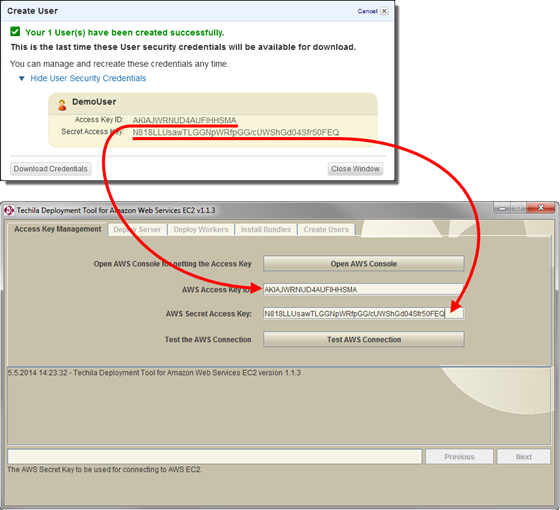 Figure 15. Copy the security credentials to the Techila Deployment Tool. Text can be pasted to the text fields by using the Ctrl-V keyboard shortcut or the right mouse button menu.
 -
After copying the security credentials, go back to your web browser and close the window by clicking the
Close Windowbutton.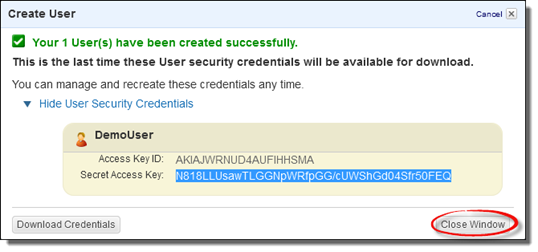 Figure 16. Close the window.
 -
At this point, you might be prompted to download the security credentials in a file. If you want, you can click the
Download Credentialsbutton to download the credentials for safe keeping. Click theClose Windowbutton to continue.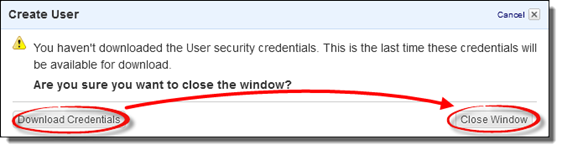 Figure 17. Login credentials can be downloaded by clicking the
Download Credentialsbutton. Click theClose Windowbutton to continue.Next steps will consist of giving the AWS User elevated permissions, which are required in order to use the Techila Deployment Tool.
-
Select the User by clicking on the
User Name.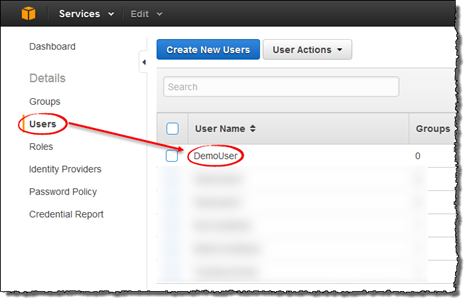 Figure 18. Modifying User permissions.
 -
Under
Permissions, click theAttach Policybutton.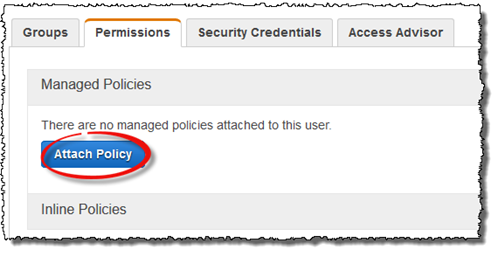 Figure 19. Attaching a user policy.
 -
Select the Power User Access by ticking the highlighted checkbox and clicking the
Attach Policybutton.Tip! You can use the text box to easily search for the correct policy.
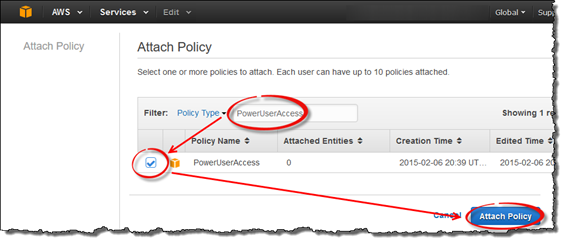 Figure 20. Selecting the Power User policy.
 -
Go back to the Techila Deployment Tool and click the
Test AWS Connectionbutton. After the network connection test is completed, the messageAWS connection tested successfullywill be displayed in the message area.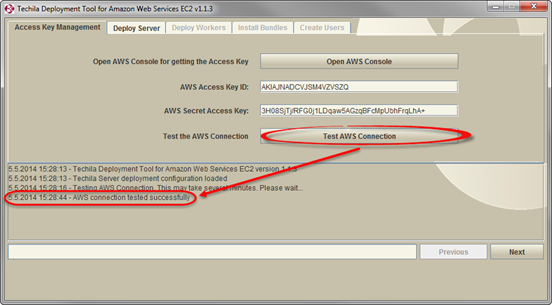 Figure 21. Message "AWS connection tested successfully" indicates that the network connection test was successful.
 -
Click the
Nextbutton to continue to theDeploy Servertab.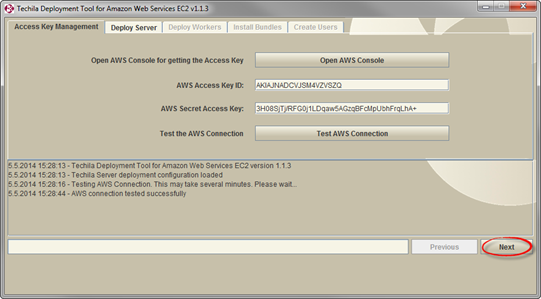 Figure 22. Proceed to the next tab.
 -
On the
Deploy Servertab, click theImport Licensebutton. This will open a file dialog window, which will be used to select your Techila License file.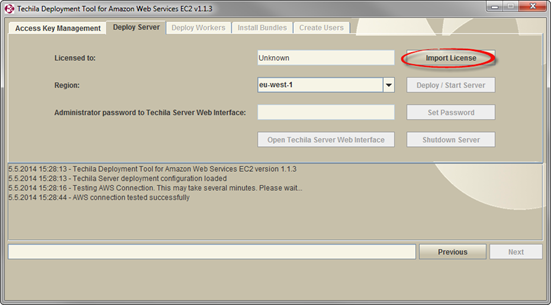 Figure 23. Importing a License is required before deploying the Techila Server. Techila Licenses are provided by Techila Technologies. If you do not have a Techila License, please contact support@techilatechnologies.com or your account manager.
 -
After clicking the
Import Licensebutton, use the file dialog window to select your Techila License file. The Techila License file can be recognized from the.licensesuffix. After selecting the file, click theOpenbutton.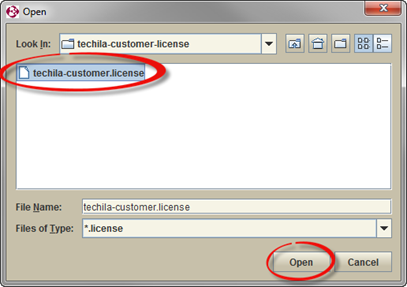 Figure 24. The file dialog window can be used to select your Techila License.
 -
After importing your Techila License, the "Licensed to" field will contain information stored in the Techila License file.
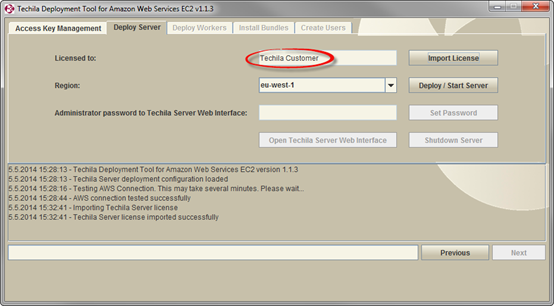 Figure 25. The Techila License information will be displayed after a successful import process.
 -
Using the dropdown menu, choose the region where the Amazon Web Services EC2 components will be created.
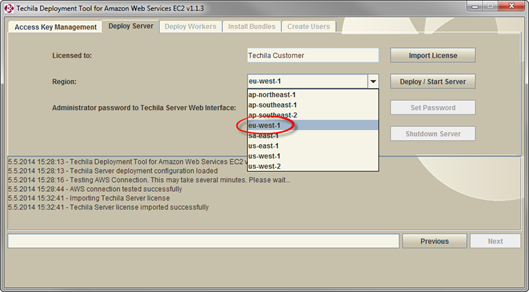 Figure 26. The dropdown menu can be used to select the desired region.
 -
After selecting the region for the components, click the
Deploy/Start Serverbutton to begin the Techila Server deployment process.This deployment process will create all necessary AWS components and will also automatically deploy one (1) AWS EC2
m3.xlargeinstance, which will be used to run the Techila Server. Please refer to Techila Distributed Computing Engine Product Description for recommended minimum and required minimum Compute instance features.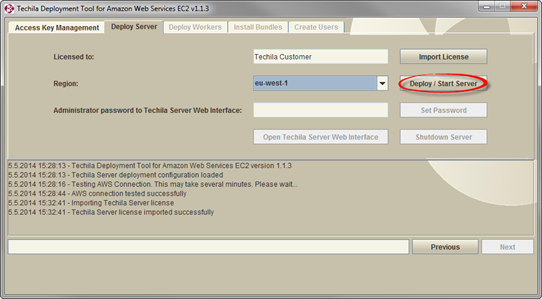 Figure 27. Clicking the
Deploy/Startbutton will start the deployment process. This process may take several minutes.During the deployment, a computational Project will be automatically created for testing purposes. The progress of the test Project will be indicated by a status window, which will be visible for the duration of the Project. The status of the Project will also be displayed in the text field of the Techila Deployment Tool.
After the deployment process has been completed, a message stating
Techila Server Installation completedwill be displayed and theOpen Techila Server Web Interfacebutton will be enabled. The password for the Useradminwill be displayed in theAdministrator password to Techila Server Web Interfacefield.The Techila Server has now been successfully deployed and is ready for use. You can now continue with deploying Techila Workers in Amazon Web Services EC2 as described in Deploying Techila Workers in Amazon Web Services EC2.
Note! If you want, you can change the Techila Web Interface password for the
adminUser.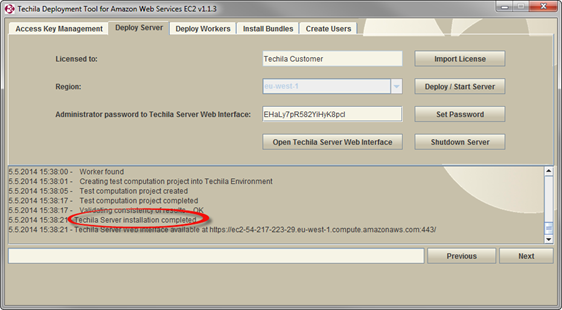 Figure 28. A successful Techila Server deployment to Amazon Web Services EC2.
 -
After the Techila Server has been deployed, you can change the Techila Web Interface password for the
adminUser by entering a new password to theAdministrator password to Techila Server Web Interface. After entering the new password, click theSet Passwordbutton.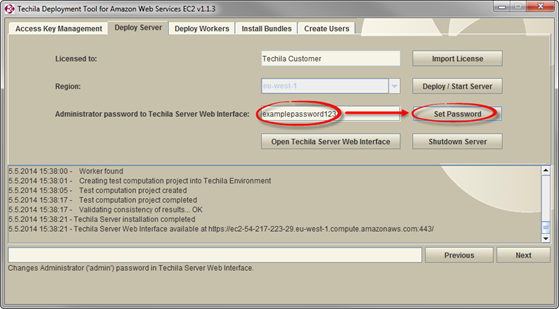 Figure 29. Changing the Techila Web Interface password for the
adminUser. -
After clicking the button, the message
Administrator password changedwill be displayed. The password has now been successfully reset.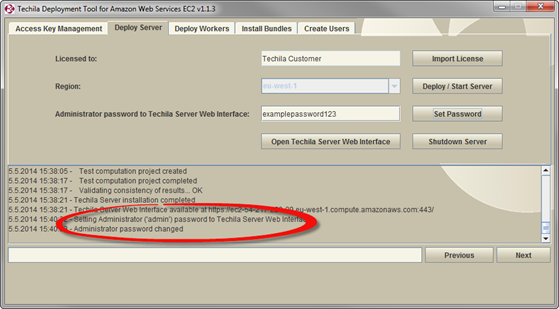 Figure 30. A successfully changed password.
4. Deploying Techila Workers in Amazon Web Services EC2
This Chapter contains instructions for deploying Techila Workers in Amazon Web Services EC2. Instructions for removing Techila Workers can be found in Removing Techila Workers. When deploying Techila Workers using the Techila Deployment Tool, the Techila Workers are automatically placed in to auto scaling groups. The amount of Techila Workers that are running is controlled by entering the desired values to the Techila Deployment Tool, which will then automatically adjust the auto scaling groups to match the desired values.
Please note that in order to deploy (or remove) Techila Workers, a deployed Techila Server must be available. Instructions for deploying the Techila Server in Amazon Web Services EC2 can be found in Deploying the Techila Server in Amazon Web Services EC2.
-
Navigate to the directory containing the Techila Deployment Tool and launch the application by double clicking on the
awsinstaller.jarfile icon.Note! If the Techila Deployment Tool is already running and you have performed a connection test, you can continue from Step 3.
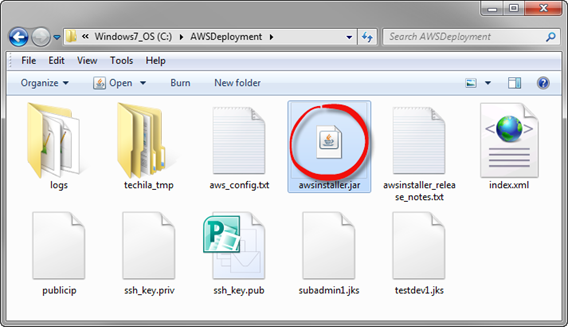 Figure 31. After a successful deployment of the Techila Server in your Amazon Web Services EC2 environment, several new files have been automatically generated in to the directory containing the Techila Deployment Tool. The application can be re-launched by double clicking the
awsinstaller.jarfile icon. -
After the Techila Deployment Tool has been launched, click the
Test Amazon Web Services EC2 Connectionbutton.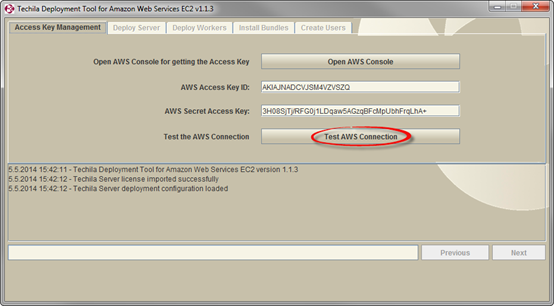 Figure 32. Performing a connection test is required before you can proceed to the other tabs in the Techila Deployment Tool
 -
After the connection test has been performed, click on the
Deploy Workerstab to open the tab that will be used to deploy Techila Workers in Amazon Web Services EC2.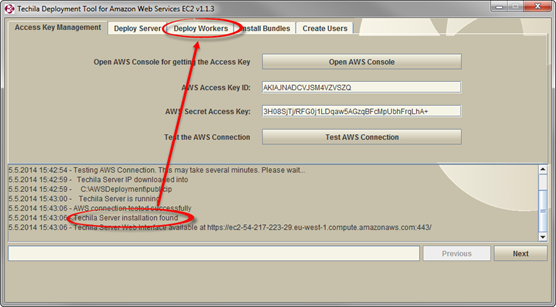 Figure 33. After a successful connection test, the "Deploy Workers" tab will be available.
 -
The "Deploy Workers" tab can be used to deploy Techila Workers on Amazon Web Services EC2 instances. Before any Techila Workers have been deployed, the tab should resemble the one illustrated in Figure 34.
The "Total" value in the highlighted field contains information on how many cores are currently used by existing Techila Worker deployments and how many cores would be used if the specified number of Techila Workers (value in the "Selected Worker Count") would be deployed.
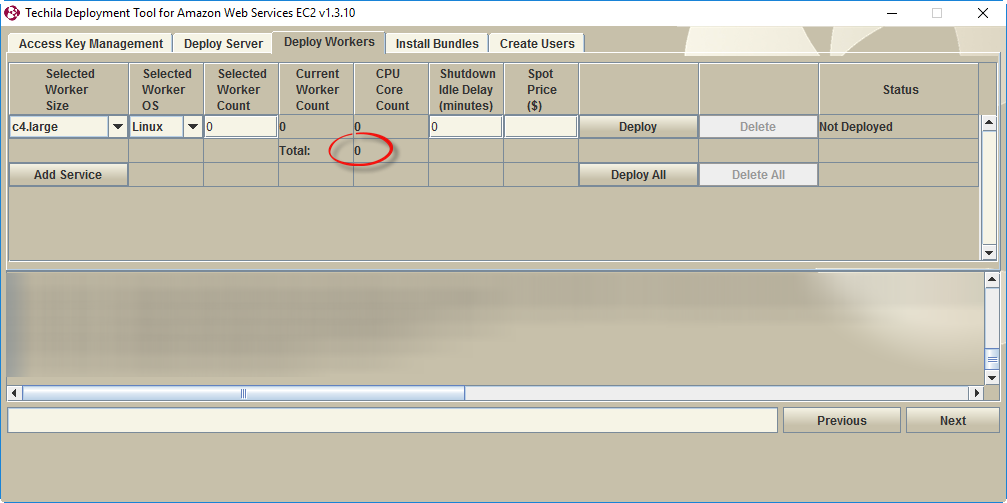 Figure 34. The "Deploy Workers" tab will contain information on the currently deployed Techila Workers.
When deploying Techila Workers, you will need to specify the following settings:
-
The instance size of the Techila Workers
-
The instance operating system
-
The Techila Worker count for the deployment
-
The instance shutdown delay (optional)
-
Spot price bid (optional)
These settings are explained below:
Techila Worker Sizedropdown menu can be used to select the Amazon Web Services EC2 instance type that will be used when deploying Techila Workers. The maximum number of instances you can deploy will be determined by the quota of your Amazon Web Services account.When selecting the Techila Worker Size, it is recommended that you choose the instance type that best suits the distributed application(s) you plan on computing on the Techila Workers. Most important properties include the amount of memory, amount of available disk space and the instance price per hour. Information on these properties can be found on the following webpage:
The total amount of CPU cores that can be deployed can be increased by selecting an instance type with a large number of CPU cores per instance. The examples below illustrate the difference in the amount of CPU cores that can be deployed when changing the selected instance type.
Example 1: John plans on deploying 20 instances using c3.large instances (2 cores each). This means that John will have access to 20 * 2 = 40 CPU cores of computing capacity.
Example 2: John plans on deploying 20 instances using c3.8xlarge instances (32 cores each). This means that John will have access to 20 * 32 = 640 CPU cores of computing capacity.
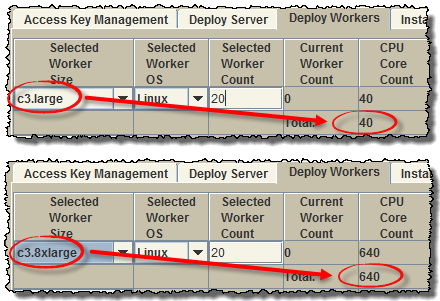 Figure 35. Using different instance types will change the maximum number of CPU cores that can be deployed by using your quota.
Note! The "Selected Worker Size" dropdown menu will only be available if there are no currently deployed Techila Workers for the selected service.
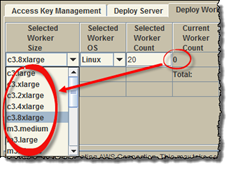 Figure 36. The "Selected Worker Size" dropdown menu can be used to set the Instance size. Only available when no Techila Workers are currently deployed.
After you have deployed Techila Workers to a service, all additional Techila Workers will be automatically deployed on the same instance type and operating system. If you wish to have Techila Workers deployed on different instance types at the same time, please see instructions in Deploying Techila Workers on Different Instance Types
Selected Worker OSdropdown menu can be used to select the operating system of the Techila Workers that will be deployed. The following operating systems are available in the dropdown menu: -
Linux
-
Windows
The dropdown menu is illustrated in the screenshot below.
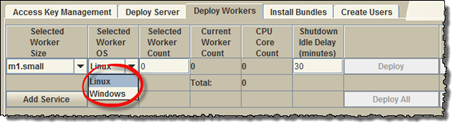 Figure 37. The OS dropdown menu can be used to select the Techila Worker operating system.
The selected OS will affect the time required to deploy the Techila Workers. Techila Workers with a Windows operating system typically take approximately 10-15 minutes to deploy. Techila Workers with a Linux operating system are typically deployed in 2-4 minutes. Please note that deployment times for your environment might differ from the ones mentioned here.
Selected Worker Countfield can be used to specify the number of deployed Techila Workers. In the example below, the deployment count is set to 10 and the Worker Size has been set to "m1.small". These settings could be used to deploy 10 Techila Workers on "m1.small" instances.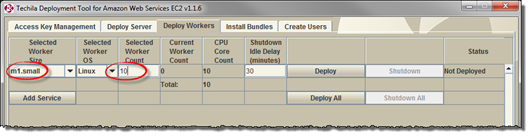 Figure 38. The value defined in the "Selected Worker Count" field is used to control the number of Amazon Web Services EC2 Instances that will be deployed as Techila Workers.
If you have already deployed Techila Workers, specifying a larger value will enable you to increase the number of deployed Techila Workers. In the example below, the current Techila Worker deployment count is 10 and the "Selected Worker Count" field contains the value 15. These settings could be used to deploy five additional Techila Workers, bringing the total number of deployed Techila Workers to 15.
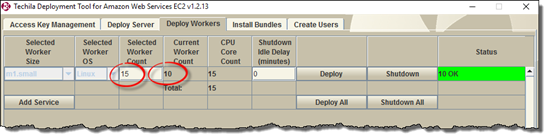 Figure 39. Additional Techila Workers can be deployed by entering a larger value to the field. With the settings shown in this example, the Techila Worker deployment count would be increased from 10 to 15.
Note! If you attempt to deploy a larger number of instances than allowed by your Amazon Web Services EC2 quota, the deployment will fail with a quota related error message as illustrated below.
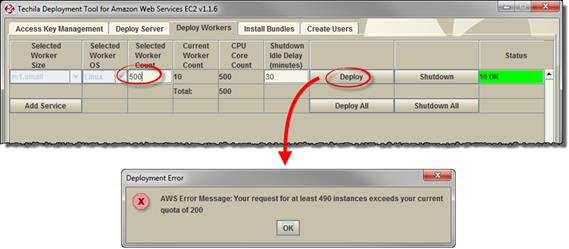 Figure 40. Deploying more instances than allowed by your quota will generate an error message. In this example, 490 additional Techila Worker instances were requested but the request failed because the maximum quota was only 200 instances. Please note that your quota might be different than the one illustrated here.
Instructions for reducing the number of deployed Techila Workers can be found in Removing Techila Workers.
Shutdown Idle Delay (minutes)field can be used to specify a shutdown delay for the Techila Workers that are deployed in the service. Specifying a shutdown delay will automatically shutdown the instances hosting the Techila Workers if they remain idle for the specified time. It is however strongly recommended that the deletion of the instances is always verified using the Amazon Web Services EC2 management portal.The shutdown timer will be activated when computational Jobs are detected on the Techila Workers belonging to the specified service. Computational activity is polled at five second intervals, meaning extremely short test Projects might not trigger the shutdown counter. Please note that this also means that if the Techila Workers have only been deployed, but no Projects have been created, the instances will not be automatically shutdown.
The counter will be automatically reset when a new computational Job is detected on any of the Techila Workers belonging to the specified service. It is also possible to modify the shutdown delay of existing Techila Worker deployments by entering a new value to the field and clicking the
Deploy Workersbutton.In the example below, the shutdown delay has been set to 30 minutes and the Techila Worker deployment count to 10. This means that all Techila Workers will be automatically terminated if they remain idle for 30 minutes after a Job has been detected on the Techila Workers.
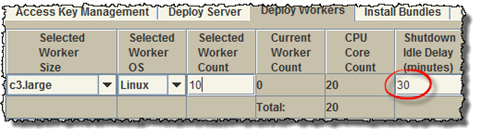 Figure 41. Specifying that Techila Workers should be shut down after 30 idle minutes.
Automatic shutdown can be disabled by entering the value 0 field as illustrated below.
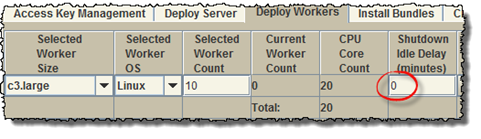 Figure 42. Specifying that Techila Workers should not be automatically shutdown
It is also possible to modify the "Shutdown Idle Delay (minutes)" value of existing Techila Worker deployments. This can be done by entering the new desired value to the field and clicking the
Deploybutton for the specified service.Spot Price ($)field can be used to specify a spot bid, which allows you to use spot instances instead of regular on-demand instances when starting Techila Workers. If you want to use spot instances, enter the spot price that you are willing to pay per instance hour to theSpot Price ($). The decimal separator is a dot (.). If your bid does not exceed the current spot price, no instances will be started. Spot pricing information can be found here. More information about spot instances can be found here. As a rule of thumb, if you are in a hurry and want to ensure that you get the Techila Workers started as soon as possible, it is recommended that you do not use spot instances.In the example below, a spot bid of $0.02 has bee specified, meaning the c4.large Linux instance will only be launched if the bid exceeds the current spot price.
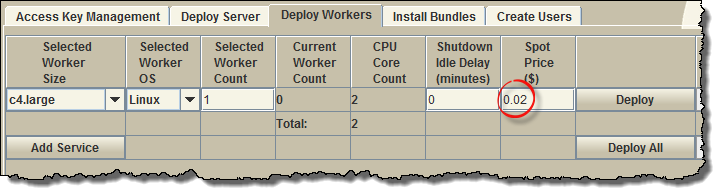 Figure 43. Specifying a spot bid for an instance.
In order to deploy Techila Workers, specify the following settings:
-
Worker Size
-
Worker operating system
-
Number of Techila Workers to be deployed
-
The shutdown idle delay value (optional)
-
Spot price bid (optional)
After specifying these settings, click the
Deploybutton to begin the deployment processIn the example below, the Worker Size has been set to
m1.smalland the operating system has been set toLinuxand the Techila Worker count to ten (10). The value of the shutdown delay has been set to30, meaning that the instances will be automatically shut down after 30 minutes of idle time. TheSpot Price ($)is empty, meaning spot instances will not be used.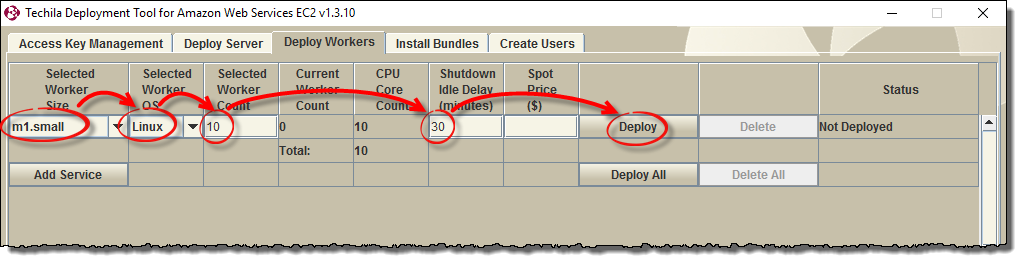 Figure 44. After selecting the desired Worker Size and the number of Techila Workers that should be deployed, click the
Deploybutton to begin the deployment process.After the virtual machines have been deployed, the "Current Techila Worker count" field will display the number of deployed Techila Workers and should match the value you specified in the previous step.
Note! It will take several minutes before the Techila Workers can be used in computational Projects. Techila Workers with Linux operating system should take approximately 2-4 minutes. Techila Workers with Windows operating system typically take 10-15 minutes.
Note! The "Status" column is updated based on the information from the AWS EC2 environment and does not include the configuration of the Techila Worker components. This means that even though the "Status" column would report "10 of 10 deployed", it might take several minutes before the Techila Workers will be visible in the Techila Web Interface and before they can be used in computational Projects.
In the example below, 10 Techila Workers have been deployed on "m1.small" instances. After you have deployed Techila Workers, the Techila Worker Instance Size dropdown menu will be disabled and all new Techila Workers will be deployed on the same instance type. You can now continue with installing Bundles on the Techila Server as described in Installing Bundles.
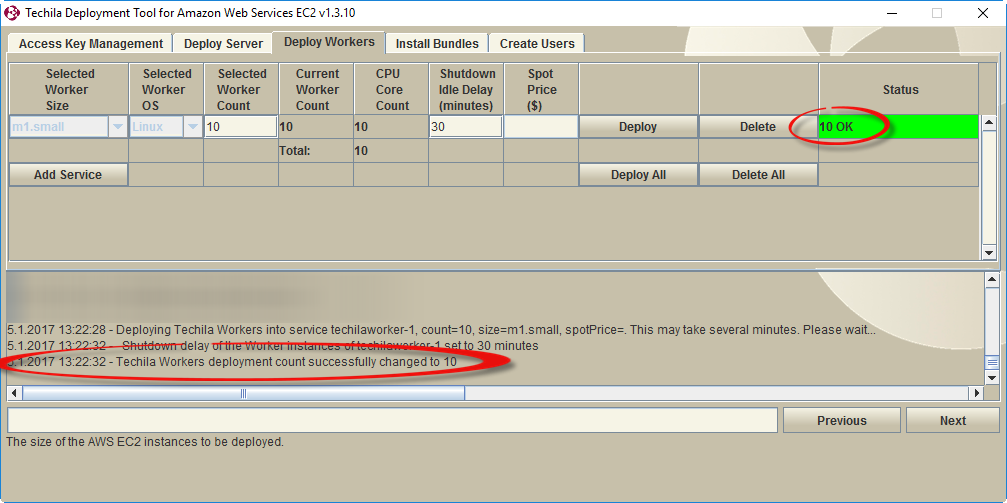 Figure 45. After the Techila Workers have been deployed, the "Current Worker Count" and "Status" columns will display information on the number of deployed Techila Workers.
-
4.1. Deploying Techila Workers on Different Instance Types
This Chapter contains instructions on how to deploy Techila Workers on different AWS EC2 instance types.
-
Navigate to the directory containing the Techila Deployment Tool and launch the application by double clicking on the
awsinstaller.jarfile icon.Note! If the Techila Deployment Tool is already running and you have performed a connection test, you can continue from Step 3.
-
Click the
Test Amazon Web Services EC2 Connectionbutton -
Click the
Deploy Workerstab. In the example below, there are already 10 Techila Workers deployed onm1.smallinstances. Click theAdd Servicebutton.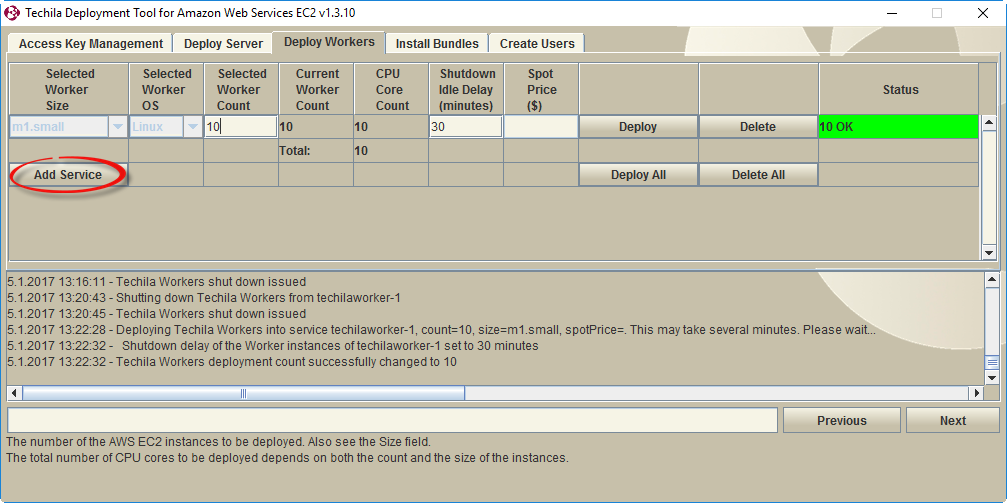 Figure 46. In this example, the environment already contains 10 deployed Techila Workers on "m1.small" instances.
 -
After clicking the
Add Servicesbutton, a new line will be displayed. This line can be used to deploy Techila Workers on different instance types and/or operating system.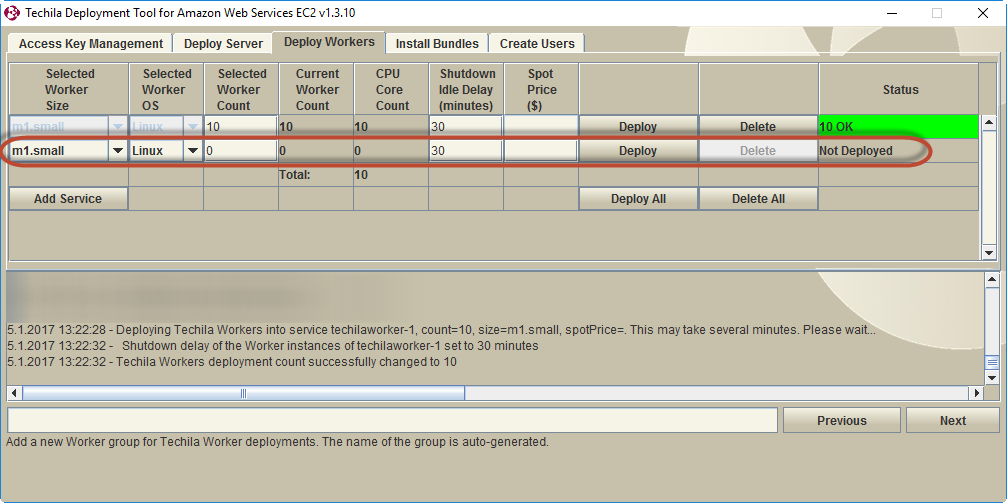 Figure 47. After clicking the
Add Servicesbutton, a new line will be displayed. -
Specify the following settings for the new service. Specifying these settings follows the same principle as described in Deploying Techila Workers in Amazon Web Services EC2.
-
Techila Worker Size
-
Techila Worker operating system
-
Number of Techila Workers to be deployed
-
Shutdown idle delay
After defining the settings, deploy the Techila Workers by clicking the
Deploybutton on the matching line.Note! If you have added multiple new lines containing Techila Worker deployment settings, you can deploy all Techila Workers by clicking the
Deploy Allbutton.In the example below two (2) Techila Workers will be deployed on
m1.mediuminstances. Figure 48. Techila Worker deployment will be started when the
Deploybutton is clicked.After new Techila Workers have been deployed, the information on the line will be updated in the "Current Worker Count" and "Status" columns.
 Figure 49. After the Techila Workers have been deployed, the information will be automatically updated.
-
5. Installing Bundles
This Chapter contains instructions for installing Bundles on the Techila Server. Please note that in order to install Bundles, a deployed Techila Server must be available. Instructions for deploying the Techila Server in Amazon Web Services EC2 can be found in Deploying the Techila Server in Amazon Web Services EC2.
Installed Bundles will be automatically transferred to Techila Workers if components are required in the computational Job that is assigned to the Techila Worker. The Bundle transfer process from the Techila Server to the Techila Workers may take several minutes depending on the size of the Bundle, but will only need to be performed once per deployment.
After the Bundle has been transferred to Techila Workers, the Techila Workers will automatically re-use the Bundle in subsequent computational Projects. Please note that if the Amazon Web Services EC2 Instances hosting the Techila Workers are shut down and restarted, the Bundles will need to be transferred again from the Techila Server to the Techila Workers. This is due to the stateless nature of Techila Workers in the Amazon Web Services EC2 environment.
There are two different methods for installing Bundles:
-
Installing Runtime Bundles This is the default method, which is typically used when deploying a Techila Distributed Computing Engine (TDCE) environment in Amazon Web Services EC2.
-
Installing Custom Bundles This method is typically used only when you create your own Runtime Bundles or when you receive Bundles from Techila Technologies.
5.1. Installing Runtime Bundles
This Chapter contains instructions for installing Runtime Bundles that are available in the Bundle list. Runtime Bundles contain runtime components that are required when performing computations using the following programming languages.
-
MATLAB
-
R
-
Python
-
Perl
-
Navigate to the directory containing the Techila Deployment Tool and launch the application by double clicking on the
awsinstaller.jarfile icon.Note! If the Techila Deployment Tool is already running and you have performed a connection test, you can continue from Step 3.
-
Click the
Test Amazon Web Services EC2 Connectionbutton -
Click the
Install BundlestabThe
Install Bundlestab contains a list of Bundles that can be installed to the Techila Server. Bundles can be marked for installation by ticking the checkboxes of the Bundles you wish to install.The naming convention of the Bundles is typically of the following format:
<Programming Language> <Version> <Processor Architecture>
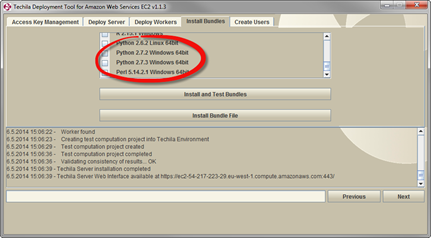 Figure 50. The appearance of this tab will vary, depending on which Bundles are currently available. In this example, Bundles containing the runtime components for Python and Perl can be selected and installed.
When installing Bundles containing the runtime components, you will need to remember two principles:
-
-
Bundles are programming language specific
-
Bundles are version specific
These two principles are shortly explained below
Bundles containing the runtime components are
programming language specific, meaning you will need to install the Bundles for the programming languages you plan on using. For example, if you wish to perform computations using the Python programming language, you will need to select and install the Bundle containing the Python runtime components.In the example below, the Bundle containing the runtime components for Python version 2.6.2 has been selected.
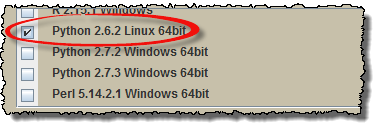 Figure 51. Support for programming languages can be added by selecting and installing applicable Bundles.
Bundles containing the runtime components are
version specific. It is therefore recommended that you install Bundles that contain the same version of the runtime components as used by the End-User. The versions of the runtime components stored in the Bundles are visible in the list displayed in the "Install Bundles" tab.In the example below, the version of the runtime components in the Python Bundle has been highlighted. The runtime components correspond to the Python version 2.6.2.
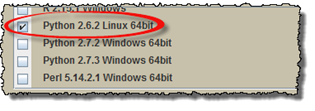 Figure 52. The version of runtime components in Bundles should match the development environment versions used by the End-Users.
If you plan on performing MATLAB computations in the Techila Distributed Computing Engine (TDCE) environment, you will need to install a MATLAB Bundle with the same version and processor architecture as the MATLAB you are using for creating the computational Projects. This is due to MATLAB compilations being processor architecture specific, meaning that e.g. 64-bit compilations will require 64-bit runtime components for the same MATLAB version.
Select the Bundles you wish to install by ticking the checkboxes and click the
Install and Test Bundlesbutton to install the Bundles. In the example below, the Bundle containing the runtime components for Python version 2.6.2 will be installed.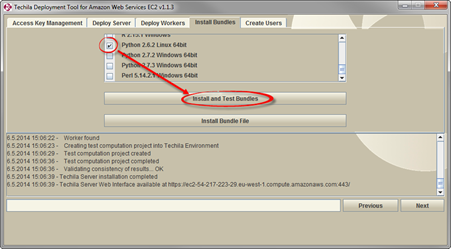 Figure 53. Bundles are installed by ticking the checkboxes of the Bundles you wish to install and clicking the
Install and Test Bundlesbutton. Multiple Bundles can be installed by ticking several checkboxes.After clicking the
Install and Test Bundlesbutton, the installation process will be started. This may take several minutes. After the Bundles you selected have been installed, a message stating that the installation process was successful will be printed and the selections you made will be grayed out.The Bundles that were installed will now be automatically used in computational Projects created by End-Users. You can now continue with adding End-Users to the TDCE environment as described in Adding End-Users.
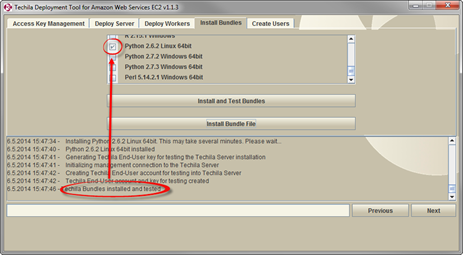 Figure 54. After successfully installing a Bundle, the selection will be grayed out. The runtime components in the Bundle will now be automatically used in computational Projects that have dependencies to the Bundle. In this example, the support for Python version 2.6.2 was added.
5.2. Installing Custom Bundles
This Chapter contains instructions for uploading Bundles from your computer to the Techila Server in Amazon Web Services EC2. The procedure described here can be used to e.g. upload Runtime Bundles that are not included in the Bundle list. Typical usage scenarios include uploading Bundles received from Techila Technologies and uploading Bundles that you have created using the Techila Bundle Creator Tool.
-
Navigate to the directory containing the Techila Deployment Tool and launch the application by double clicking on the
awsinstaller.jarfile icon.Note! If the Techila Deployment Tool is already running and you have performed a connection test, you can continue from Step 3.
-
Click the
Test Amazon Web Services EC2 Connectionbutton -
Click the
Install Bundlestab -
Click the
Install Bundle Filebutton. This will open a file dialog window which can be used to select the Bundle you wish to upload to the Techila Server.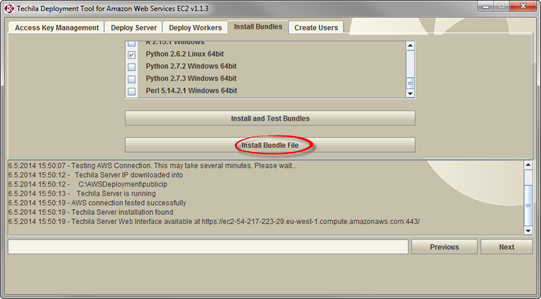 Figure 55. Clicking the highlighted button will open a file dialog window.
 -
Using the file dialog window, select the Bundle you wish to upload to the Techila Server. Click the
Openbutton to upload the Bundle to the Techila Server.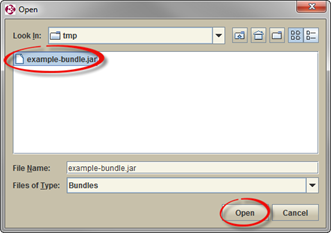 Figure 56. Select the Bundle you wish to upload. In this example a file called
example-bundle.jarhas been selected. -
After starting the upload process, a Status Window will displayed containing information on the upload process.
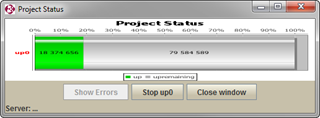 Figure 57. Duration of the upload process will depend on the size of the Bundle and available network bandwidth.
 -
After the Bundle has been uploaded, the corresponding message will be displayed in the message area. The Bundle can now be used in computational Projects.
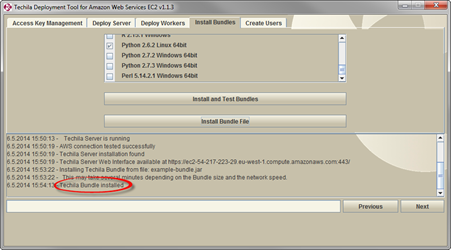 Figure 58. A successfully uploaded Bundle.
6. Adding End-Users
This Chapter contains instructions for adding End-Users to the Techila Distributed Computing Engine (TDCE) environment. All End-Users in the TDCE environment will require a personal keystore containing their End-User Key. This End-User Key will be used for signing Bundles when a computational Project is created.
In addition to the actual keystore file, the End-User will also need the password of the keystore. This password will be defined during the keystore file creation process described in this Chapter.
In addition to the keystore and keystore password, the End-User will also need the hostname of the Techila Server when configuring the techila_settings.ini file as described in Getting Started.
The hostname of the Techila Server will be displayed in the message area of the Techila Deployment Tool after clicking the Test Amazon Web Services EC2 Connection button in the Access Key Management tab.
Please note that the protocol (https://) and trailing port and forward slash need to be removed as illustrated in the example below.
| Parameter | Example Value |
|---|---|
Network address of the Techila Server Web Interface |
https://ec2-203-0-113-0.eu-west-1.compute.amazonaws.com:443/ |
Hostname |
ec2-203-0-113-0.eu-west-1.compute.amazonaws.com |
After you have successfully added End-Users to the TDCE environment, please refer to Getting Started for instructions on how to configure your Techila SDK to connect to the Techila Server. Programming language specific preparation steps are described in the document series "Techila Distributed Computing Engine with". These documents are available in the Techila Extranet.
-
Navigate to the directory containing the Techila Deployment Tool and launch the application by double clicking on the
awsinstaller.jarfile icon.Note! If the Techila Deployment Tool is already running and you have performed a connection test, you can continue from Step 3.
-
Click the
Test Amazon Web Services EC2 Connectionbutton. -
Click the
Create Userstab.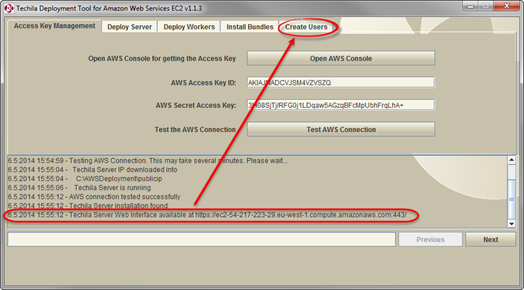 Figure 59. The network address of the Techila Server will be displayed in the message area. If you have performed multiple operations since you launched the Techila Deployment Tool, you might need to scroll back in order to see the highlighted message.
 -
This tab can be used to launch the Techila Keytool, which can be used to create keystore files containing End-User Keys. Click the
Open Techila Keytoolbutton to launch the Techila Keytool.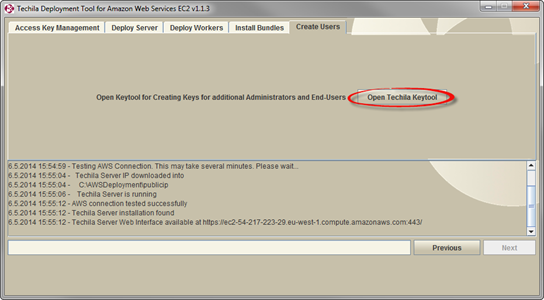 Figure 60. Keystore files containing End-User Keys are generated with Techila Keytool.
 -
After launching the Techila Keytool, the main window will be displayed. Click the
Create a new end-User key and sign itbutton. Figure 61. The Techila Keytool can be used to create End-User Keys (used for signing Bundles) and Administrator Keys (used for creating End-User Keys).
 -
After clicking the button, a new window will be displayed. Specify the full name of the End-User by filling in the following fields:
-
First Name -
Last Name -
The
Aliasfield will be automatically updated to match the values entered to theFirst NameandLast Namefields.Note! The End-User can use the value shown in the
Aliasfield to log in to the Techila Web Interface.The
Validity periodfield displays how long the End-User Key will be valid. By default, all End-User Keys will be valid for 365 days. A different validity period can be defined by entering the desired time period in the field.Using the
Keystore PasswordandVerify Passwordfields, specify the keystore password that will be used to protect the keystore file. Note! This is the password that the End-User will need to enter when creating computational Projects in the TDCE environment.After you have filled all necessary fields, click the
Generate Keybutton to continue.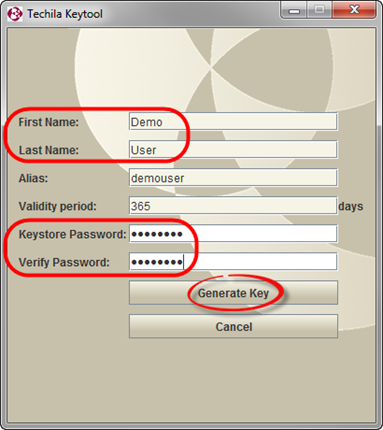 Figure 62. After specifying the End-User’s name and password, the Generate Key button will be enabled. In this example, an End-User with the name "Demo User" would be added to the Techila Distributed Computing Engine environment.
-
-
After clicking the
Generate Keybutton, a new window will be displayed. This window will be used to specify the following settings regarding the keystore file:-
The name of the keystore file
-
The destination directory where the keystore file will be stored
Click the
Savebutton to create the keystore file.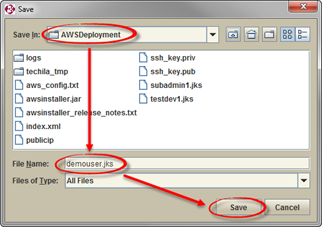 Figure 63. This window can be used to specify a name for the file and the location where it will be stored. In this example, the keystore file would be named
demouser.jksand stored in a directory calledAWSDeployment.A new window will be displayed that contains information on where the keystore was stored on your computer. The key will also be automatically sent to the Techila Server and a corresponding transfer status message will be displayed in the message area. If the transfer was successfully completed, the following message should be displayed:
"Key has been sent to the server successfully."
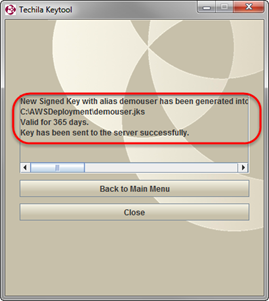 Figure 64. View after the key has been successfully transferred to the Techila Server
-
-
The End-User has now been successfully added to the TDCE environment. The End-User Key that was created can now be used for signing Bundles, which will be required when creating computational Projects.
In order for the End-User to access the TDCE environment they will need the following file:
The keystore file that was created (
demouser.jksin the example)And the following information:
-
The keystore password
-
The hostname of the Techila Server. The hostname of the Techila Server will be displayed in the message area of the Techila Deployment Tool each time the
Test Amazon Web Services EC2 Connectionbutton is clicked. This is illustrated in Figure 58.
-
-
Click the
Closebutton to close the Techila Keytool or theBack to Main Menubutton if you wish to add more End-Users to the TDCE environment.
7. Components Created During the Deployment Process
This Chapter contains a description of Techila Distributed Computing Engine (TDCE) components that are automatically created in Amazon Web Services EC2 when deploying the TDCE environment.
These components are:
-
Techila Server Data Disk EBS Volume (incurred costs)
-
Elastic IP (incurred costs)
-
Security Groups (no related costs)
-
Keypairs (no related costs)
An overview of these components is visible under "All Items" in the AWS Management Console as illustrated below.
7.1. Techila Server Data Disk EBS Volume
The Techila Server Data Disk EBS Volume is used to store information about the TDCE environment. This includes information about Techila Workers, Projects, Jobs and Bundles.
7.2. Elastic IPs
Elastic IP addresses are used to give the Techila Server a static IP address. This will ensure that the IP address of the Techila Server will not change even if the Techila Server is shut down and re-deployed.
7.3. Security Groups
Security groups contain firewall rules for network communication within the TDCE environment and rules for inbound network connections to the Techila Server.
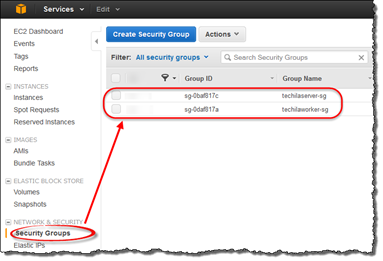
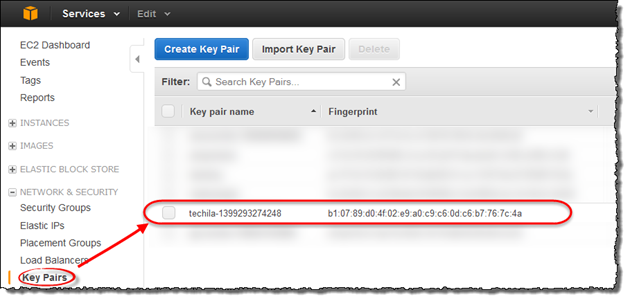
Security Groups under Network & Security.7.4. Keypairs
Keypairs are used to sign in to the Techila Server using SSH.
8. Removing Components from Amazon Web Services EC2
8.1. Removing Techila Workers
This Chapter contains instructions on how to terminate Techila Worker Amazon Web Services EC2 instances. Terminating all instances will stop hourly costs from being incurred by Techila Workers instances.
Note! After removing Techila Workers, verify that the Amazon Web Services EC2 instances were successfully deleted. The status of Amazon Web Services EC2 Instances can be viewed using the AWS Management Console.
Please note that in order to shut down the Techila Workers, you will need to have the Techila Deployment Tool running and you need to have access to the Deploy Workers tab.
When removing Techila Workers, the following approaches can be typically applied:
Please follow the steps applicable to your situation.
8.1.1. Removing ALL deployed Techila Workers in ALL services
To remove ALL currently deployed Techila Workers and the matching , click the Delete All button.

After the operation has been completed, the changes will be visible in the "Deploy Workers" tab as illustrated below.
In the AWS Management Console, there should not be any Techila related autoscaling groups visible in the Auto Scaling Group.
The example screenshot below illustrates a situation where no auto scaling groups exists. If you see any Techila related auto scaling groups, delete them using the AWS Management Console.
Respectively, there should not be any Techila Worker instances running in the Instances view.
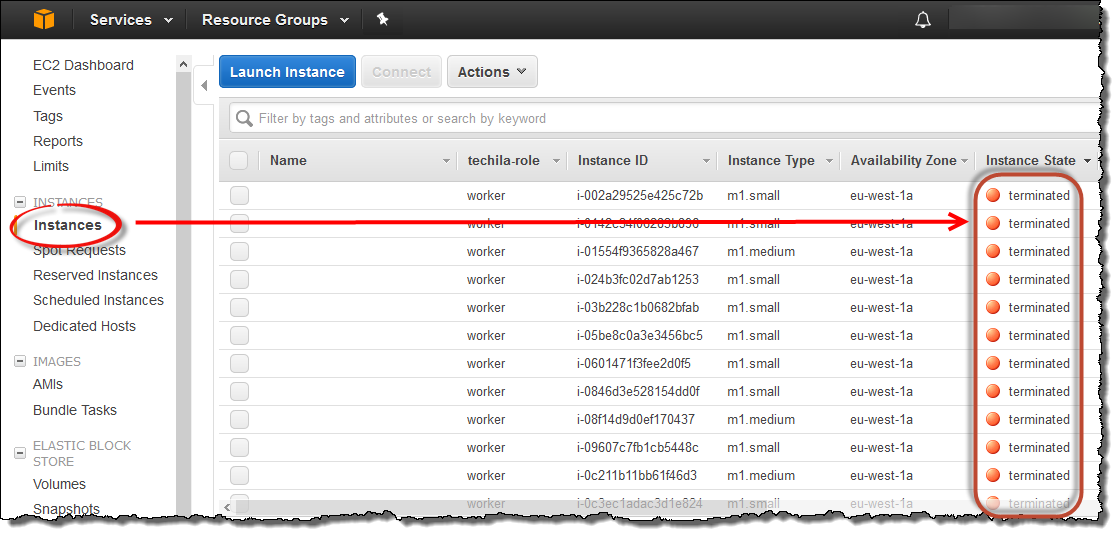
terminated.8.1.2. Removing ALL deployed Techila Workers in one service
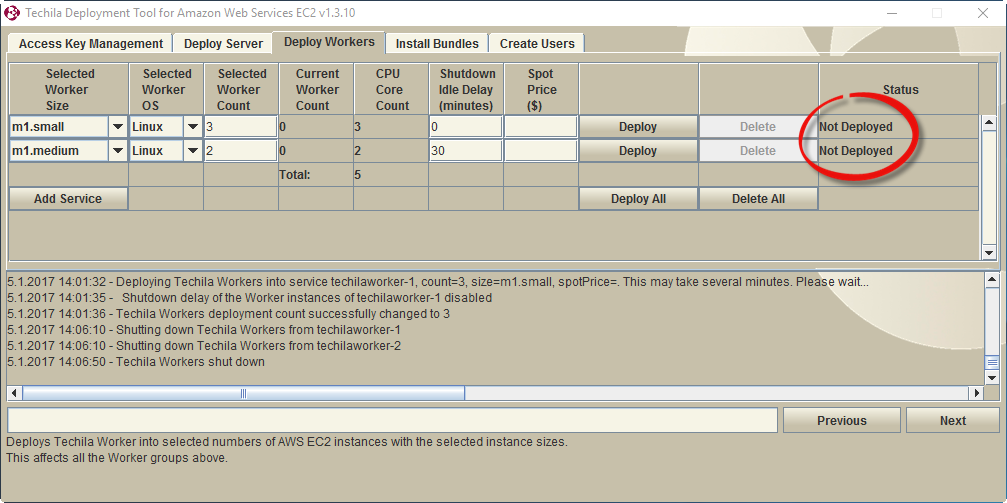
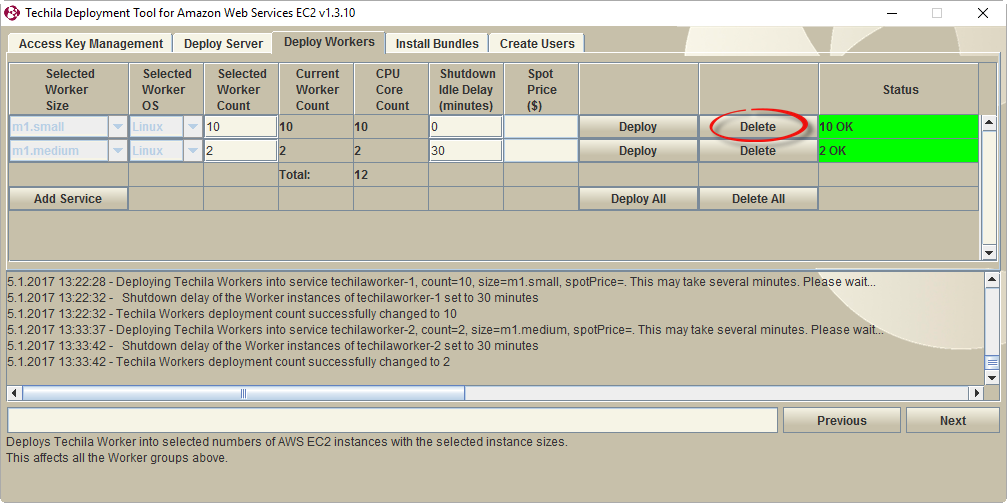
To remove ALL currently deployed Techila Workers in one service, click the Delete button for the specified service.
In the example below, clicking the highlighted button would remove all Techila Workers deployed to the default service. Techila Workers deployed to the second service would remain unaffected.
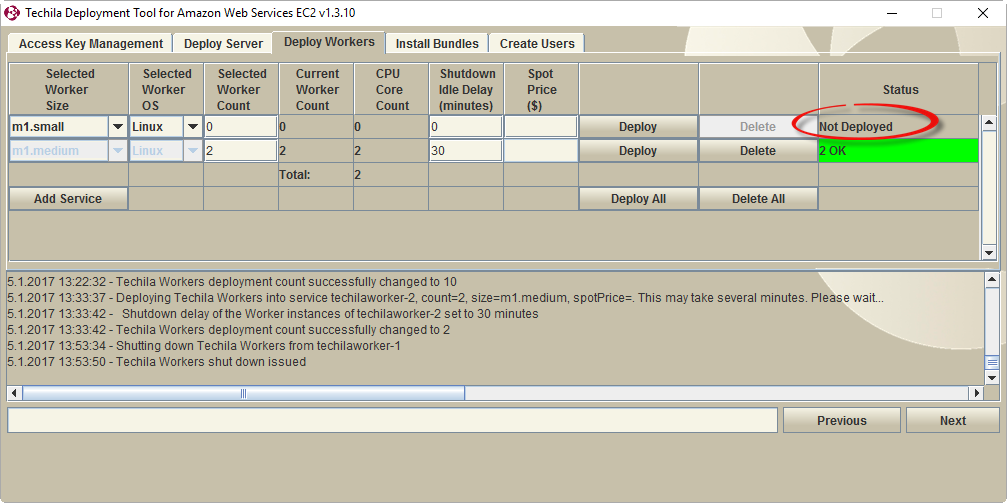
After the operation has been completed, the changes will be visible in the "Deploy Workers" tab. In the example below, the Status column displays "Not Deployed", indicating that Techila Workers in the service have been removed. Please note that it may take several minutes for the changes to take effect.
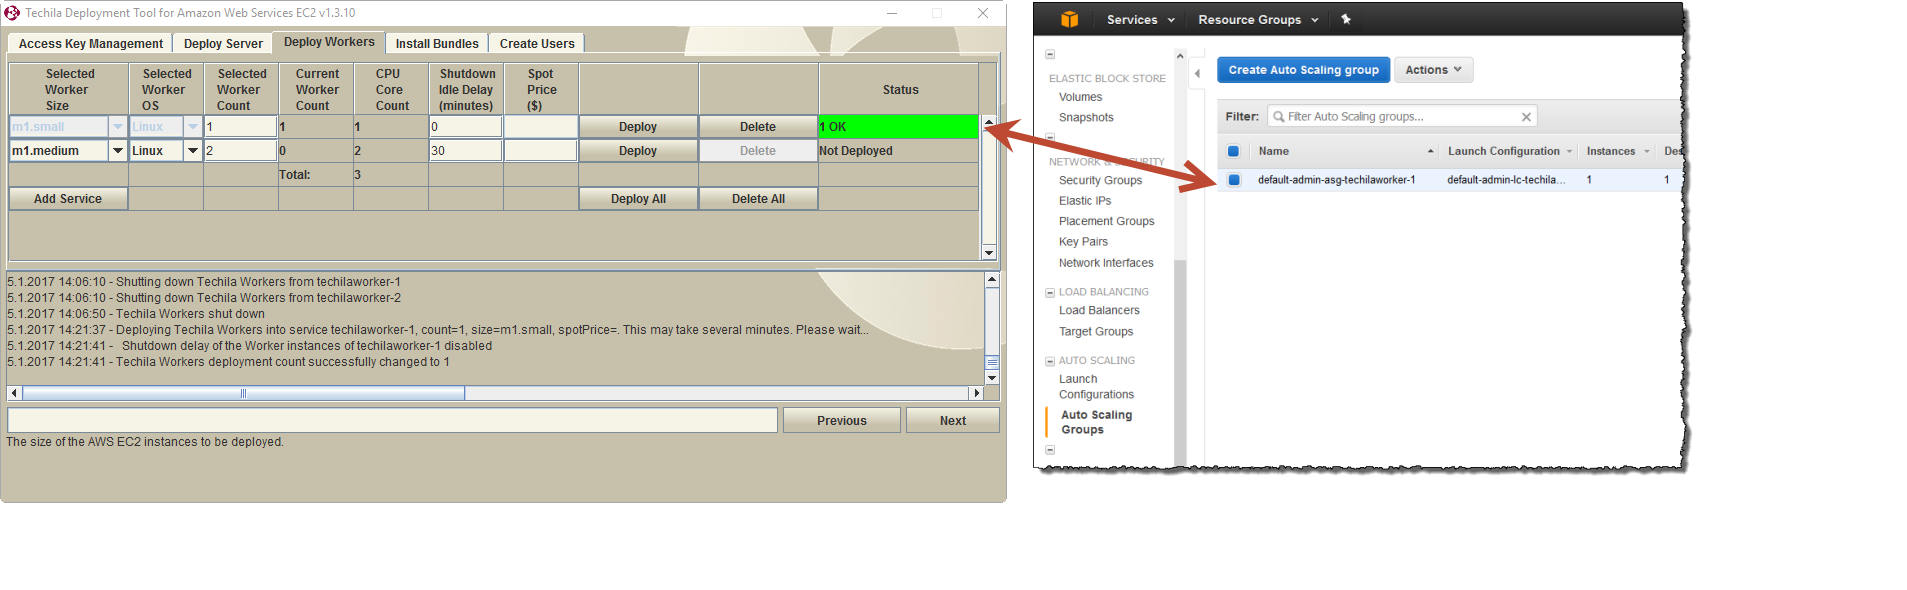
In the AWS Management Console, there should not be a Techila related autoscaling group with the matching service id visible in the Auto Scaling Group view.
The example screenshot below illustrates a situation where no auto scaling groups exists for the first service (in other words, there is no auto scaling group with name default-admin-asg-techilaworker-1). An auto scaling group with name default-admin-asg-techilaworker-2 is listed, which contains the Techila Workers that are still running.
Respectively, Techila Workers belonging to the first service should not be running in the Instances view.
terminated.8.1.3. Reducing the number of deployed Techila Workers in a service
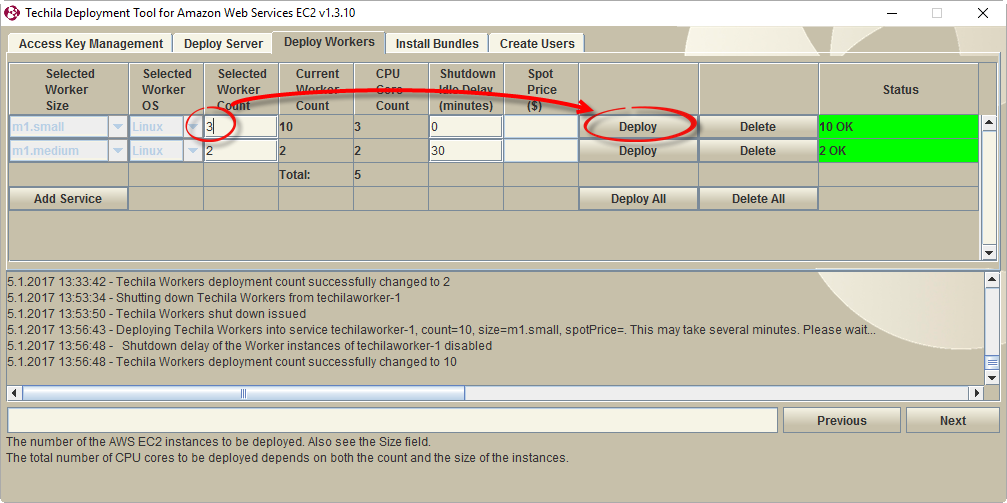
To reduce the number of deployed Techila Workers in a service, specify the new Techila Worker count in the "Selected Worker Count Field". The value entered to the field will determine how many Techila Workers will remain deployed after the operation. After you have entered the value, click the Deploy button for the service to apply the changes.
In the example below, there are currently ten (10) Techila Workers deployed in the first service and the "Selected Worker Count" field contains the value three (3). These settings could be used to remove seven (7) of the Techila Workers that are currently deployed in the service.
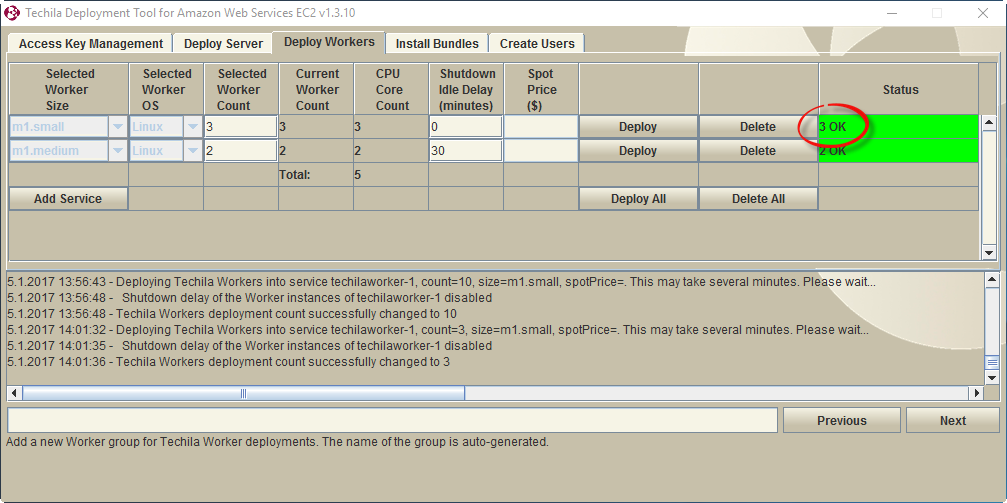
After the operation has been completed, the changes will be visible in the "Deploy Workers" tab. In the example below, the Status column displays "3 OK", indicating that there are 3 Techila Workers running and 7 Techila Workers were removed.
8.2. Removing the Techila Server
This Chapter contains instructions on how to terminate the Techila Server Amazon Web Services EC2 instance. Terminating the instance will stop hourly costs from being incurred from the Techila Server instance.
Note! Removing the Techila Server will also remove all Techila Workers that are currently deployed.
Note! After removing the Techila Server, verify that the Amazon Web Services EC2 Instances were successfully terminated. The status of Amazon Web Services EC2 Instances can be viewed using the Amazon Web Services EC2 Management Portal.
-
Navigate to the directory containing the Techila Deployment Tool and launch the application by double clicking on the
awsinstaller.jarfile icon.Note! If the Techila Deployment Tool is already running and you have performed a connection test, you can continue from Step 3.
-
Click the
Test Amazon Web Services EC2 Connectionbutton -
Click the
Deploy Servertab -
Click the
Shutdown Serverbutton to remove the Techila Server.Note! Shutting down the Techila Server will also shut down the Techila Workers.
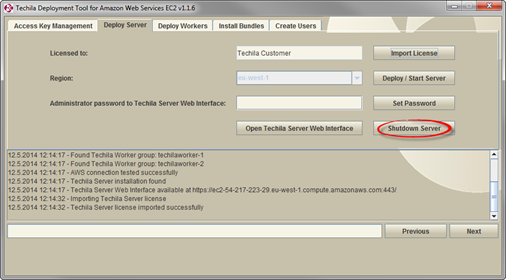 Figure 80. The
Shutdown Serverbutton can be used to delete the Techila Server instance. -
After the Techila Server has been removed, a Shutdown Verification window will be displayed. Click the
OKbutton to open the AWS Management Console in your web browser.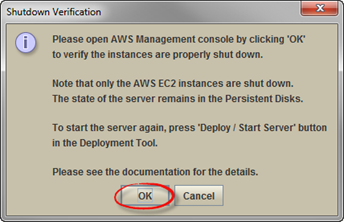 Figure 81. Clicking the
OKbutton will open the AWS Management Console. -
After clicking the button, your web browser will display the AWS Management Console. Sign in using your login credentials.
-
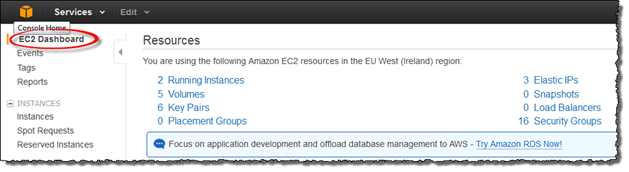
After signing in your AWS Management Console, click on
EC2.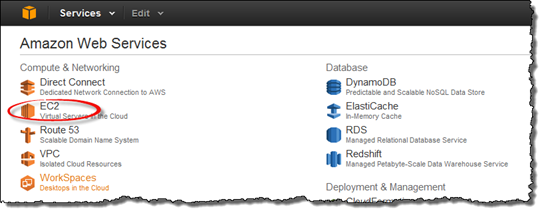 Figure 82. The components will be visible in the EC2 section.
 -
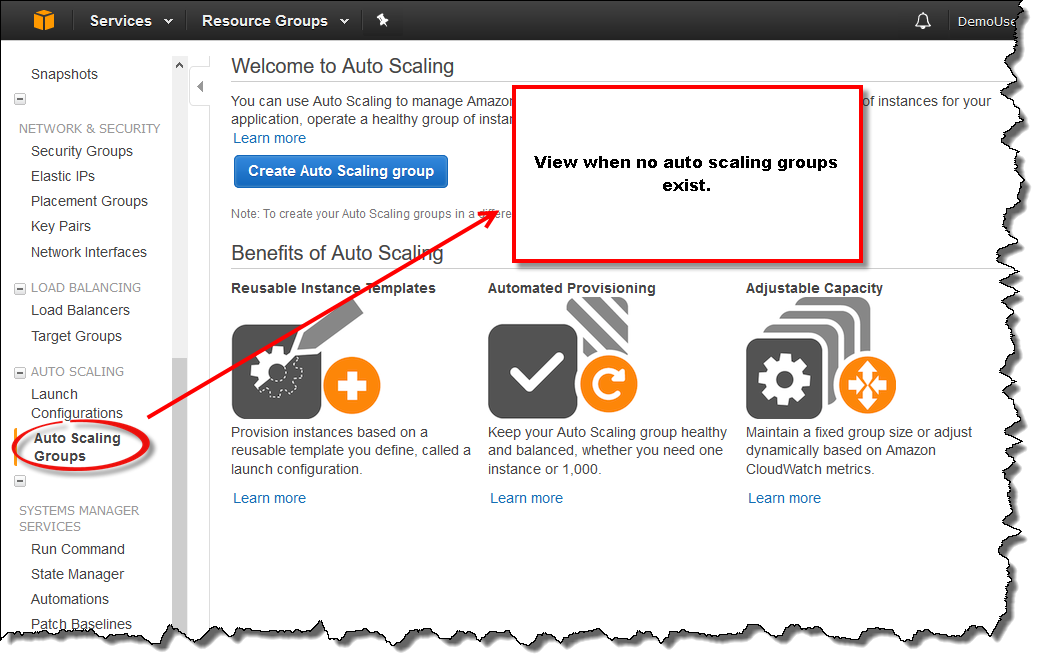
Click on
Auto Scaling Groupsand verify that no Techila related auto scaling groups exist. The naming convention of Techila Worker auto scaling groups is 'default-admin-asg-techilaworker-<N>', where <N> corresponds to the Techila Worker service id. Example auto scaling group name: 'default-admin-asg-techilaworker-1'. If you see any Techila related auto scaling groups, you can delete them by using the AWS Management Console.The example screenshot below illustrates a situation where no auto scaling groups exists.
-
View when no autoscaling groups exists. image::noauto.png[ ]
-
Click on
Instancesand verify that all Techila Server and Techila Worker instances were successfully terminated. TheInstance Stateshould beterminatedfor all terminated Techila instances.Note! If the instances were not terminated successfully, terminate the instances using the AWS EC2 Management Console.
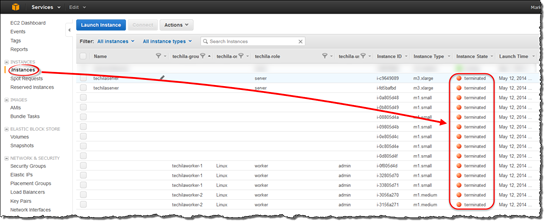 Figure 83. Checking that all Techila Workers have been terminated.
8.3. Removing Components Created During Deployment
This Chapter contains instructions on how to remove all cost-incurring Techila Distributed Computing Engine (TDCE) components from Amazon Web Services EC2. The components removed during this Chapter are:
-
Amazon EC2 instances hosting the Techila Server or Techila Workers
-
Techila Server Data Disk EBS Volume
-
Techila Server Elastic IP
NOTE! Performing the procedure described in this Chapter will remove all data from the Techila Server, meaning the state of the Techila Server will be lost. The steps described in this Chapter are typically only required if you wish to discontinue the use of your current Techila Server or to re-deploy a Techila Server to a clean Amazon Web Services EC2 environment.
-
Remove the Techila Server as described in Removing the Techila Server.
-
Sign in to the AWS Management Portal using your Amazon credentials
-
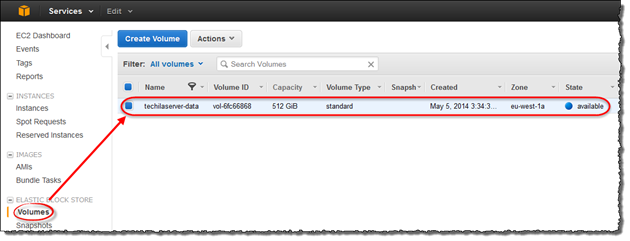
Click Volumes and select the volume named
techilaserver-data.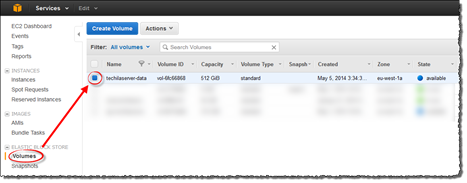 Figure 84. Select the volume.
 -
Using the "Actions" dropdown menu, select "Delete Volume"
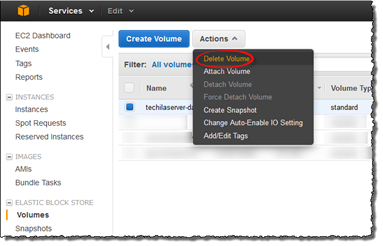 Figure 85. Delete the volume.
 -
When prompted, confirm the action.
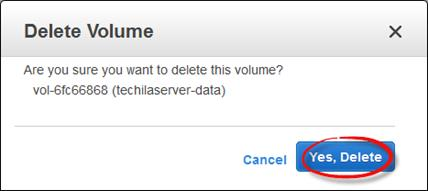 Figure 86. Confirm the action.
 -
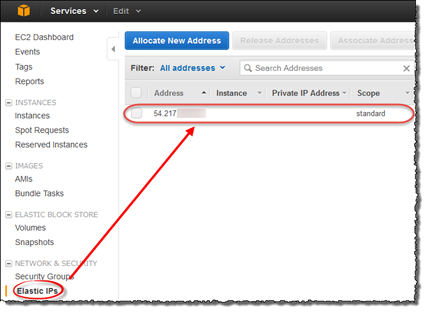
The next steps will consist of deleting the Techila Server Elastic IP address. Click on
Elastic IPsto change the view, select the IP address of the Techila Server and click theRelease Addressesbutton.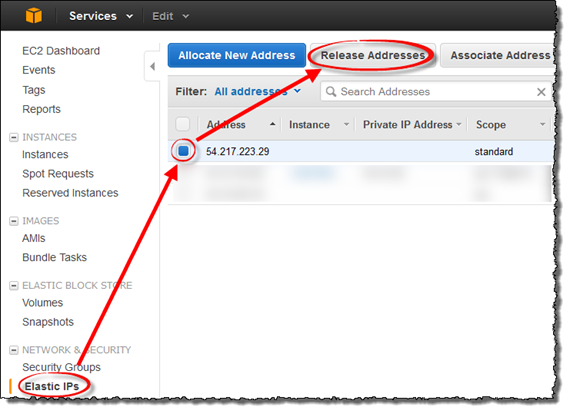 Figure 87. Select the IP address and click the highlighted button.
 -
After clicking the button, you might receive a pop-up window prompting for confirmation. Confirm the action.
 Figure 88. Confirm the action.
9. Appendix
9.1. Appendix 1: Techila Web Interface Login Credentials
After deploying the Techila Server in Amazon Web Services EC2, the Techila Web Interface can be accessed with the login credentials shown below:
| Techila Web Interface | |
|---|---|
Login |
admin |
Password |
Displayed in the Techila Deployment Tool "Deploy Server" tab in the field "Administrator password to Techila Server Web Interface". Password can also be reset using the "Set Password" button on the "Deploy Server" tab. |
9.2. Appendix 2: Updating the Techila Deployment Tool
When a new version of the Techila Deployment Tool is released, please follow the steps below to update your Techila Deployment Tool.
-
Download the new version of the Techila Deployment Tool from the Techila Extranet
-
If your Techila Deployment Tool is running, close the tool.
-
Extract the new
awsinstaller.jarfile over your existingawsinstaller.jarfile.The new version is now ready for use. Previously generated files and configuration settings will be automatically used by the new version of the Techila Deployment Tool.