1. Introduction
This chapter provides a brief overview of Techila Distributed Computing Engine and explains the objective of this document.
1.1. Techila Distributed Computing Engine
Techila Distributed Computing Engine (TDCE) is a patented middleware solution designed to handle high throughput and scale-out workloads for demanding parallel applications. It supports popular simulation applications such as MATLAB and programming languages such as R, Python, MATLAB, C, C++, and Windows .Net. Using the TDCE APIs, you can dramatically accelerate your applications and codes by harnessing the full resources of the cloud to run your simulations faster. TDCE delivers time to results that can be 100s or even 1000s of times faster than your workstation, dramatically reducing your "Time to results".
1.2. What is This Document
This document is a guide for persons planning to set up Techila Distributed Computing Engine in Microsoft Azure Marketplace.
If you are unfamiliar with the Techila Distributed Computing Engine terminology in this document, please refer to Introduction to Techila Distributed Computing Engine.
The structure of this document is as follows:
Overview gives an overview of Techila Distributed Computing Engine environment in a Microsoft Azure (Azure) context and describes some of the system and knowledge requirements relevant to the deployment process.
Deploying and Managing Techila Distributed Computing Engine contains step-by-step instructions on how to set up and test a Techila Distributed Computing Engine environment in Azure.
Appendix contains additional information about several advanced topics, such as creating and restoring from backups, estimating the cost of the deployment over a longer period, and increasing the applicable Azure limits required to start large numbers of Techila Worker nodes.
2. Overview
This chapter contains an overview of the deployment of Techila Distributed Computing Engine.
2.1. TDCE in Azure Marketplace
Deploying a TDCE environment in Azure Marketplace is done by using a Resource Manager template. This template will allow you to specify general deployment details, such as the Resource Group where the solution will be deployed. After filling out the template and initiating the deployment process, all resources will be created in one Resource Group in your Azure subscription. The location of the Resource Group determines the location of the resources. Please see TDCE Components for a comprehensive list of the created resources.
The resources will also include one virtual machine, which is the Techila Server. The Techila Server provides access to the Techila Dashboard, which can be used to start Techila Workers. Please note that to start large amounts of Techila Workers, your Azure subscription will need sufficient instance quotas. Please see Making an Azure Quota Increase Request for instructions on how to increase your quota if needed. Please see Cost Estimation for more information about the costs incurred when running a TDCE environment.
Please note that when deploying the TDCE solution, everything will run in your Azure subscription. You will need at least one Azure subscription to deploy the solution successfully. You must choose which Azure subscription you will use to deploy the solution if you have multiple subscriptions.
The Resource Manager template will automatically set the required Techila Server OS (Debian 11) and storage options (1024 GB disk) and create the necessary network resources. You do not need to manually create or install any of these components when deploying the TDCE environment.
Users can push computational workloads to the TDCE environment using the Techila SDK, which is automatically configured to connect to the IP address assigned to the Techila Server. Your Techila SDK will also contain a password-protected keystore file containing a set of Techila user credentials that will be used for authentication when using Techila SDK APIs. The Techila SDK can be downloaded from the Techila Dashboard after deploying the TDCE solution.
2.2. Knowledge Requirements
When deploying the TDCE solution, you must provide an Azure SSH key. This key will enable you to establish an SSH connection to the Techila Server if required. Establishing SSH connections is not necessary during everyday use but can be helpful when performing Troubleshooting. If you want to familiarize yourself with either Azure Resource Manager templates or SSH keys, please check the following links for more information.
If you plan on performing some of the more advanced activities, such as automatically creating backups, knowledge of the following Azure services will be useful:
2.3. System Requirements
To perform computations in Techila Distributed Computing Engine, the workstation where you plan to install the Techila SDK must meet specific programming language requirements.
These requirements are described in the table below.
| Programming Language | Supported Versions | Additional Requirements | Required Operating System |
|---|---|---|---|
R |
3.6.3, 4.0.5, 4.1.3, 4.2.2 |
Java Development Kit (JDK) or Java Runtime Environment (JRE) (version 6 or newer) |
Microsoft Windows OR Linux |
Python |
3.7.9, 3.8.10, 3.9.13, 3.10.9, 3.11.1 |
||
MATLAB |
2012b-2022b |
- MATLAB Compiler Toolbox |
Only 64-bit versions of each language are supported.
The Python and R versions listed in the table correspond to the Python and R versions available on Techila Workers. If you use a different version on your local workstation, you can still use the system but might run into problems caused by the version differences.
To maintain binary compatibility, your local workstation and the Techila Workers must have the same operating system platform.
Example 1: If you wish to perform R computations in Techila Distributed Computing Engine, your workstation must run either a Microsoft Windows or Linux operating system. Your workstation must also have JDK or JRE (version 6 or newer) available. Computations will be performed on the Techila Workers using the R version closest to your local R version. The closest matching version is determined by comparing the major and minor version numbers of R releases.
Example 2: If you wish to perform Python computations in Techila Distributed Computing Engine, your workstation must run either a Microsoft Windows or Linux operating system. Your workstation must also have JDK or JRE (version 6 or newer) available. Computations will be performed on the Techila Workers using the Python version closest to your local Python version. The closest matching version is determined by comparing the major and minor version numbers of Python releases.
Example 3: If you wish to perform MATLAB computations in Techila Distributed Computing Engine, your workstation must run either a Microsoft Windows or Linux operating system. A separate Java installation is not required on your workstation.
3. Deploying and Managing Techila Distributed Computing Engine
This chapter contains instructions on how to manage and configure the Techila Distributed Computing Environment. Instructions are provided for all steps, including starting, testing, and deleting the VM instances.
If you encounter problems during the deployment process, please see Support Requests for more information on how to request support and include the necessary log files typically needed in the troubleshooting process. Once you have deployed the Techila Server, you can contact the Techila support team using the email address provided on the Techila Dashboard, if required.
3.1. Starting the Techila Server
This chapter gives a short description of how to start the Techila Server. After the steps described in this chapter, you will have access to the Techila Dashboard that you can use to download your Techila SDK and start Techila Workers.
You should be able to complete the deployment steps described in this chapter in under 15 minutes.
-
Using your web browser, navigate to the Azure Marketplace:
-
To locate the
Techila Distributed Computing Engineoffering, either use the search box at the top of the marketplace view or click the link below to open the product page in your browser. -
Click the
Get It Nowbutton.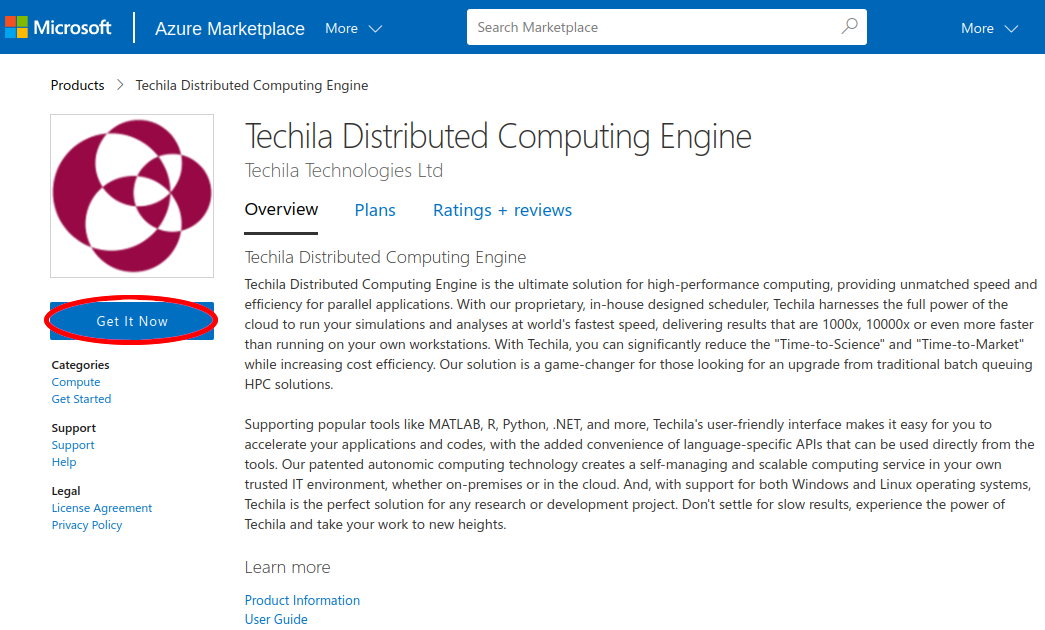
-
Follow the steps required. Depending on your status, a login may be required.
-
Click the
Createbutton.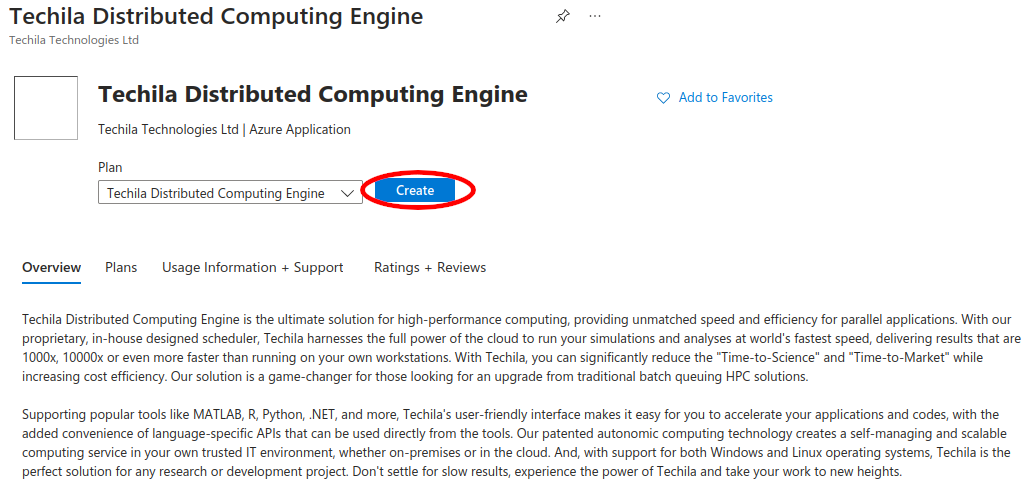
-
Select your desired Subscription and Resource Group. Creating a new dedicated Resource Group for TDCE is recommended, which can be achieved by clicking the
Create newbutton. Also, select the region where you will place your resources. After you are done, clickNext.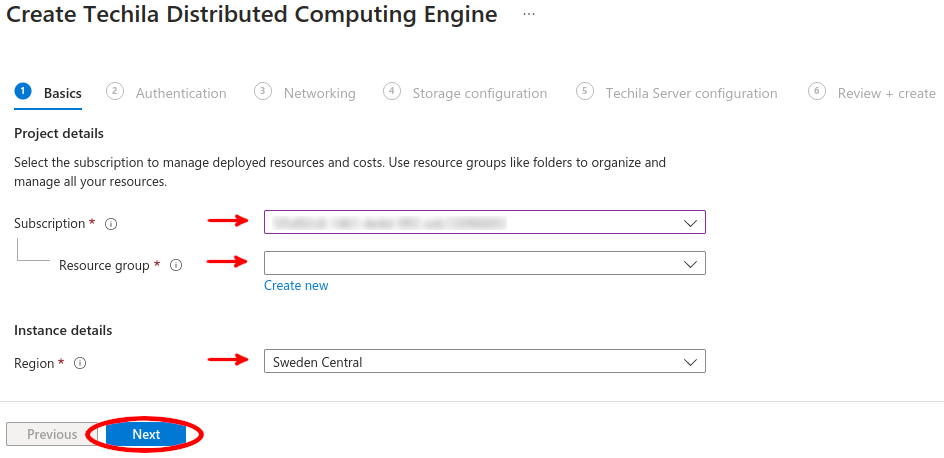
-
Fill in the Authentication details.
-
The field
Techila Server VM Admin Account User Namedefines the Linux user account name for the Techila Server; the recommended value istechilaRoot. In normal use, this is not needed but has to be defined. -
Choose an appropriate SSH key for logging in to the Techila Server. In normal use, this is not needed but has to be defined. If you don’t have a pre-created key, a new key can be created here (key download is offered after the last step).
-
Choose a good password for logging in as the
adminuser to the Techila Web UI and Dashboard. Password must be at least 8 characters and contain at least one lowercase character, one uppercase character, and one numeric digit. Control characters are not allowed. Confirm the password. -
Also, choose a good password for the Windows Workers account. In normal use, this is not needed. Confirm the password.
-
Once all fields are filled, click
Next.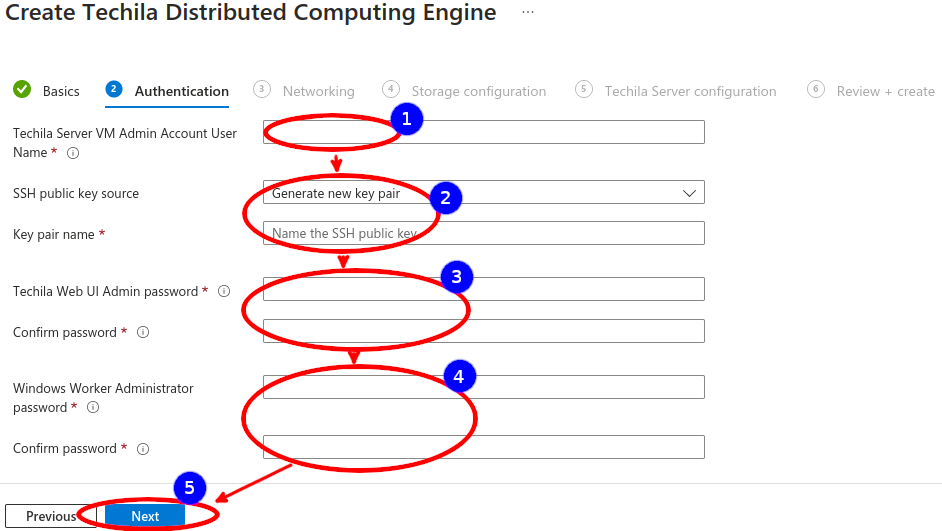
-
-
Check Networking details. The defaults are fine in everyday use and don’t need to be changed. If required, access to the Techila Server can be limited to be allowed from specific IP addresses by listing them in the
Source Address Prefixesfield. When done, clickNext.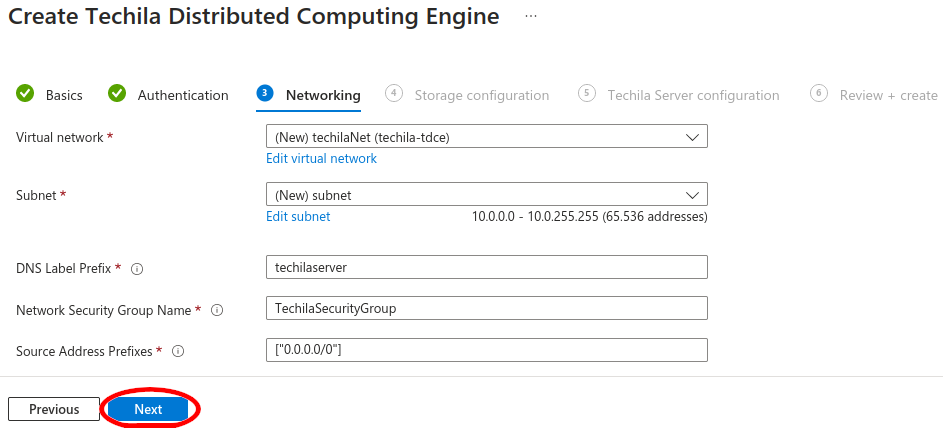
-
The Techila Server data disk type and size can be defined here. The defaults are usually fine. Click
Next.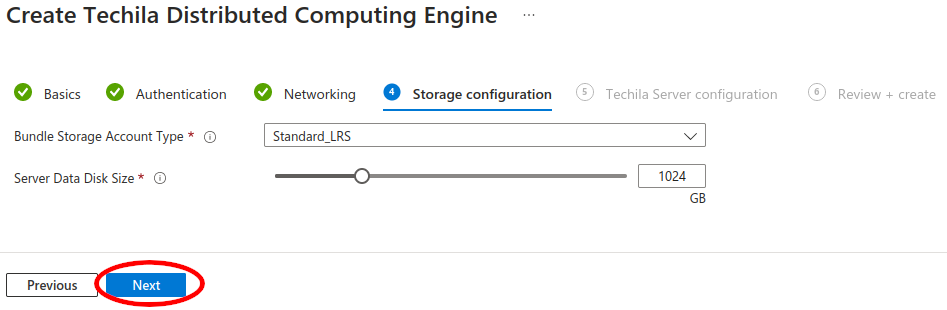
-
The Techila Server VM Instance size and Server Name can be chosen here. Defaults are usually fine. Click
Next.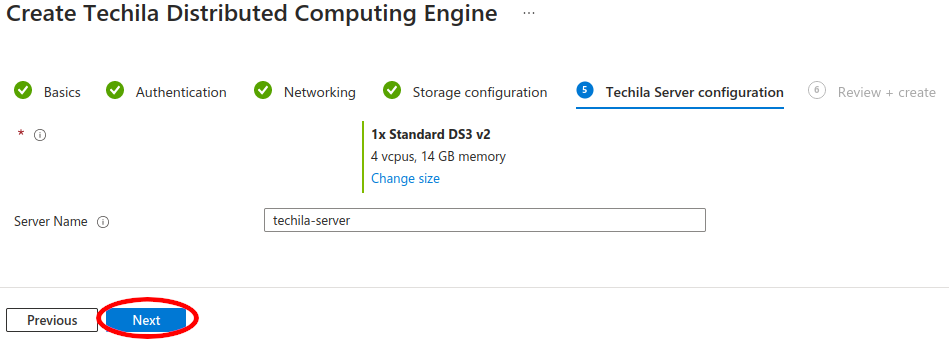
-
On the Review + Create tab, you should do a final check, and if everything looks ok, click
Create. Scroll down to see all the details.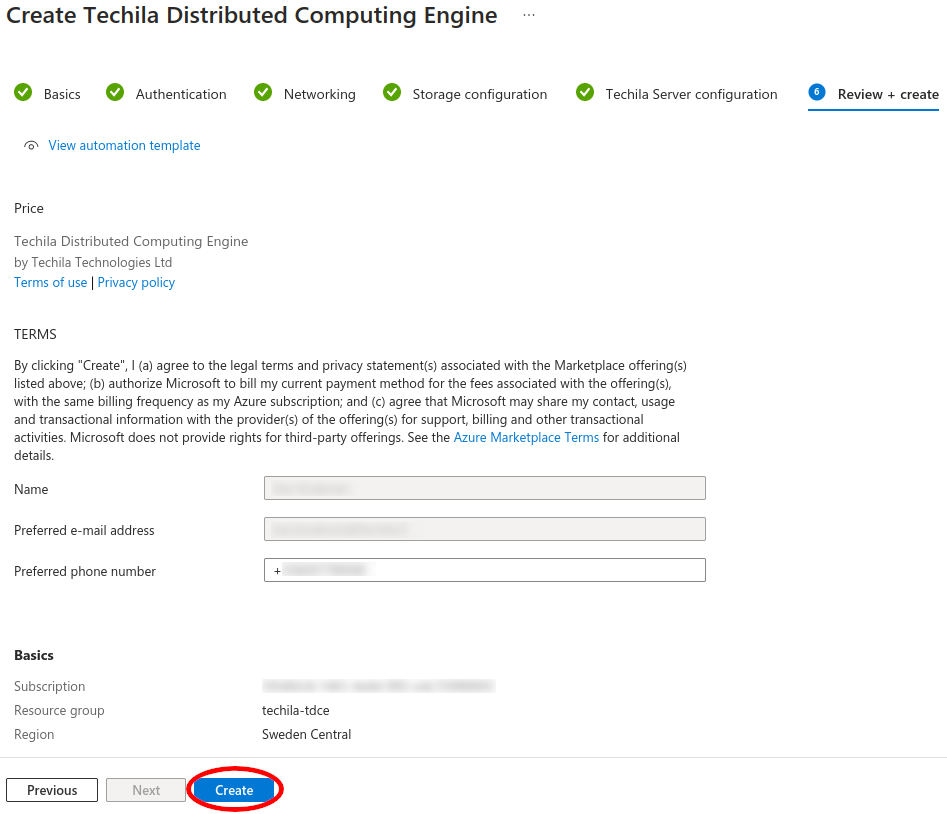
-
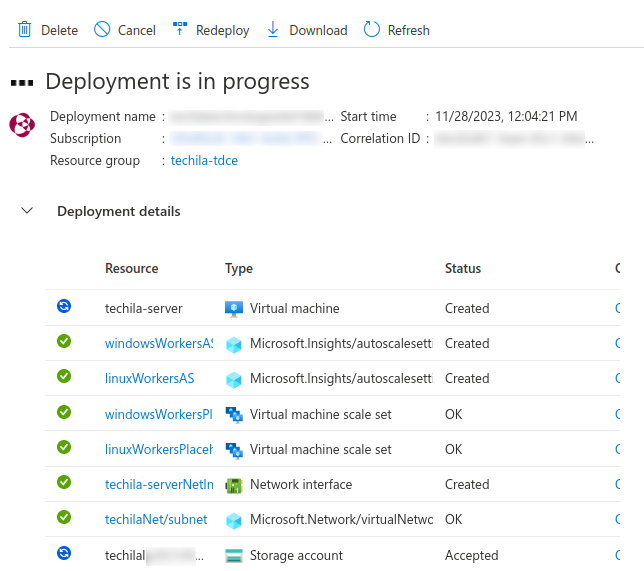
Please wait a few minutes while the deployment is in progress.
-
Once the deployment is complete, click
Outputson the left-hand side of the page. And proceed to the next chapter.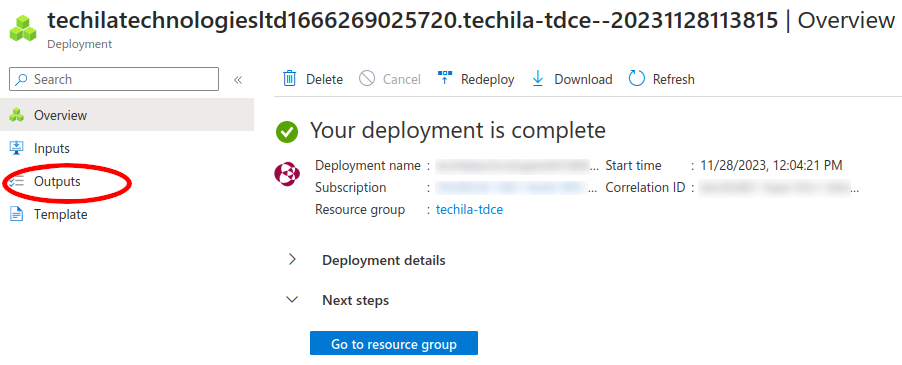
3.2. Accessing the Techila Dashboard from the Post Deployment Page
This chapter contains instructions on how you can log in to the Techila Dashboard from the post-deployment page after starting the Techila Server for the first time.
Please note that the steps in this chapter assume that you are accessing the Techila Dashboard for the first time after starting the Techila Server as described in Starting the Techila Server. Instructions on accessing the Techila Dashboard without the post-deployment page can be found in Accessing the Techila Dashboard.
-
On the
Outputstab, copy thetechilaDashboardURL and paste it into your browser to go to that address.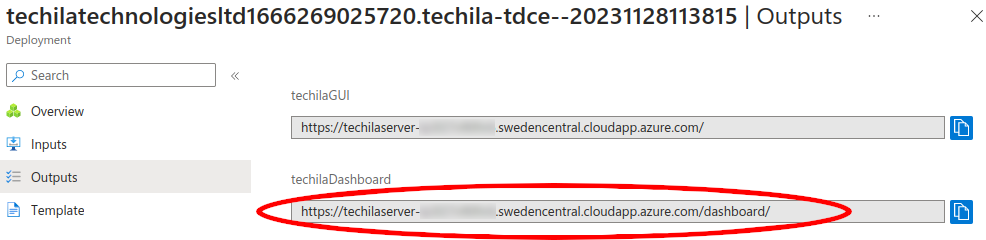
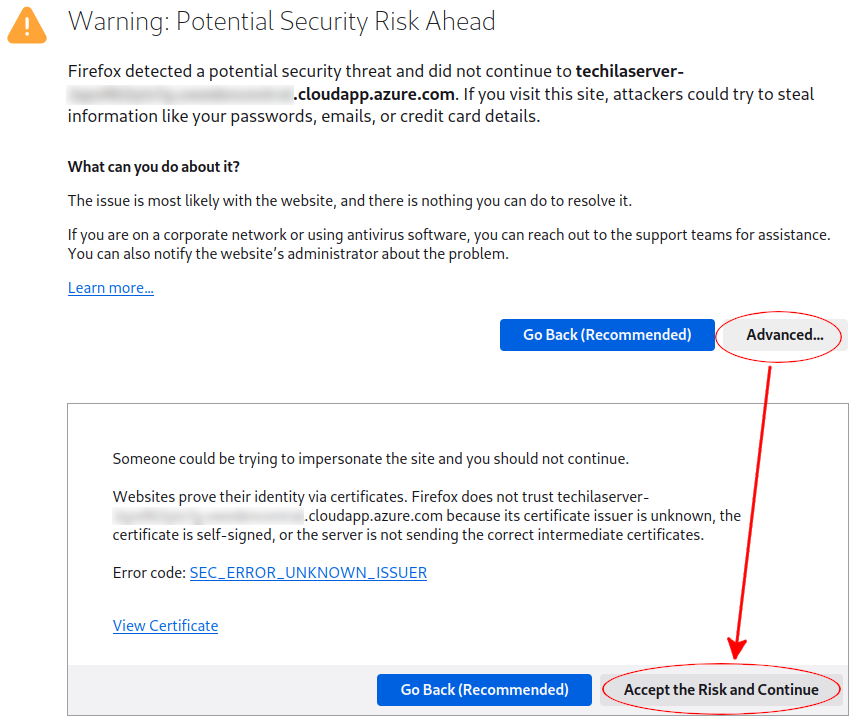
-
Opening the Techila Dashboard may display a credential warning. The appearance of the warning will depend on what browser you are using. Accept the certificate and continue.
-
Enter
adminas the username. In the password field, enter the password you defined when creating the deployment. Click theLog inbutton to log in.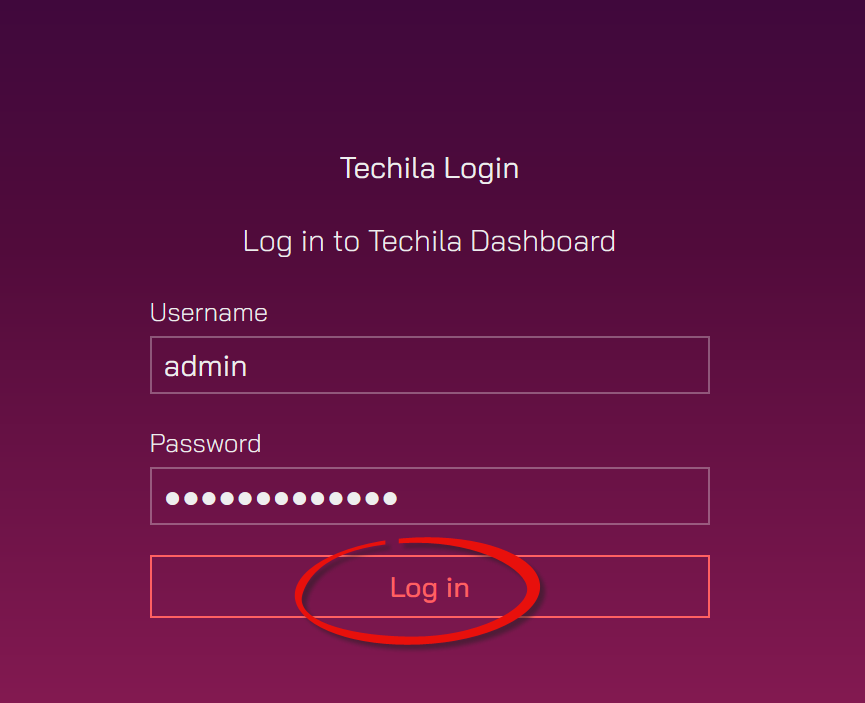
After logging in, you will be presented with the first page of the Techila Configuration Wizard. The Wizard will be used to download the application plugins (delivered in a file called TechilaSDK.zip) from the Techila Server. This is described in Downloading and Configuring the Application Plugins.
3.3. Downloading and Configuring the Application Plugins
This chapter contains instructions for downloading the application plugins to your computer. These application plugins will enable you to push computational workload from your computer to Techila Distributed Computing Engine.
The application plugins are delivered in a file called TechilaSDK.zip. In addition to containing the application plugins for, e.g., MATLAB, Python, and R, the TechilaSDK.zip contains ready-to-run examples for various programming languages. The application plugin package is also referred to as the "Techila SDK".
Please note that as long as you keep using the same TDCE deployment, the Techila SDK only needs to be downloaded and installed once. After you have done it once, you can click the "Continue" buttons in step 1/2 in the Techila Configuration Wizard to skip so you reach step 2/2. If you already have the Techila SDK installed, you can skip all the steps by clicking the I already have Techila SDK link.
Note! The Techila SDK can be installed on a computer with a Linux or Microsoft Windows operating system. The Mac OS X operating system is not supported.
Note! The steps described in this chapter assume you have logged in to the Techila Dashboard. If you have not logged in, please log in to the Techila Dashboard before continuing.
-
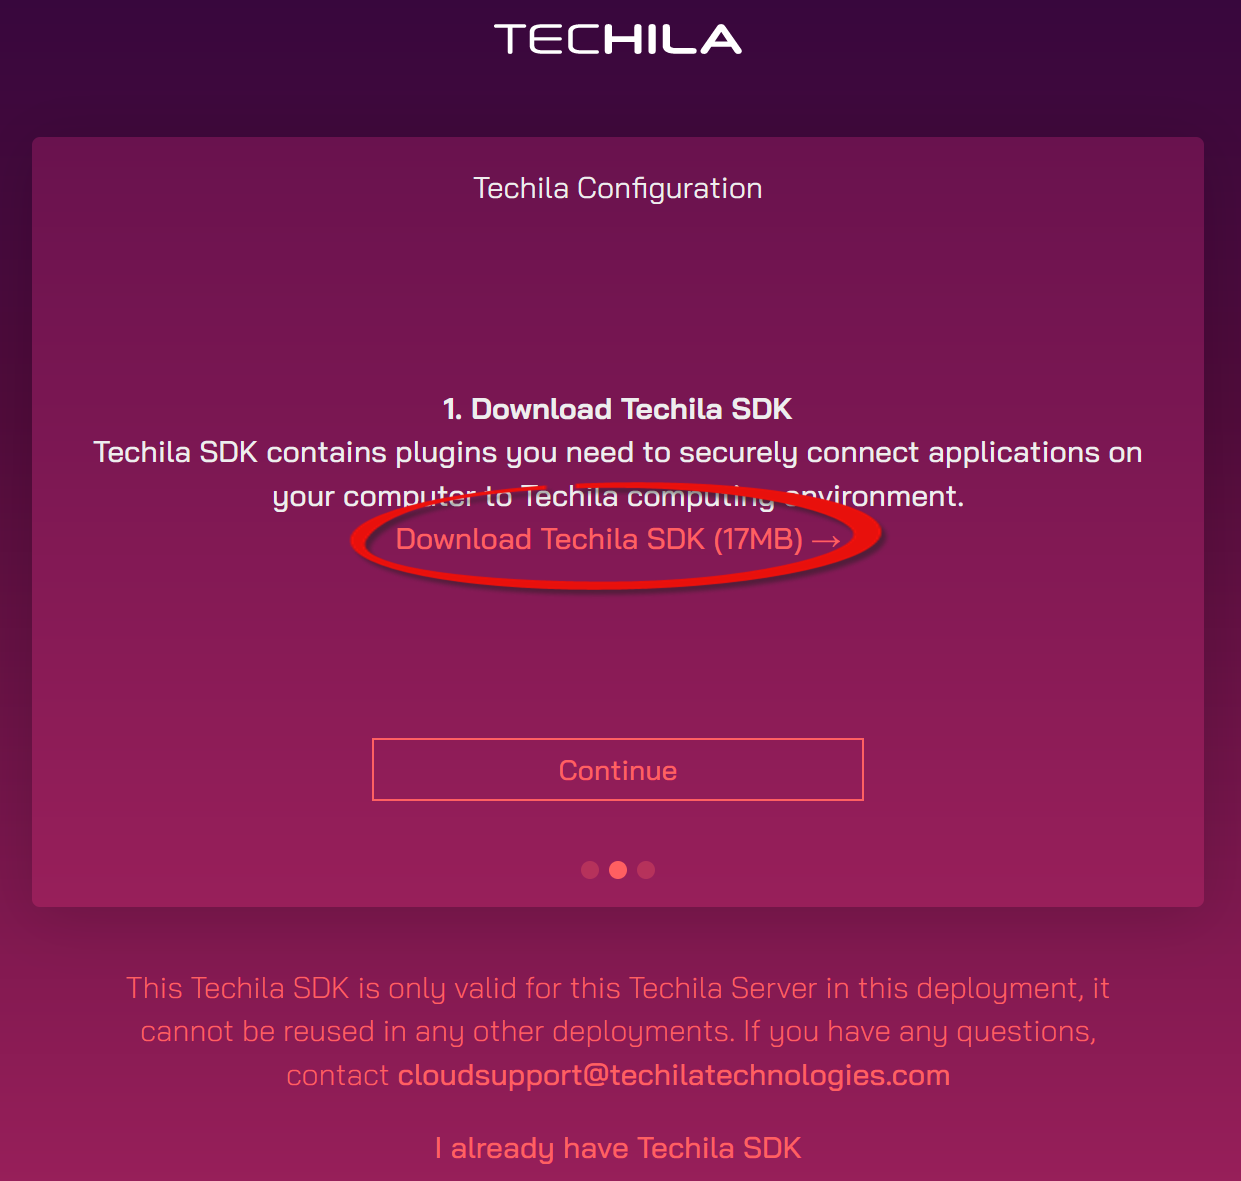
Click the
Startbutton on the first page of the Techila Configuration Wizard. -
In step 1. of the Techila Dashboard, click the highlighted link to download the application plugins (TechilaSDK.zip) to your computer.
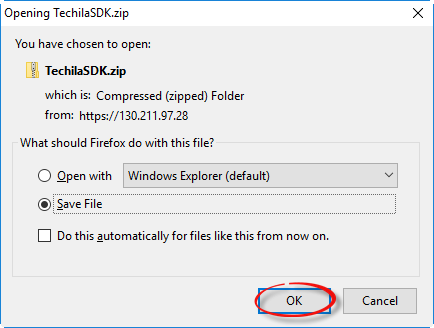
-
Save the TechilaSDK.zip file on your computer.
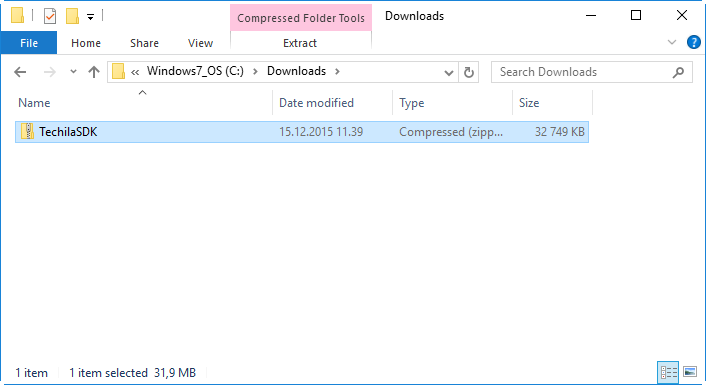
-
Wait for the download to complete. After the download has been completed, you should have a file called 'TechilaSDK.zip' as illustrated in the example screenshot below. Please note where you saved the file, as you will need it when configuring the application plugins in the following steps.
In the example screenshot below, TechilaSDK.zip has been saved to 'C:\Downloads'.
-
Select your web browser and click the
Continuebutton.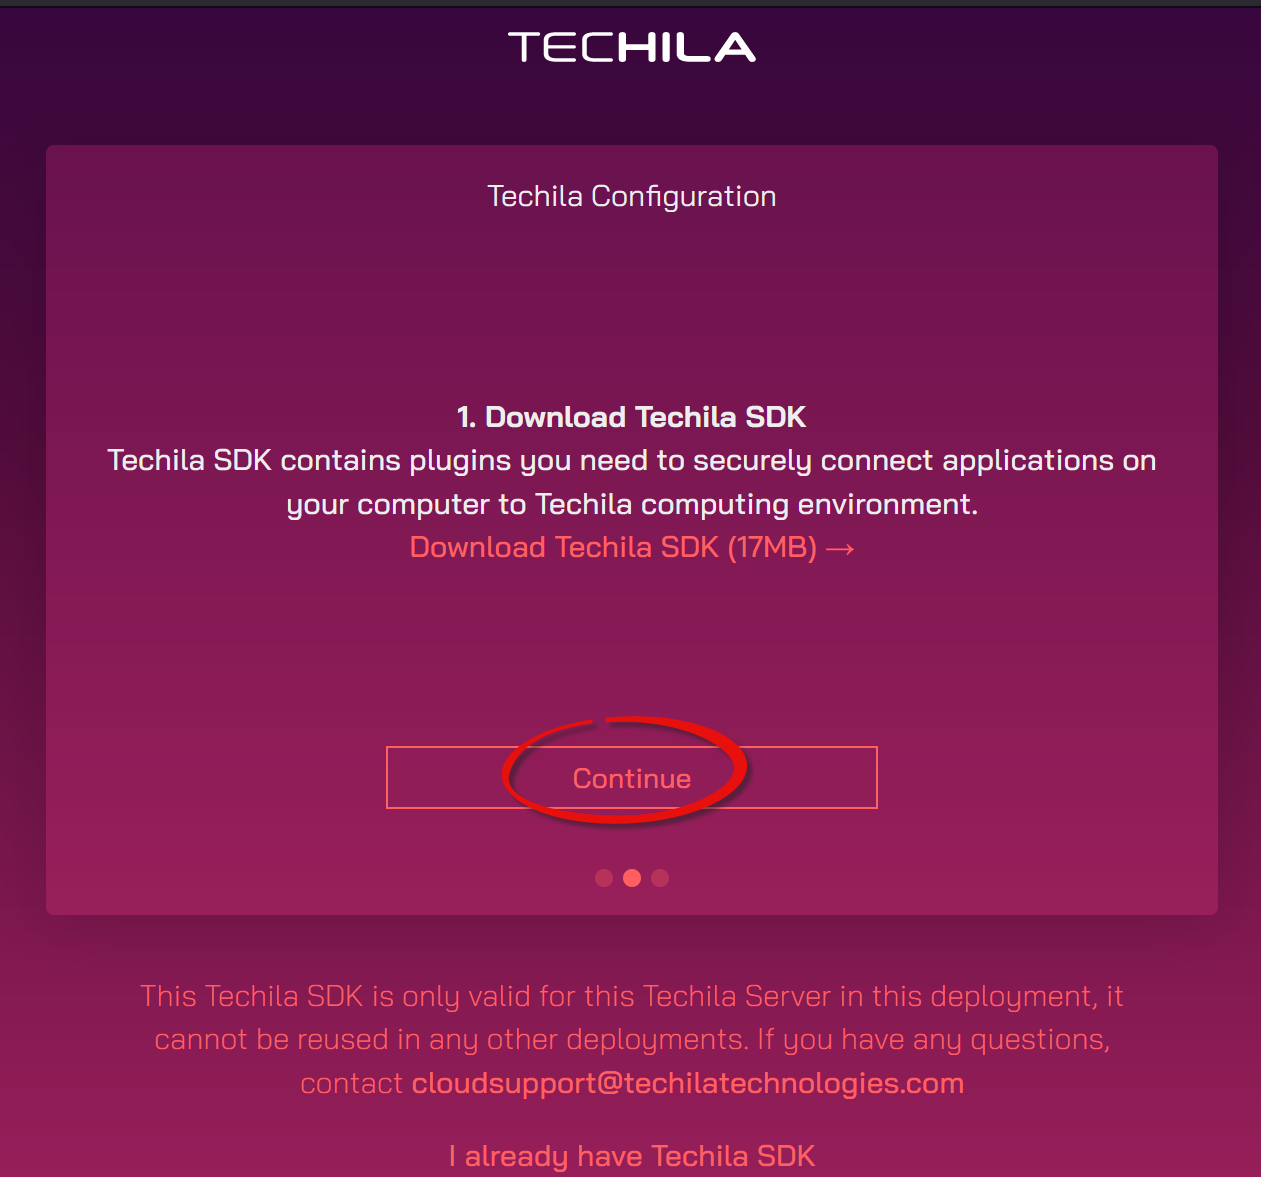
-
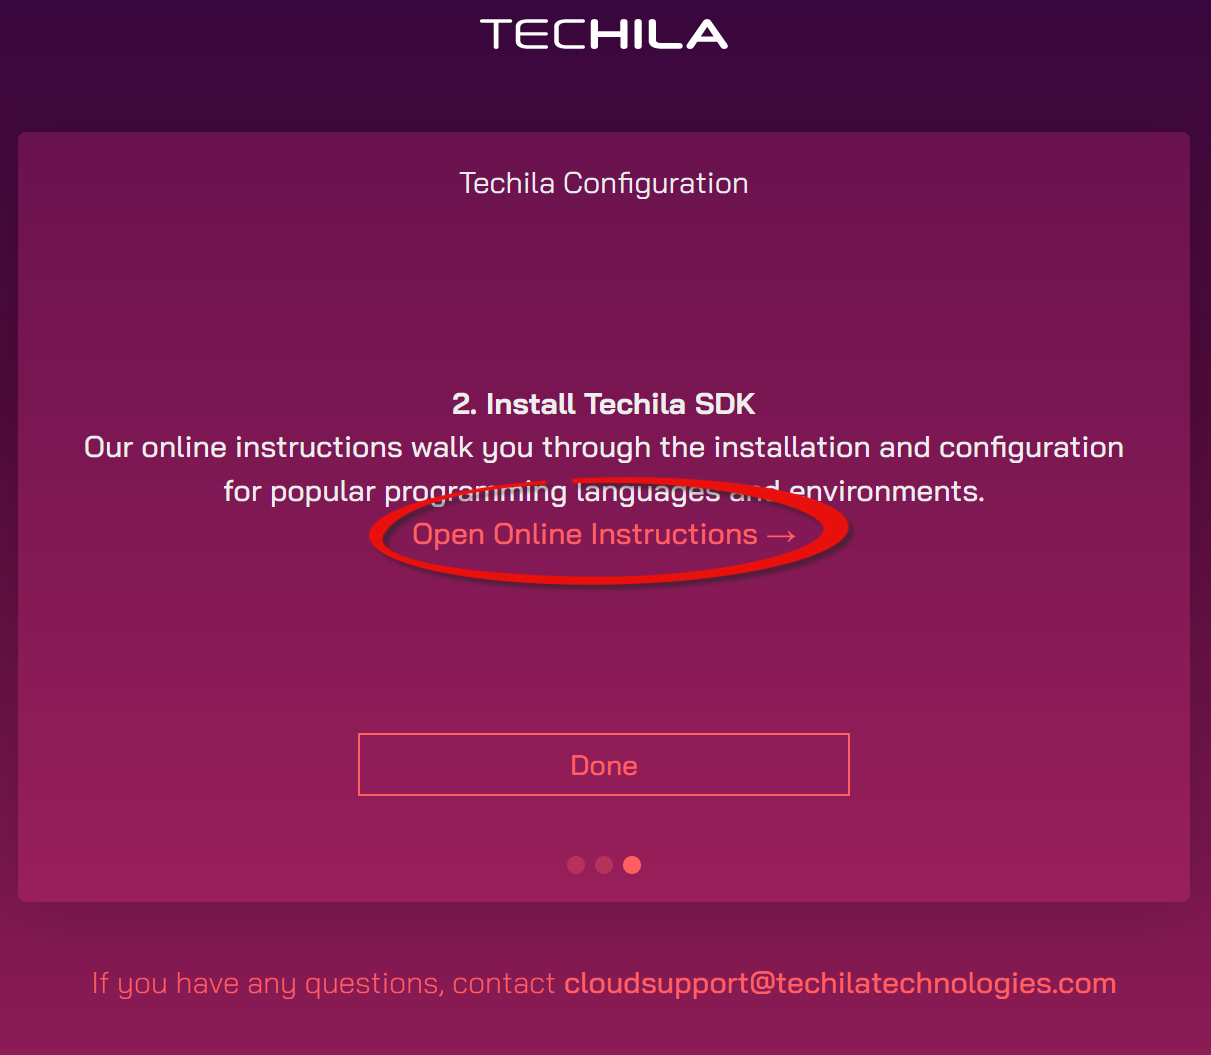
After clicking the
Continuebutton, the second step of the Techila Configuration Wizard will be displayed. This step contains a link to a help page, which contains instructions on how to configure the application plugins on your computer.Click the highlighted link to open a help page containing links on how to configure the application plugins on your computer.
Please follow the instructions on the help page to configure the application plugins for the programming language you are using before continuing.
The table below contains the direct links to programming language-specific instructions describing the application plugin configuration steps:
Table 2. Configuration Instructions Programming Language Link Python
R
MATLAB
-
After configuring the Techila SDK on your computer, select your web browser and navigate to the Techila Dashboard using the
Donebutton.
3.4. Increasing Computing Throughput
This chapter describes how to start Techila Workers to increase your computing throughput.
Note! Before starting any Techila Workers, it is recommended that you configure the application plugins as described in Downloading and Configuring the Application Plugins.
The Techila Dashboard is used to adjust the computing throughput by starting and shutting down Techila Worker VM instances. Tip! Add this page to your browser’s bookmarks to easily access it later.
-
Click the
Show deploymentbutton to display the deployment panel. -
To start Techila Workers, select the Techila Worker VM
instance type, choose theoperating system, and definehow manyTechila Worker VM instances you want to start. When selecting theoperating system, please select the same operating system you use on the workstation where your Techila SDK is installed. For example, if you installed the Techila SDK to a workstation with a Microsoft Windows 10 operating system, please selectWindowsfrom theComputing Environmentmenu.The Techila Worker instance type must be selected to match the requirements of your computational workload. For example, suppose you are going to run a memory-intensive application in TDCE. In that case, it is recommended that you also use instances that have a large amount of memory per CPU core. Workloads that only require a small amount of memory can be processed on machines with a lower memory per CPU core ratio.
Techila Workers will always have a fixed disk size of type Standard HDD LRS.
Note! You must not exceed your Azure instance quota. There are no quota checks in the start process, meaning the system will not work as intended if you try to start more Techila Workers than Azure quota allows. Instructions for viewing quotas can be found in the Azure documentation:
-
After defining the properties listed above, click the
Update deploymentbutton to start the Techila Workers.Suppose you already have Techila Workers that are running. In that case, you can increase (or decrease) the amount of Techila Workers by entering the desired number in the field and clicking the
Update deploymentbutton.Techila Workers will be started when the
Update deploymentbutton is clicked and the action is confirmed.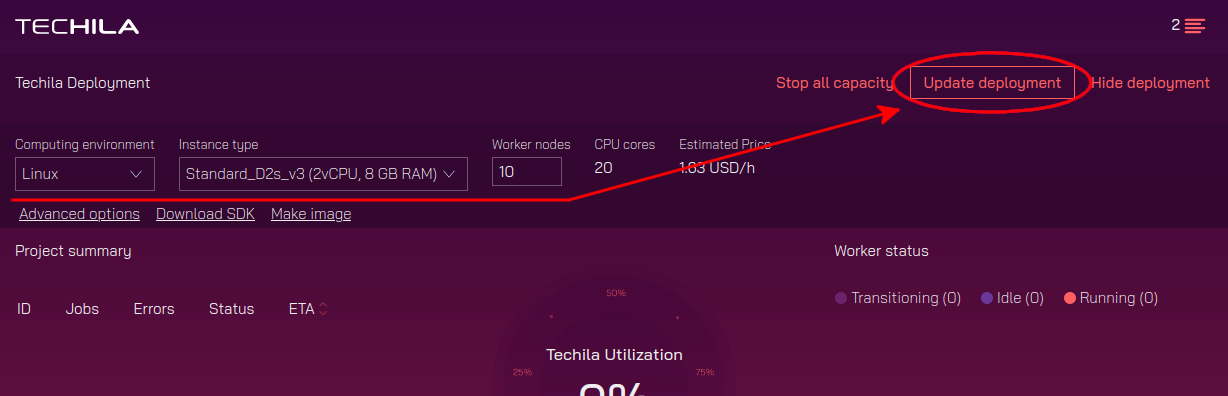
After clicking the button, the deployment process for the Techila Workers will start. After starting, Techila Workers will be displayed under the
Worker statusheading.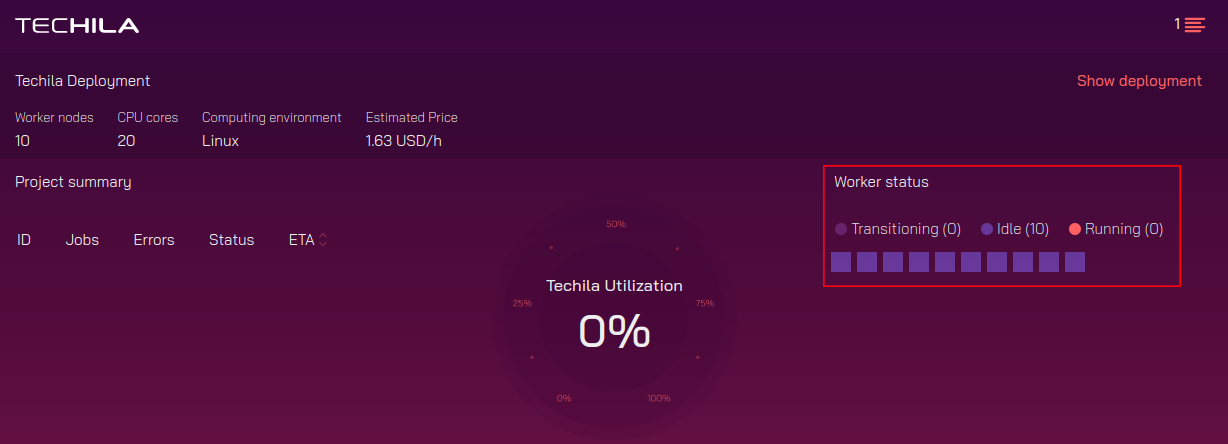
Note! The
Computing EnvironmentandInstance Typedropdown menus will only be enabled when no Techila Workers are currently running. If Techila Workers are already running, these menus will default to the values used when starting the existing Techila Workers. -
After you have started Techila Workers, Azure VM instances will be started in your Azure subscription and placed in a Virtual Machine Scale Set, which will maintain the desired number of instances even if an instance becomes unhealthy.
You can now create a computational Project to test that everything works. You can do this by executing one of the examples included in the Techila SDK. Examples of R, Python, and MATLAB can be found in the following Techila SDK directories:
-
Python examples: 'techila/examples/python'
-
R examples: 'techila/examples/R
-
MATLAB examples: 'techila/examples/Matlab'
The Techila SDK examples contain information on how you add Techila Distributed Computing Engine functionality to your application and how to enable various Techila Distributed Computing Engine features. Additional information on how to use the Techila Distributed Computing Engine functions from different programming languages can be found using the following links.
-
Techila Distributed Computing Engine with MATLAB
Note! After starting Techila Workers, program-specific runtime components will be transferred from the Techila Server to the Techila Workers during the first Project. Depending on your programming language, the transfer process may take several minutes. After the runtime components have been transferred, they will be stored on the Techila Workers' hard disks until the Techila Worker VM instances are deleted. During subsequent Projects, the runtime components will be used from the Techila Worker’s hard disk, meaning there will be no network transfer delay. If you delete the Techila Worker VM instances and restart Techila Workers later, the runtime components will need to be re-transferred.
-
-
After verifying that the Techila Distributed Computing Engine environment works as expected, you can continue by adding the Techila Distributed Computing Engine functionality to your application and running it in Techila Distributed Computing Engine.
-
After you have completed processing computational workloads, deleting all Techila Worker VM instances is recommended to prevent unnecessary costs from being incurred. Instructions for deleting Techila Worker VM instances can be found in Decreasing Computing Throughput.
3.5. Decreasing Computing Throughput
This chapter contains instructions for decreasing computing throughput, which is done by deleting the Techila Worker VM instances using the Techila Dashboard.
Note! The steps described in this chapter assume you have logged in to the Techila Dashboard. If you have not logged in, please log in before continuing.
If you, at some later point, again wish to perform computations in the Techila Distributed Computing Engine environment, you will need to start new Techila Workers as described in Increasing Computing Throughput
-
Using your browser, open the Techila Dashboard (the page that was bookmarked earlier).
-
Click the
Stop all capacitybutton to delete all Techila Worker VM instances currently running.Note! If you only want to delete some of the Techila Worker VM instances, enter a smaller value in the
Number of Worker Nodesfield and click theUpdate deploymentbutton. This value should be set to match the number of desired Techila Workers. For example, if you currently have 10 Techila Workers running and you then define value 6 in theNumber of Worker Nodesfield, the number of running Techila Workers would be reduced to 6 when theUpdate deploymentbutton is clicked.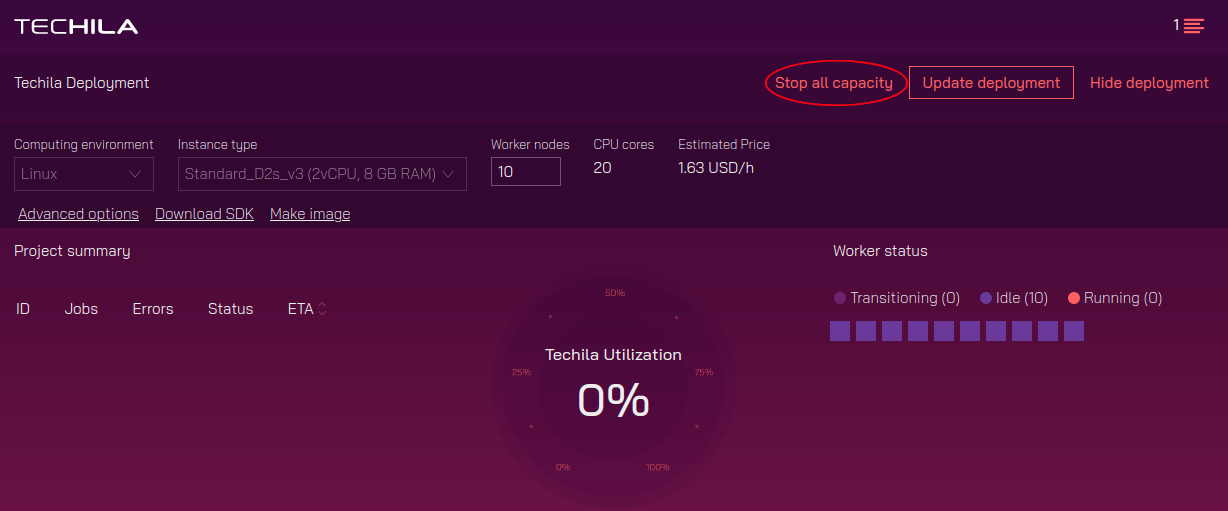
-
After clicking the
Stop all capacitybutton, verify that the Techila Worker VM instances were successfully deleted by doing the checks described in the following steps. -
Open the Azure Portal
-
Navigate to
Azureand click onVirtual Machine Scale Sets. Verify that there are no TDCE-related scale sets (other than the Placeholders). If scale sets exist, delete them using the Azure portal’s delete functionality. The example screenshot below shows what the view looks like when no scale sets exist. The placeholder scale sets can be deleted if so desired.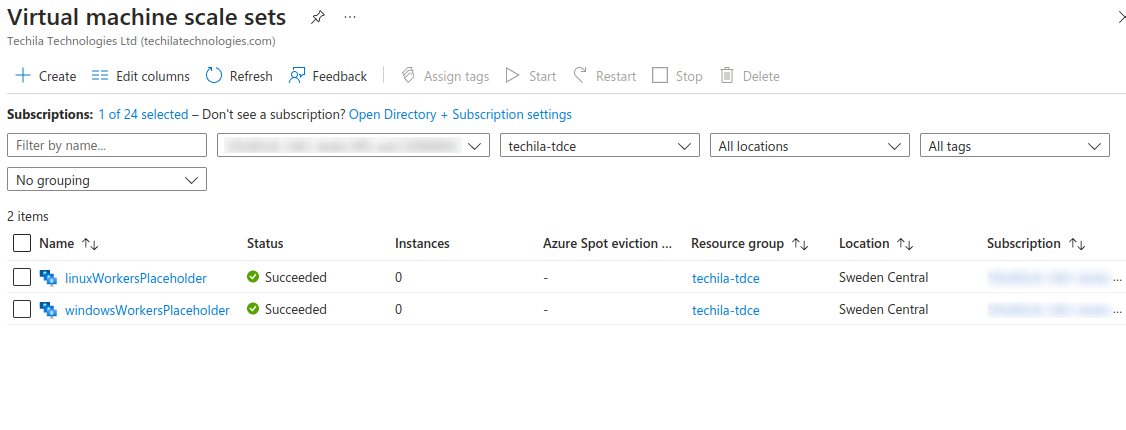
3.6. Stopping the Techila Server
This chapter contains instructions for stopping the Techila Server VM instance using the Azure Portal. Stopping the Techila Server VM will save you some of the cost of running TDCE. Stopping the Techila Server VM instance will not remove any critical data from the Techila Server. If you stop the Techila Server VM instance, you will be able to restart it at a later time.
Note! When stopping the Techila Server, using the Stop button in the Azure Portal is essential. Do not delete the Techila Server.
Note! Stopping the Techila Server will not delete the Techila Worker VM instances. Please delete all Techila Worker VM instances that are running by using the Techila Dashboard. Instructions for deleting Techila Worker VM instances can be found in Decreasing Computing Throughput.
Please also note that even though you stop the Techila Server VM instance and delete all Techila Worker VM instances, you will be billed for the Techila Server disk and the static IP address reserved for the Techila Server.
-
Navigate to the Azure Portal located at:
-
Navigate to
Virtual Machines→ select your Techila Server → ClickStop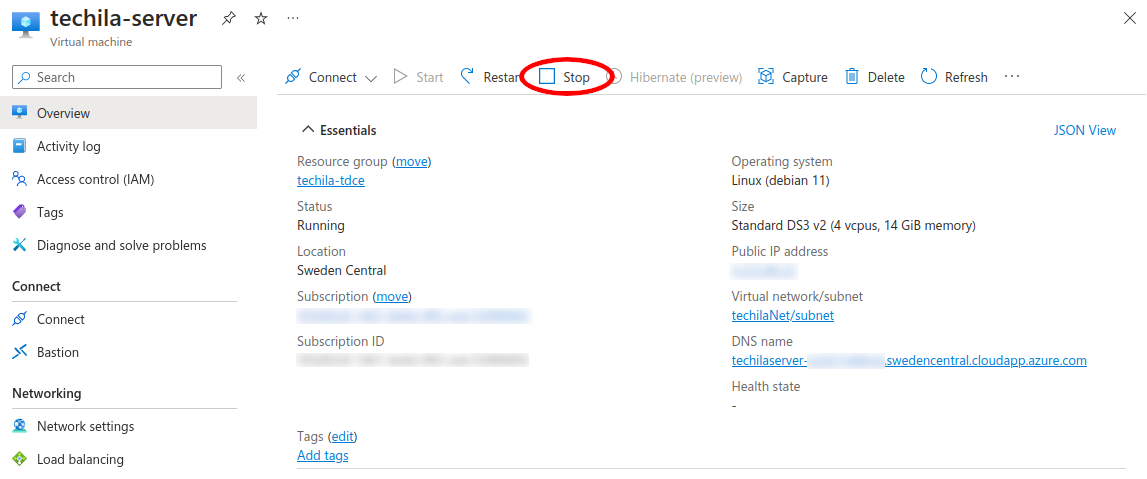
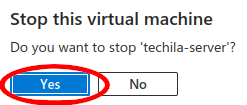
-
When prompted, confirm the action.
After confirming the action, the Techila Server VM instance will be stopped.
3.7. Restarting the Techila Server
This chapter contains instructions for restarting the Techila Server using the Azure Portal. After restarting the Techila Server, you can continue using your existing application plugin package. You do NOT need to re-download or re-configure the application plugins.
After restarting the Techila Server VM instance according to the instructions in this chapter, the IP address of the Techila Server will be the same as in the initial deployment. This means you can use your existing browser bookmarks to access the Techila Dashboard.
-
Navigate to the Azure Portal located at:
-
Navigate to
Virtual Machines→ select your Techila Server → ClickStart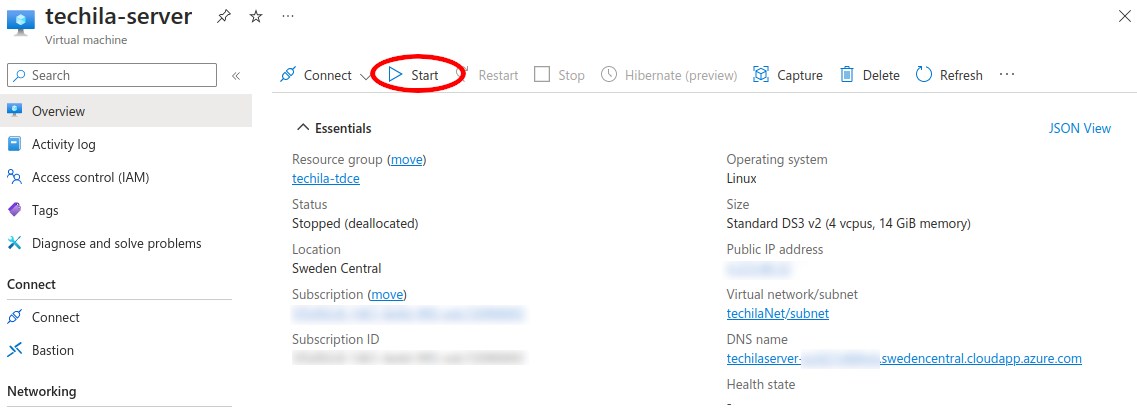
-
After starting the Techila Server VM instance, please follow the instructions in Accessing the Techila Dashboard to access the Techila Dashboard.
3.8. Removing all Techila Distributed Computing Engine Components from Azure
This chapter contains instructions on how to remove all components that were created when taking Techila Distributed Computing Engine in Microsoft Azure Marketplace into use.
Please note that the steps described in this chapter are typically only required when you want to discontinue using the Techila Distributed Computing Engine system and don’t plan on performing any computations using Techila Distributed Computing Engine in Microsoft Azure Marketplace with this deployment. If, after removal of all components, you need to perform more computations, you will need to deploy a new Techila Distributed Computing Engine from scratch; see Starting the Techila Server.
Note! If you perform the steps described in this chapter, you will NOT be able to restart the Techila Server. Performing the steps described in this chapter will also delete all user credentials and computational data stored on the Techila Server.
-
Delete all Techila Worker VM instances as described in Decreasing Computing Throughput
-
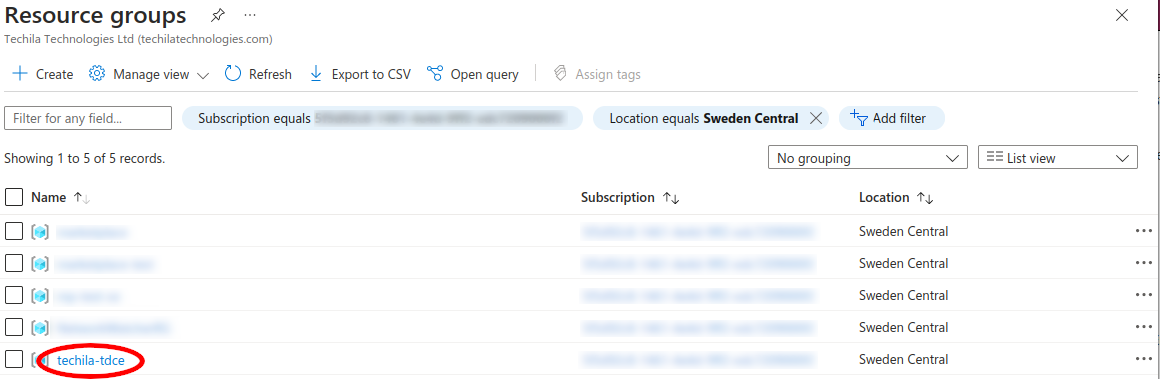
In the Azure Portal, select
Resource Groups -
Locate and select the Resource Group you have been using for your Techila Distributed Computing Engine components.
-
Click
Delete resource group
-
When prompted, enter the Resource Group name and click
Deleteto confirm the action.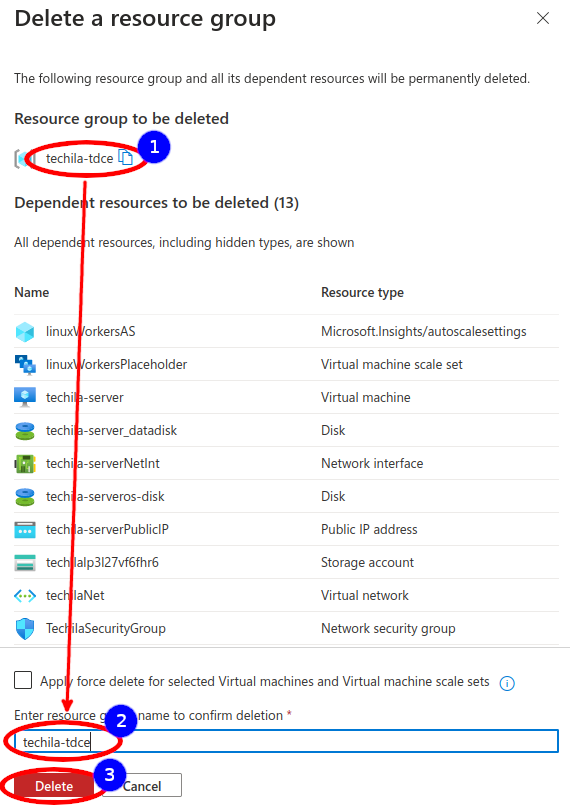
-
Wait for the Resource Group to be deleted. After the Resource Group has been deleted, it will no longer be visible on the
Resource Groupsview. All components created when taking Techila Distributed Computing Engine in Microsoft Azure Marketplace into use have now been removed. -
Note! If you have created any other unrelated resources into the same Resource Group, they will also be deleted.
4. Appendix
4.1. Advanced Techila Dashboard Settings
Advanced Techila Deployment settings can be displayed by clicking the Advanced link highlighted in the image below.

The Spot price field allows you to use spot virtual machines, which can help you reduce the cost of computing capacity.
The public IP address setting allows you to control whether or not the Techila Workers are assigned a public IP address. If no public IP address is set, the Techila Workers will be unable to access data located in the internet. Additionally, if no public IP address is set, you cannot directly establish a remote connection to the Techila Worker via SSH (Linux) or RDP (Windows). Establishing a remote connection is typically needed when you are creating a custom image from a Techila Worker. If you plan on creating an image, it is recommended to set public IP address to On. Additional costs may be incurred when using public IP addresses; see https://azure.microsoft.com/en-us/pricing/details/ip-addresses/ . For creating the image, see Creating a Custom Image.
The Idle shutdown settings allow you to enable an idle shutdown for the Techila Workers. Specifying a shutdown delay will automatically cause Techila Worker VM instances to be terminated if no Jobs are detected on Techila Workers within the specified time. The idle shutdown timer will be activated immediately after deployment. If no Jobs are detected, the Techila Workers will remain online for a minimum of 30 minutes after deployment. The value defined in the idle shutdown setting will be applied when Jobs are detected. When the One-by-one mode is set to On, the defined timer value will take effect on each individual Worker when they are idle. When it is set to Off, all Workers must be idle before any of them is shut down.
4.2. Techila Worker GPU Instances
GPUs can be used by selecting an instance that includes GPUs. Please see the Azure documentation for a list of instance types that include GPUs.
Techila Workers with a Linux operating system include the latest Nvidia drivers available from backports:
Techila Workers with a Windows operating system do not include Nvidia drivers and need to be installed manually. After installing Nvidia drivers, a custom image can be created as described in Creating a Custom Image.
4.3. Creating a Custom Image
A custom machine image is a boot disk image that you own and control access to.
Generally speaking, custom images can be used to create an image from the boot disks of your existing Azure VM instances. You can then use that image to create new boot disks for your instances. This process allows you to create new instances that are preconfigured with the applications that you need without having to configure a public image from scratch.
In the TDCE context, custom images can be used to make additional software packages available on Techila Workers. The example flow below illustrates how this could be done:
Note! You cannot create images from spot instances. If you plan on creating an image, please make sure you start on-demand capacity.
-
Using your web browser, navigate to your Techila Dashboard.
-
In the Techila Dashboard, select the base operating system you want to use (Windows or Linux). If you have already created a custom image and want to make further modifications to it, you can select the custom image.
-
In the
Advanced Instance Optionssection, make surePublic IP addressis set toOn -
In the
Worker nodes, set the count to1. -
Click the
Update deploymentbutton to start the Techila Worker. Wait until the Techila Worker is running. This may take several minutes. -
Establish a remote connection to the VM. By default, the Techila Workers will accept both SSH (port 22, Linux) and RDP (port 3389, Windows) connections if the connections are routed via the Techila Server. If you want to establish remote connections directly to Techila Workers, you must configure the network security rules related to the Techila Workers. This can be found under
Resource Groups→ <Your Resource Group> →ResourcesGeneral instructions for establishing remote connections to instances can be found here:
-
After establishing a remote connection to the Techila Worker, install the software you want to include in your custom image. Please note that the Techila Worker processes (including the actual Jobs) will run under user
techila-workerand will need to have access to software. -
After you have installed all required software on the Techila Worker, test that everything works. A comprehensive test would be to run an actual computational Project that uses the functionality of the software you just installed. You can remain connected to the Techila Worker while running the tests.
-
After verifying that everything is working as intended, return to the Techila Dashboard and give the image a descriptive name by using the
Image namefield and create the image.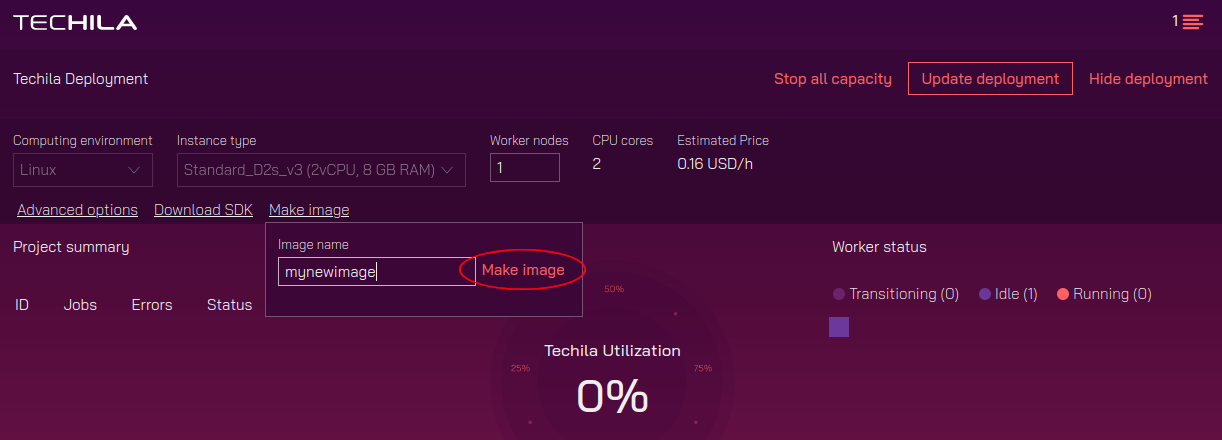
-
After specifying a name, click the
Make imagebutton. This will start the image creation process. Progress information will be displayed in the Techila Dashboard. Please note that the Techila Worker will be automatically shut down at the end of the process. -
After creating the image, the new custom image will be listed in the
Computing environmentmenu. You can now choose the custom image to make the previously installed software available on all Techila Workers.
4.4. Accessing the Techila Dashboard
-
Navigate to the Azure Portal located at:
-
Locate the Resource Group where your TDCE is deployed.
-
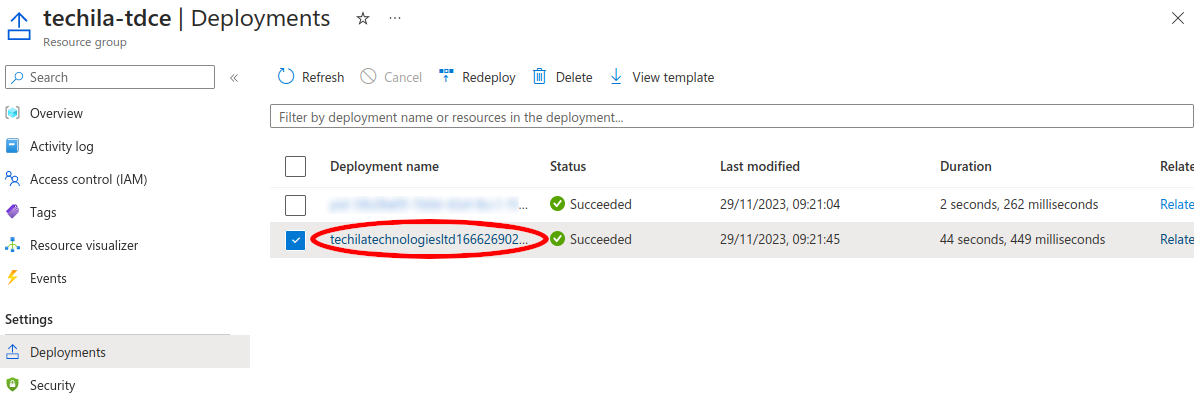
From the left sidebar, select
Deployments. -
Then click on your TDCE deployment.
-
On the left sidebar, select
Outputs. -
On the
Outputstab, copy thetechilaDashboardURL and paste it into your browser to go to that address.
-
Opening the Techila Dashboard might display a credential warning. The appearance of the warning will depend on what browser you are using. Accept the certificate and continue.
-
Enter
adminas the username. In the password field, enter the password you defined when creating the deployment. Click theLog inbutton to log in.
4.5. Making an Azure Quota Increase Request
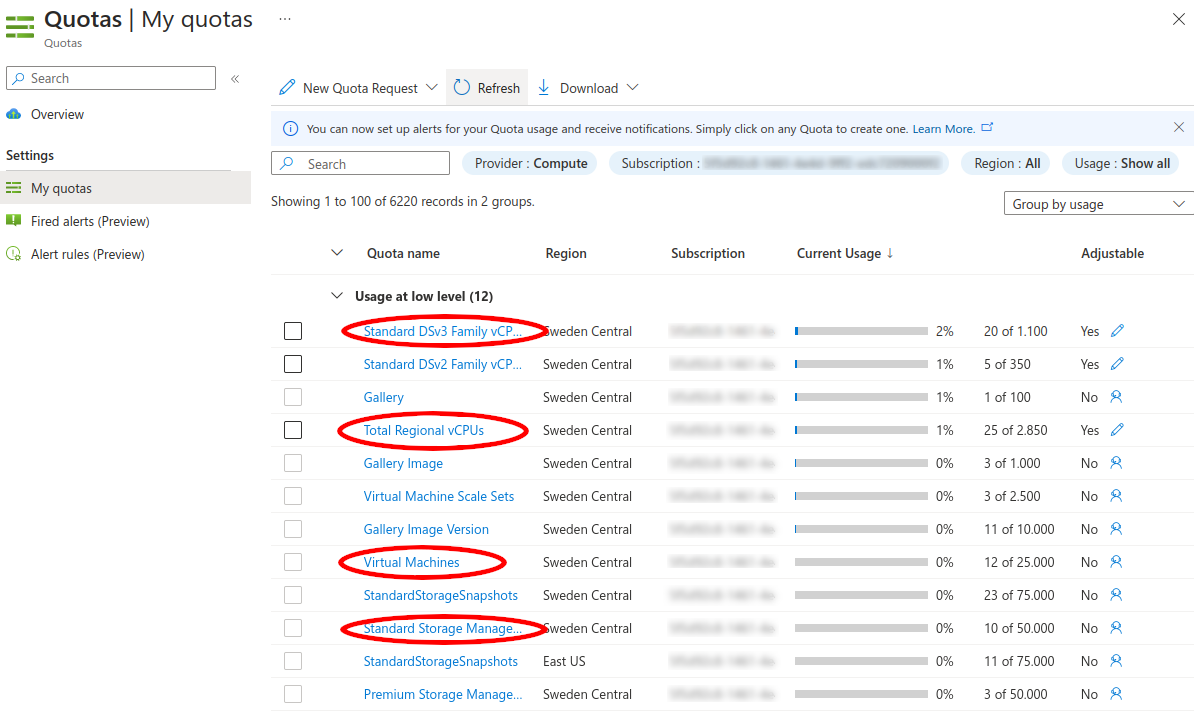
To start a large number of Techila Workers, you might need to increase your Azure quota. Please follow the following instructions for making the quota increase request:
The screenshot below shows an example of the typical quotas that will typically need to be increased to start larger amounts of Techila Workers.
4.6. Techila Distributed Computing Engine Backup
This chapter contains instructions for backing up your existing Techila Server.
-
Stop all Techila Workers as described in Decreasing Computing Throughput
-
Stop the Techila Server as described in Stopping the Techila Server
-
Navigate to the Azure Portal located at:
-
Navigate to
Resource Groups→ Select your Resource Group for TDCE. -
Create snapshots of
techila-server_datadiskandtechila-serveros-diskaccording to instructions described here https://learn.microsoft.com/en-us/azure/virtual-machines/snapshot-copy-managed-disk?tabs=portal
-
Fill in a name for the snapshot (
1), then clickReview + Create.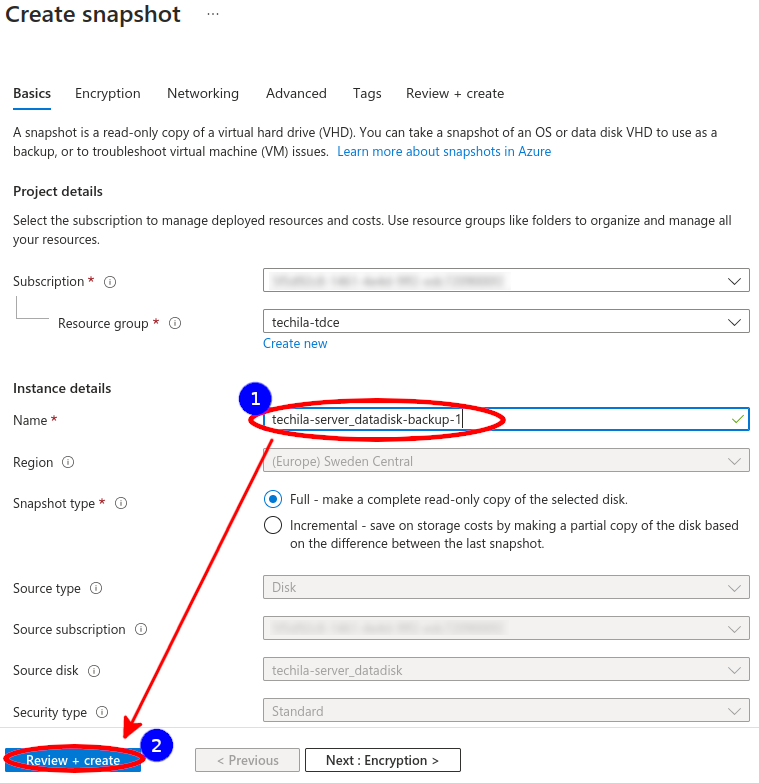
-
On the review page, click
Create. -
Repeat the steps for both Techila Server disks.
-
The snapshot creation process may take several minutes. Navigate to the Resource Group and wait until the Techila Server snapshots have been created. You can restore the Techila Server using these snapshots described in Techila Distributed Computing Engine Restore.
4.7. Techila Distributed Computing Engine Restore
Restoring a Techila Server requires having an existing Techila Server snapshot as described in Techila Distributed Computing Engine Backup.
The process of restoring a Techila Server from a previous snapshot is described below. Repeat the steps for both the OS disk and the data disk.
-
On the snapshot page, click
Create disk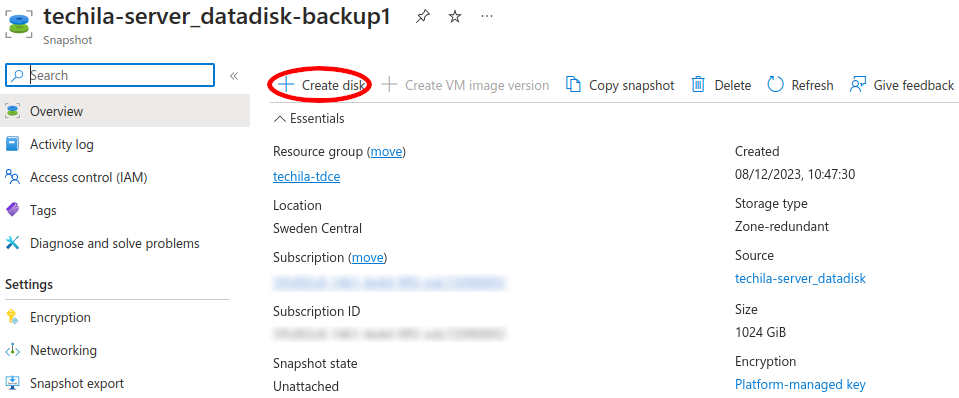
-
Fill in the Disk name and then click
Review + create.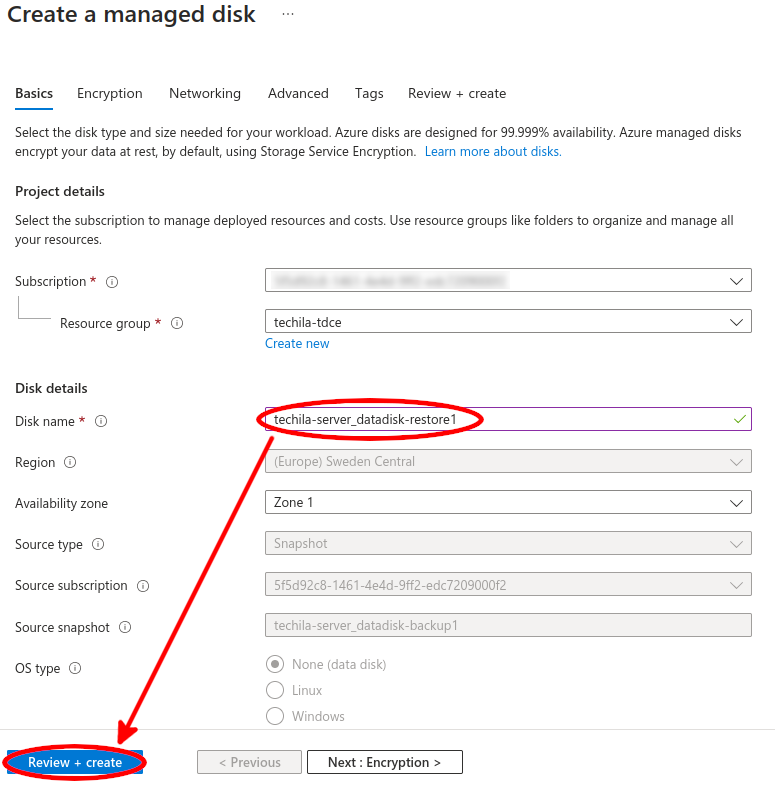
-
On the review page, click
Create. -
On your Techila TDCE Resource Group, locate
techila-serverand click on it.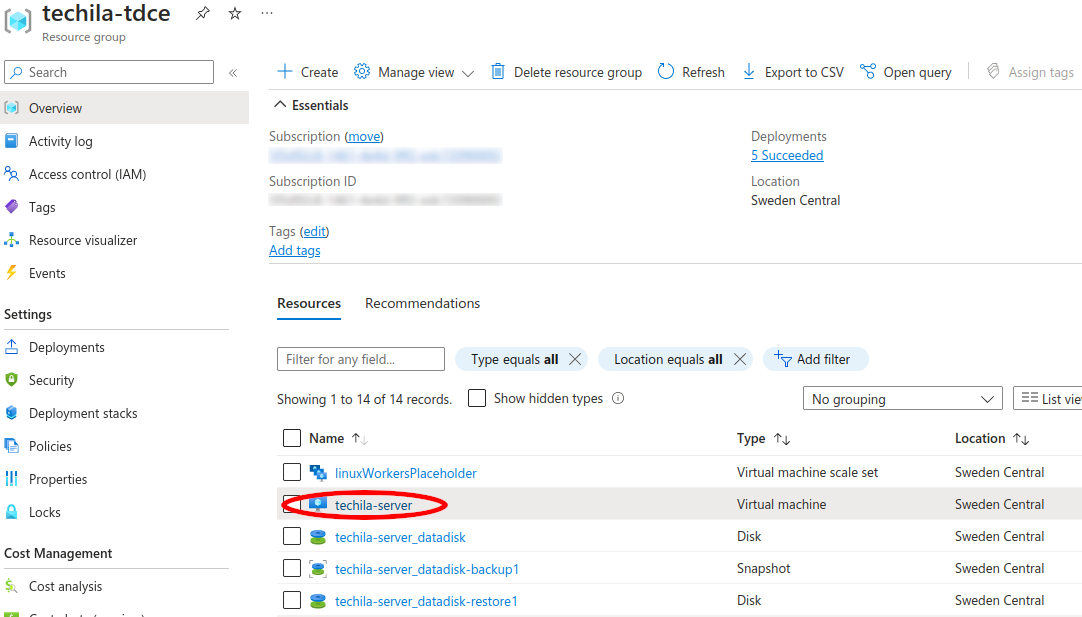
-
On the
techila-serverVM page, locateDiskson the left sidebar and click it.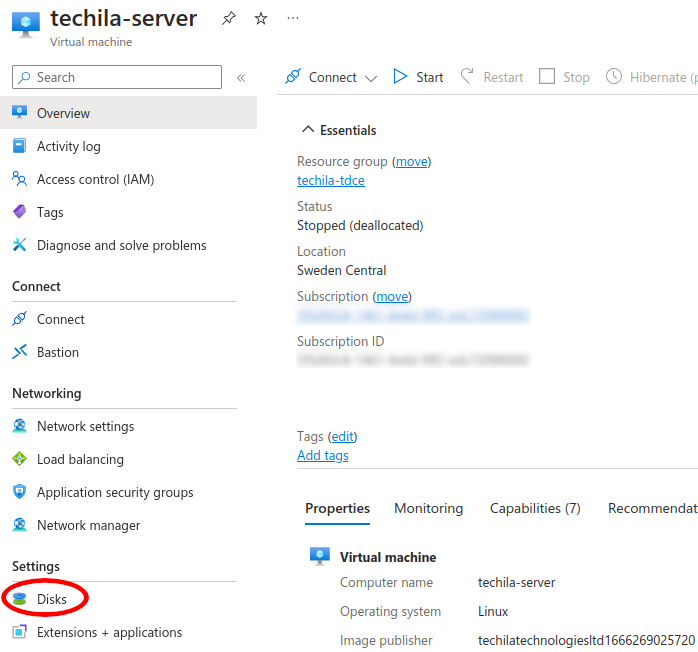
-
For the OS disk, click
Swap OS disk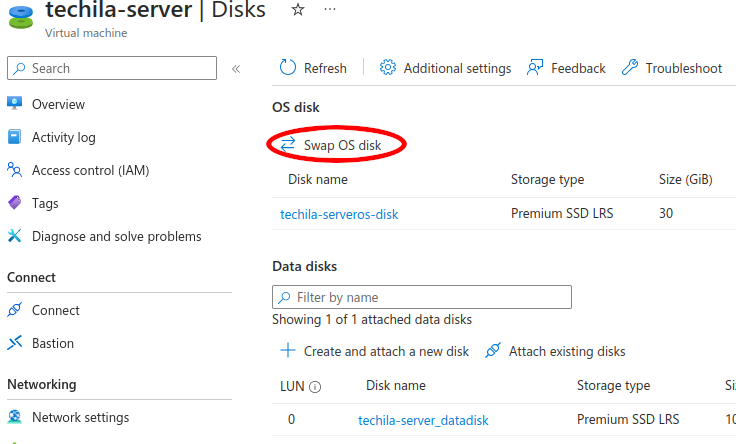
-
On the
Swap OS Diskpage, select the existing disk and choose your server OS disk restore.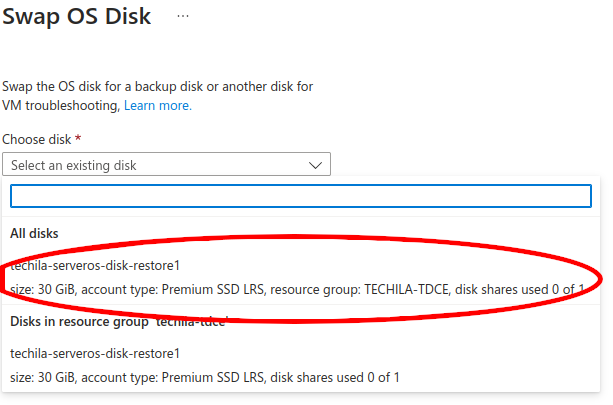
-
Confirm the swap by entering the VM name, usually
techila-server. And clickOK. -
For the datadisk
techila-server_datadisk, click theDetachicon on the far right.
-
Then click
Attach existing disks.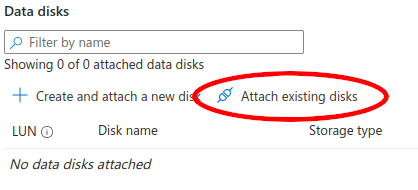
-
Then select your datadisk restore.
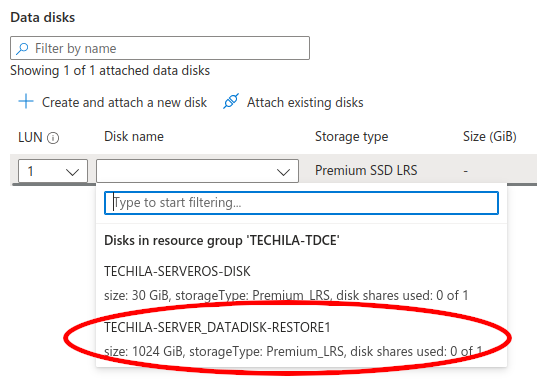
-
After making the changes, click
Apply.
-
Restart the Techila Server as described in Restarting the Techila Server.
4.8. Network Configuration Details
The table below describes the network connections used in TDCE. In the Azure Marketplace context, all network connections between Techila Server and Techila Workers are established inside an Azure virtual network. Chapter TDCE Components contains more information about the various network components created during deployment.
| Data Channel | Signal Channel | Management Channel | Web Access | Azure storage | |
|---|---|---|---|---|---|
Port |
TCP/20002 |
TCP/20001 |
TCP/25001 or TCP/25002 |
TCP/443 |
TCP/443 |
Protocol |
HTTPS |
HTTPS + XML-RPC like |
HTTPS + XML-RPC |
HTTPS |
HTTPS |
Direction of Initialization |
Techila Worker → Techila Server |
Techila Worker → Techila Server |
End-User → Techila Server |
Browser →Techila Server |
Techila Worker → Azure storage, Techila Server → Azure storage |
Description |
Transfer slots and request queues in server. |
Always open. |
Synchronous requests. |
Techila Web Interface |
Used to transfer Bundles. |
4.9. TDCE Components
This chapter lists the name and type of components created by the Azure Resource Manager template in the following format:
-
ComponentName (Component type)
List of components:
-
vNet (Virtual network)
-
TechilaServerSecurityGroup (Network security group)
-
techila-serverPublicIp (Public IP address)
-
techila-serverNetInt (Network Interface)
-
techilaServerIdentity (Manager Identity)
-
techilaServerRole-… (Custom Role)
-
(Role Assignment)
-
techila… (Storage account)
-
techila-server (Virtual machine)
-
techila-server_datadisk (Disk)
-
techila-serveros-disk (Disk)
Additional components created by Techila Server when Workers are deployed
-
…-TWC-… (Virtual machine scale set)
4.10. Establishing SSH Connections to the Techila Server
Establishing SSH connections to the Techila Server is not required during the deployment or regular operation. However, if you want to establish an SSH connection, this can be done using the SSH key defined during the deployment process.
General instructions for establishing remote connections to instances can be found here:
Please note that the Techila Server processes are automatically started under the dedicated user account. If you establish an SSH connection to the Techila Server, do not change the processes to run under root. If you need to either stop, start, or restart the Techila Server processes, please use the following commands:
sudo systemctl stop tgs.init
sudo systemctl start tgs.init
sudo systemctl restart tgs.init
4.11. Cost Estimation
Your TDCE environment will consist of one Techila Server instance and several Techila Worker instances. You can set the number and type of Techila Worker instances based on your computational needs by using the Techila Dashboard.
The Techila Server does not have additional software costs. Techila Worker software is billed at an hourly rate determined by the instance type you are using.
Billable infrastructure components in a standard TDCE deployment include:
-
Techila Server Azure VM instance;
-
Techila Worker Azure VM instances;
-
Disk storage;
-
Blob storage;
-
Outbound traffic.
4.12. Troubleshooting
This chapter contains a list of items that can be checked if the TDCE is not working correctly and your computations are not progressing as expected.
-
If you cannot connect to the Techila Server, check that the Techila Server instance is running, i.e., not stopped. If required, please restart the instance as described in Restarting the Techila Server.
-
If the Techila Server instance is running but can still not connect to it, check that Techila Server processes are running. To do this, establish an SSH connection as describer in Establishing SSH Connections to the Techila Server and check the status using the command:
systemctl status tgs.init
If the processes are not running, start them using the command:
sudo systemctl start tgs.init
-
If the Techila Server instance and processes are running, but you cannot connect to it, check the Techila Server logs for errors. Relevant log files can be found in the following directories on the Techila Server:
-
Wrapper log:
/data/techila/server/bin/wrapper.log -
Log files in the folder:
/data/techila/server/bin/logs
-
-
To verify that the network connections are working correctly, test TCP port 443 by connecting to the Techila web interface using your web browser. Also, check TCP port 25001 connectivity by running a Techila SDK command to test network connectivity as described in the Downloading and Configuring the Application Plugins configuration instructions.
-
Check for any new warning messages in the Techila web interface
Statuspage. The URL of theStatuspage ishttps://<TechilaServerNetworkAddress>/status.php -
Check that free disk space is available on the Techila Server. This can be checked from the
Statuspage, from the table located at the bottom of the page.If you need to free up disk space, this can be done by removing either old computational Project results or old Bundles that are no longer needed. These can be removed using the Techila web interface.
Bundles can be removed in
Admin→Bundles→DB Bundles. When removing Bundles, do not remove any Bundles with a defined category, as these can contain runtime components required during all computations.Projects can be removed in
Projects→DownloadedandCompleted. When removing Projects, you will also be removing the actual result data. Please make sure that you have downloaded the results before deleting any Projects. -
If your computational Project is not progressing, please check if you have the computational capacity (=Techila Workers) deployed. Please start capacity as described in Increasing Computing Throughput if required.
-
If Jobs are not being assigned to Techila Workers, verify that you selected the operating system that matches the machine where you have the Techila SDK. If needed, you can change the operating system of Techila Workers when launching capacity as described in Increasing Computing Throughput.
-
If computational Projects are started, and Jobs are assigned to Techila Workers but are not completed successfully, please check if errors are being generated in the Jobs. These error messages can be viewed in the Techila SDK
techila\logs\project_errorsdirectory. If errors are being generated, the log files can be viewed for more information about what is causing the problem. -
If the problem persists, please see Support Requests for information on how to request troubleshooting assistance. If the problem cannot be resolved, you can restore the system to its last saved working state by restoring it from a snapshot described in Techila Distributed Computing Engine Restore.
4.13. Healthcheck
Monitoring the application’s health can be done by checking the instance status and performing some simple network connectivity tests to verify that the Techila Server software is responding as expected. The list below contains some quick checks that can be done on a daily basis to verify that everything is working as expected.
-
Check the status of the Techila Server instance using Monitor Azure virtual machines
-
Verify that you can access the Techila web interface and that the interface is responsive (uses TCP port 443).
-
Verify that you can establish Techila SDK connections (uses TCP port 25001).
-
Verify that the Techila Server has sufficient free disk space available. This can be checked on the Techila web interface
Statuspage.
4.14. System Updates
Keeping the system up to date can be done by regularly running operating system updates on the Techila Server virtual machine.
sudo apt-get update
sudo apt-get upgrade
Techila Technologies regularly makes new versions of the TDCE solution available in the Azure Marketplace. It would be best to consider updating when a new version is available by creating a new deployment.
4.14.1. Techila SDK Credentials
When you download a TechilaSDK.zip file from the Techila Dashboard, a Java keystore file named admin will be included in the package. This keystore contains a key with a validity period of 365 days.
If you want to rotate your user credentials, you can do this by downloading the TechilaSDK.zip again from the Techila Web Interface. Each time you download the TechilaSDK.zip file, a new set of user credentials will be created and stored in the package.
To disable your old Techila SDK user credentials, you will need to set the status of the old End-User Key to untrusted using the Techila web interface as described below:
-
In the Techila Web Interface, navigate to
Admin→End-Users→End-User List→ Click onAdmin -
Click the
Untrustbutton next to the old key you want to disable.
4.14.2. Support Requests
Support for TDCE in Azure Marketplace can be requested using the following online form.
Please note that there is no SLA included in this support offering. If you are interested in learning more about dedicated, premium technical support levels that include SLA, please get in touch with sales@techilatechnologies.com for more information.
When requesting support, the following document describes how you can create a log file package for troubleshooting purposes.