1. Introduction
This document is intended for Techila End-Users who wish to execute precompiled binaries or other independently executable applications on the Workers. The Command Line Interface (CLI) provides a simple, light-weight interface, which can be used to perform the following tasks:
-
Distribute and execute precompiled binaries on Workers
-
Integrate the Bundle and Project creation process into a single locally executable script file The CLI interface is accessible from command line interpreters for operating systems that support Java, including but not limited to:
-
Command Prompt for Windows based operating systems
-
Shells for Unix-like systems
This document contains descriptions of the available features in the CLI and provides practical examples on how to implement them. If you are unfamiliar with the terminology or theory used in this document, please refer to Introduction to Techila Distributed Computing Engine for more details.
The structure of this document is as follows:
Techila Command Line Interface contains instructions on how you can access the CLI and a short overview of available CLI commands. Instructions are also provided on how you can create an environment variable to conveniently access the CLI. This Chapter also contains instructions on how to specify the location of the techila_settings.ini file, which can be useful if the configuration file is not found in any of the default locations.
CLI commands contains a short description on available CLI commands. These commands can be used to test that you can connect to your Techila Server and to create a computational Project. The syntax of most of the commands is illustrated by a short example. An exception to this is the peach command, which is explained in CLI peach-command.
CLI peach-command contains an overview of the CLI peach command, which is the primary interface for creating computational Projects using the CLI. Available peach parameters are explained by using small code snippets that illustrate the syntax. Please note that the majority of the CLI syntaxes used in this Chapter require some additional parameters and therefore cannot be executed 'as is'. Executable code samples can be found in Tutorial Examples and Feature Examples.
Tutorial Examples contains walkthroughs of simplistic example code samples that use the peach CLI command for creating a computational Project. The example material illustrates how to control core features, including defining input arguments for the executable program and transferring data files to the Workers. After examining the material in this Chapter you should be able create computational Projects by using the CLI where independently executable programs are deployed and solved in the Techila environment.
Feature Examples contains several examples that illustrate how to implement different features available in CLI peach command. Each subchapter in this Chapter contains a walkthrough of an executable piece of code that illustrates how to implement one or more features. These include Snapshotting and the use of shell/batch scripts for creating Projects. After examining the material in this Chapter you should be able implement several features available in the CLI peach in your own application.
Please note that the procedures described in this document are only applicable if you have successfully installed the Techila SDK. For instructions on how to install the Techila SDK, see Getting Started.
2. Techila Command Line Interface
The Techila Command Line Interface (CLI) enables the End-User to interact with the Techila Server by executing commands on the command line interpreter of their operating system. The Techila CLI has has several different functionalities, but perhaps the most important is the peach command. The peach command can be used to execute scripts / precompiled binaries / 3rd party applications in TDCE by using the operating system’s command line interface.
For reference, the example code snippet below shows how the peach command could be used to send an executable called my_binary.exe from the End-User’s computer to Techila Workers. The syntax used in this example would create a computational Project that consists of five Jobs (one per peachvector element). Each Job would execute the my_binary.exe with a different input argument. Job #1 would execute command my_binary.exe 1, Job #2 would execute my_binary.exe 2 and so on. A file called my_out.txt would be returned from the Techila Workers back to the End-User’s computer as output. On the End-User’s computer, the output files will be automatically renamed based on the Job’s index number and stored in the output directory.
java -jar C:\techila\lib\techila.jar peach command="my_binary.exe" parameters="%P(peachparam)" outputfiles="output;file=my_out.txt" peachvector="1 2 3 4 5"
The image below illustrates some of the key operations that are performed when the above peach is executed. More details and examples about using peach can be found in Tutorial Examples and Feature Examples.

2.1. Overview
The Techila CLI can be used to e The CLI interface can be used to execute commands that enable you to perform the following tasks:
-
init- Initializes a session to the server -
unload- Removes the session and deletes temporary files -
createSignedBundle- Creates a signed Bundle and uploads the Bundle to the server -
createProject- Creates and starts a Project -
waitCompletion- Waits for Project completion -
download- Downloads Project results -
unzip- Unzips Project results that have been downloaded -
download+unzip- Downloads and unzips result in a single step -
read- Reads commands from stdin -
checkConfig- Prints loaded configuration options -
createBundle- Creates a Bundle -
testsession- Tests the session -
peach- Creates and starts a Project according topeachparameters.
As mentioned earlier, the main focus in this document and in the example material will be on the peach CLI command, which provides an easy-to-use interface for creating Projects, defining input arguments to the executable program and transferring data files to Workers participating in the Project.
The functionality of the CLI interface is in the techila.jar file, which is included in the Techila SDK and is located in the lib folder.
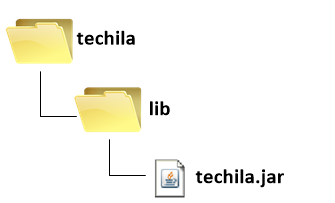
lib directory in the Techila SDK.2.2. Accessing the CLI Interface
The CLI interface can be accessed by changing your current working directory to the lib directory in the Techila SDK and executing the following command:
java -jar techila.jar
Executing the command shown above will display the internal help, which will list available CLI commands. This is illustrated in the figure below.
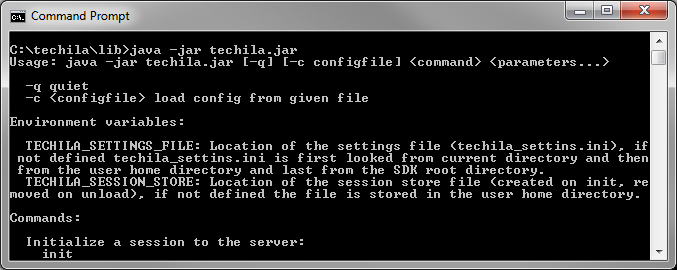
java -jar techila.jar will display a list of available CLI commands.If the current working directory does not contain the techila.jar file, the path to the file needs to be defined when the command is executed. For example, if full path to the techila.jar file is C:\techila\lib\techila.jar, internal help can be displayed with command:
java -jar C:\techila\lib\techila.jar
Executing CLI commands is done by simply defining the name of the command and any possible parameters for the command. This general syntax is shown below:
java -jar techila.jar <command> <parameters>
Where the <command> notation will be replaced with the CLI command that will be executed and the <parameters> notation with applicable parameters (if any) for the command.
Again, if the current working directory does not contain the techila.jar file, the path to application needs to be defined. For example, if full path to the directory that contains the techila.jar application is C:\techila\lib, CLI commands could be executed with the following command:
java -jar C:\techila\lib\techila.jar <command> <parameters>
2.2.1. Location of the techila_settings.ini Configuration File
In order to use the CLI, a properly configured techila_settings.ini file must be accessible when executing CLI commands.
The techila_settings.ini file will be automatically used if it exists in any of the locations listed below:
-
The file specified in environment variable TECHILA_SETTINGS_FILE
-
The current working directory
-
The following files from the users home directory
-
.techilarc
-
techila_settings.ini
-
-
The path specified with the environment variable TECHILA_SDKROOT
-
The parent folder of the
techila.jarfile -
The directory containing the
techila.jarfile
The locations are searched in the order they are listed above. The search process will stop, when the techila_settins.ini file is found.
By default, the techila_settings.ini file located in the techila folder will be used automatically, meaning no steps will be required to configure the location of the file.
If the techila_settings.ini file is not found in any of the locations listed above, the location of the file can be defined by using the -c switch. The general syntax for defining the location by using the -c notation is illustrated below:
java -jar techila.jar -c <path_to>\techila_settings.ini
Where the <path_to> notation needs to be replaced with the path leading to the techila_settings.ini file.
For example, the following syntax would use the techila_settings.ini file located in C:\my_files\ when executing CLI commands.
java -jar techila.jar -c C:\my_files\techila_settings.ini <command>
2.2.2. Accessing the CLI Interface by Using Environment Variables
Environment variables can be used for accessing the CLI interface and for defining any other static parameters, such as the location of the techila_settings.ini file and the techila.jar file. This will reduce the amount of repetition and provides a convenient way for executing CLI commands.
To create an environment variable in a Windows environment to access the CLI interface, use the command shown below. Note that the <path_to> notation should be replaced with the path leading to the techila.jar file:
set techila=java -jar <path_to>\techila.jar
You can also create the environment variable by using the functionality in the Windows Control Panel. Using the Windows Control Panel to create the environment variable will make the environment variable accessible in all Command Prompt sessions.
To create an environment variable in a Linux environment to access the CLI interface, use the command shown below. Again, replace the <path_to> notation in the command with the path leading to the techila.jar file on your computer:
techila="java -jar <path_to>/techila.jar"
Note that you can also create an alias that accesses the CLI interface by using the user configuration files (e.g. .bashrc) which are executed when logging in. This will make the CLI interface accessible by using the alias and removes the need for setting the environment variable manually.
After an environment variable has been created, it can be used for executing CLI commands.
For example in a Windows environment, a CLI command could be executed with the following syntax:
%techila% <command>
And respectively in a Linux environment, a CLI command could be executed using the syntax shown below:
$techila <command>
NOTE! For the remainder of this document, the %techila% and $techila notations will be used to represent the following syntax required for accessing the CLI interface:
java -jar <full path to>\techila\lib\techila.jar
If you choose to name your environment variables or differently or choose to access the CLI interface without using environment variables, please modify the commands accordingly.
3. CLI commands
This Chapter contains more detailed descriptions on the CLI commands introduced in Overview.
3.1. checkConfig
The checkconfig command displays the settings in the techila_settings.ini that will be used when executing CLI commands. To view the settings of your techila_settings.ini file, use the following command:
%techila% checkconfig
Executing the command will display a summary of the settings as illustrated below. For a description on the parameters displayed by the checkconfig command, please refer to the document Techila Getting Started.
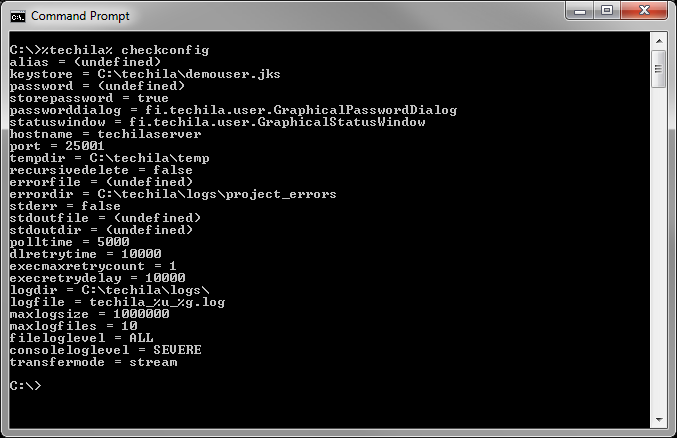
checkconfig can be used to display the settings that are currently in use.3.2. read
The read command enables commands and parameters to be read from STDIN. Commands and parameters can be typed directly to the command line or commands can be read from a file.
To enter commands directly through STDIN, use the following command:
%techila% read
After the command shown above is executed, commands and parameters can be given by entering them on the command line. Pressing "Return" will execute the command with the given parameters. STDIN mode can be exited with Ctrl-C in Windows and Ctrl-D in Linux. The figure below illustrates a screenshot where the commands init, testsession and unload have been executed.
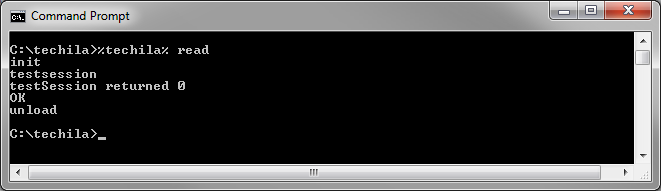
read command.Commands and parameters can be read from a file with the "<" notation. For example, the syntax shown below would read the commands and parameters from a file called commands.txt.
%techila% read < commands.txt
Commands in files are separated with carriage returns, meaning each line containing a command will be executed as a separate command. Note that also the last line in the file must end in a carriage return, in order to execute the last command in the file.
For example, if the commands.txt file contains the following lines:
init
testsession
unload
Executing the command shown below would perform the same operations as illustrated in the image above.
%techila% read < commands.txt
3.3. init
The init command creates a session, which is required for executing CLI commands that communicate with the Techila Server. The init command is typically used in situations where multiple CLI commands are executed using the read command, Windows batch files or Linux shell scripts. In these types of situations, the init command would be executed as the first CLI command, before calling other CLI commands such as peach or createBundle. Performing a separate init command in situations like these will improve performance, as only one session will be created, regardless of how many CLI commands will be executed.
When the init command is executed, the End-User will be prompted for the password for their keystore file (unless the password is stored in the techila_settings.ini file). Executing the init command will also create a file called .techila_session_store in your home directory, which will be used to store user credentials for the duration of the session. Credentials in this file are sensitive and should not be shared with anyone. This file will be removed when the unload command is executed.
A session can be created with the following syntax:
%techila% init
Note that init command only needs to be executed once, after which other CLI commands can be executed for the duration of the session. Also note that a majority of the CLI commands will automatically create a new session if no session exists. Commands that will automatically create a session include the peach and createBundle commands, which are often used when creating Projects or Bundles.
Note! In latest versions of the Techila CLI, all CLI commands automatically create a session. This means that you do not need to call init before executing other CLI commands.
3.4. unload
The unload command removes the session and deletes all temporary files, including the .techila_session_store file. The unload command is typically executed after all other Techila CLI commands have been executed.
A session can be removed with the following command:
%techila% unload
3.5. testSession
The testsession command can be used to perform a test, where a test session will be created (and also automatically removed) on the Techila Server. The syntax for creating a test session is shown below:
%techila% testsession
If a session was successfully created, the following information will be displayed:
testSession returned 0
OK
After the test session has been created, the session will be automatically removed.
If a session could not be created, a corresponding error message will be displayed.
A session can also be created with the init command, which is described in [init].
3.6. createProject
The createProject command can be used to create and start a Project in the Techila environment. This CLI command is typically used to create computational Projects that do not use the peach CLI command.
The table below contains parameters for the createProject command.
| Parameter | Example | Description |
|---|---|---|
bundlename |
bundlename=<bundlename> |
Mandatory. Specifies the name of the Executor Bundle containing the executable Program. The Executor Bundle can be created with the createBundle CLI command or with the Techila Bundle Creator tool. |
priority |
priority=2 |
Optional. Specifies the priority of the Project |
description |
description="<description>" |
Optional. Gives a description to the Project. |
projectparameters |
param1=42 param2=13 jobs=10 |
Optional. Input arguments for the executable program; jobs parameter determines the number of Jobs in the Project. This parameter can also be used to define general Project parameters. |
3.7. waitCompletion
The waitCompletion command is typically used in Projects that are created with the createProject command. When executed the waitCompletion command will make the CLI interface wait for the Project to be completed before executing any other CLI commands. When the read command is used to execute the createProject`and `waitCompletion commands, the Project ID number will be stored in memory, meaning the waitCompletion command will automatically wait for the completion of the correct Project.
If the createProject`and `waitCompletion commands are not executed using the read command, the Project ID number of the Project needs to be specified with the syntax shown below:
waitCompletion <Project ID number>
3.8. download
The download command can be used to download the results of a previously completed Project. By default the results will be downloaded in a single ZIP package, which will be stored in under the temporary directory specified by the tempdir parameter in the techila_settings.ini file. The general syntax for downloading results of a previously created Project is shown below:
%techila% download <Project ID number>
For example, the syntax shown below would download the results for Project 2363.
%techila% download 2363
The location where the ZIP-file will be stored after it has been downloaded can be defined with the dir parameter as shown below:
%techila% download dir=<destination> <Project ID number>
For example, the syntax shown below would download the results for Project 2363 and place a ZIP called project2363 file in the C:\temp\ directory.
%techila% download dir=C:\temp 2363
The CLI interface also provides a method for extracting the result package by using the CLI unzip command (described in [unzip]).
3.9. unzip
The unzip command can be used to unzip ZIP files containing Project results. The general syntax for extracting ZIP files is shown below:
%techila% unzip dir=<destination> file=<file to be unzipped>
For example, the following syntax would unzip the file called project2363 and place the Job result files to the C:\temp\ directory.
%techila% unzip dir=C:\temp file=C:\temp\project2363
3.10. download+unzip
The download+unzip command can be used to download results of previously completed Projects and to automatically extract the ZIP file after it has been downloaded. The general syntax for using the download+unzip command is shown below:
%techila% download+unzip dir=<destination> <Project ID number>
For example, the syntax shown below would download the results for Project 2363 and extract the ZIP file to the C:\temp\ directory.
%techila% download+unzip dir=C:\temp 2363
3.11. peach
The peach CLI command provides an easy-to-use syntax for creating computational Projects in the Techila environment. For a general description on the parameters of the peach command, please refer to CLI peach-command. Walkthroughs of examples on how to implement different features available in peach can be found in Tutorial Examples and Feature Examples.
3.12. createBundle
The createBundle command is used to create Bundles, which are used to transfer computational data in the Techila system. This command can be useful for example in situations where you wish to use a large, static dataset in several computational Projects. Examples on the usage of the createBundle command can be found in Creating and Importing a Named Data Bundle Example 1 and Creating and Importing a Named Data Bundle Example 2. More information on the general parameters for the createBundle command can be found in the Bundle Guide.
4. CLI peach-command
The CLI peach command provides a simple interface for executing Projects in the Techila environment. Peach will automatically transfer specified files (e.g. executables specified with the command parameter) to participating Workers and download results after the computational Jobs are completed. Additional data files can be transferred to Workers by defining the names of the files as the last parameters in the peach command.
This Chapter contains a description on the parameters of the peach command. Each subchapter will describe one parameter. Please note that the small code snippets presented in this Chapter are only intended to highlight different parameters and thus cannot be executed directly on the CLI. For executable code samples, with all the required parameters, please see Tutorial Examples and Feature Examples.
Note that the CLI peach command will automatically execute the init and unload CLI commands. This means calling these functions separately is not required, but can be beneficial in cases where multiple CLI commands will be executed using the read command or using Windows batch files or Linux shell scripts.
4.1. command
The command parameter specifies the program that will be executed on the Workers. For example, the following parameter specifies that the program called test.exe will be executed on all participating Workers
command="test.exe"
Platform specific programs can be defined with the osname parameter. Supported values for the osname parameter are:
-
Windows
-
Linux
For example, the following syntax specifies that each of the operating systems should execute a platform specific version of the program. Workers with a Windows operating system will execute a program called test.exe and Workers with a Linux operating system will execute a program called test.
command="test.exe;osname=Windows,test;osname=Linux"
4.2. outputfiles
The outputfiles parameter specifies the files that will be returned from the Workers to the End-User`s computer. For example, the following parameter specifies that a file called techila_result should be returned from the Workers.
outputfiles="output;file=techila_result"
Several output files can be returned from the Worker by defining the name of each output file in the outputfiles parameter. When several output files are specified, the output files will be compressed in to a ZIP file, which will be returned from the Workers.
For example, the following parameter specifies that the files result and result_2 will be returned.
outputfiles="output;file=result,output2;file=result_2"
The standard output stream generated during a computational Job can be stored in an output file and transferred back to the End-User`s computer with the following parameter:
outputfiles="stdout;stdout=true"
Respectively, the standard error stream can be captured and transferred back to the End-User`s computer with the following parameter.
outputfiles="stderr;stderr=true"
After the result files have been transferred to your computer, each result file will be given a name containing the Project ID number and the Job ID. For example, if the Project ID number is 13210 and the Project contains five (5) Jobs, the names of the result files would match the ones shown below.
-
output_13210_1
-
output_13210_2
-
output_13210_3
-
output_13210_4
-
output_13210_5
File output_13210_1 contains results generated in Job #1, file output_13210_2 contains results generated in Job #2 and so on.
4.3. peachvector
The peachvector parameter can be used to define the number of Jobs in the Project. More specifically, the number of Jobs will be determined by the number of elements in the peachvector. For example, the following syntax defines that the Project should be split into five Jobs.
peachvector="1 2 3 4 5"
In the example above, the elements of the peachvector would be 1, 2, 3, 4 and 5. These peachvector elements can be given as input arguments to the executable program with the %P(peachparam) notation.
Another example of a peachvector containing non-numerical values is shown below.
peachvector="filename1 filename2"
The peachvector shown above would create a Project consisting of two (2) Jobs. The elements of the peachvector would be respectively filename1 and filename2.
By default, elements are separated by spaces ( ), but also commas (,) and other separators can be used. More information on non-default separators can be found in [separator].
Setting peachvector="<stdin>" will set the peachvector according to the stdin stream. For example, when using the Windows Command Prompt, the syntax shown below would create a peachvector having an equal number of elements as there are files beginning with data_ in the current working directory. Each element of the peachvector would contain one filename in the order in which they are displayed by the dir command.
dir / b data_* | %techila% peach <other parameters> peachvector="<stdin>"
Note! The "<stdin>" notation cannot be used when using the read command.
4.4. parameters
Parameters defined in parameters are used as input arguments by the executable program. Parameters can be either defined directly or the values of the parameters can be referred to with the %P() notation.
For example, the syntax shown below defines that the executable program should use the values 13 and 42 as input arguments.
parameters="13 42"
The same input parameters could also be defined by using %P() notation and by defining the values of the parameters in projectparameters as shown below:
parameters="%P(param1) %P(param2)" projectparameters="param1=13, param2=42"
Elements of the peachvector can be used as input arguments with the %P(peachparam)notation. For example, the following syntax would define two input arguments to the executable program; an element of the peachvector and the value 13.
parameters="%P(peachparam) %P(param1)" projectparameters="param1=13" peachvector="2 4 6 8"
The jobidx is a special parameter, which is automatically generated on the Techila Server. The value of the jobidx parameter is different for each job and will contain all values from one (1) to the total number of Jobs. The jobidx parameter can be defined as an input argument with the %P(jobidx) notation.
For example, the following syntax would define three input arguments to the executable program; the value of the jobidx parameter, an element of the peachvector and the value 13.
parameters="%P(jobidx) %P(peachparam) %P(param1)" projectparameters="param1=13" peachvector="2 4 6 8"
Output files can be referred to with the %O() notation. For example, the syntax shown below would define the name of the output file as the fourth input argument that will be given to the executable program.
parameters="%P(jobidx) %P(peachparam) %(param1) %O(output)" projectparameters="param1=13" outputfiles="output;file=techila_result" peachvector="2 4 6 8"
The table below illustrates what input arguments would be received by the executable program, if a Project was created by using the syntax shown above. Each row in the table contains the input arguments given to the executable program in a one Job.
| Job | %P(jobidx) | %P(peachparam) | %P(param1) | %O(output) |
|---|---|---|---|---|
#1 |
1 |
2 |
13 |
techila_result |
#2 |
2 |
4 |
13 |
techila_result |
#3 |
3 |
6 |
13 |
techila_result |
#4 |
4 |
8 |
13 |
techila_result |
4.5. jobs
The jobs parameter can be used as an alternative method for defining the number of Jobs in the Project. When the jobs parameter is used, you do not need to specify the peachvector. For example, the following syntax could be used to create a Project with 100 jobs.
%techila% peach <other parameters> jobs=100
4.6. streaming
The streaming parameter can be used to enable or disable streaming in a computational Project. Streaming enables individual results to be transferred as soon as they become available. Please note that the result files will be transferred in the order in which they are completed on the Workers. This is different from the default implementation, where all the results will be transferred in a single package after all of the Jobs have been completed.
By default, streaming is enabled in all Projects created with the CLI Peach.
Streaming can be disabled by setting the value to "false". For example, the following syntax could be used to disable streaming in a Project:
%techila% peach <other parameters> streaming="false"
4.7. priority
The priority parameter can be used to specify the priority of a Project. Priority values can be used to affect the order in which Projects belonging to you will be computed. For example, if you create a Project with a priority value of highest and a Project with the normal priority value, Jobs belonging to the Project with the highest priority value will be assigned to Workers before processing any Jobs belonging to the other Project.
Please note that Jobs belonging to a Project with the lowest priority will be removed from a Worker if a Project created by another user with priority 4 (or better) is waiting for computational resources on Worker to become available.
Available values for the priority parameter are shown in the table below:
| Available values | |
|---|---|
1 |
highest |
2 |
high |
3 |
above_normal |
4 (default) |
normal (default) |
5 |
below_normal |
6 |
low |
7 |
lowest |
For example, the following syntax would set the priority as below normal.
%techila% peach <other parameters> priority=5
4.8. description
The description parameter can be used to give a description for the Project. This description will be visible in the Techila Web Interface when viewing your projects. For example, the following syntax would set the Project description as "Example Project".
%techila% peach <other parameters> description="Example Project"
4.9. projectid
The projectid parameter can be used to download results of a previously completed Project. When the projectid parameter is used, no other peach parameters need to be defined. For example, the syntax shown below defines that the results of a Project with Project ID 1234 would be downloaded.
%techila% peach projectid=1234
By default, the results will be downloaded to an output directory, which will be automatically created in the current working directory. If you want to store the downloaded results to a specific directory, you can use the destination parameter. For example, the following syntax would store results for Project 1234 in to directory C:\temp.
%techila% peach projectid=1234 destination=C:\temp
4.10. jobinputfiles
The jobinputfiles parameter can be used to store files to a Job Input Bundle. Files stored in the Job Input Bundle can be retrieved directly from the Techila Server, without transferring the entire Bundle to the Worker. This can be used to reduce network bandwidth consumption in situations where you only need access to specific files in a data set on any given Worker. When using the jobinputfiles parameter, the number of Jobs will be, by default, set to match the number of Job-specific input file. This means you do not need to use jobs or peachvector parameters.
For example, the following syntax places the files data_1, data_2 and data_3 in a Job Input Bundle.
%techila% peach <other parameters> jobinputfiles="data_1 data_2 data_3"
When using the syntax shown above, each Job-specific input file will be renamed to jobinputfile1 on the Worker. If you wish to specify a different name for the file, use the jobinputfilenames parameter described in [jobinputfilenames].
Files from a directory can be given by piping the filenames to the command and using jobinputfiles="<stdin>". For example, the following syntax would place all files in the current working directory that have names beginning with data_ to the Job Input Bundle.
dir /b data_* | %techila% peach <other parameters> jobinputfiles="<stdin>"
Note! The "<stdin>" notation cannot be used when using the read command.
4.11. jobinputfilenames
The jobinputfilenames parameter can be used to specify the filenames of the Job-specific input files after they have been transferred to the Workers. For example, the following syntax defines that the each of the listed Job-specific input files should be renamed to file1 on the Workers.
%techila% peach <other parameters> jobinputfiles="data_1 data_2 data_3 data_4" jobinputfilenames="file1"
Multiple Job-specific input files can be assigned with each Job by defining additional entries. For example, the following syntax would assign two (2) files for each Job in the Project.
%techila% peach <other parameters> jobinputfiles="data_1 data_2 data_3 data_4" jobinputfilenames="file1 file2"
The files data_1 and data_3 would be assigned with Job #1 and files data_2 and data_4 with Job #2.
Below is another example on the distribution of job input files:
%techila% peach <other parameters> jobinputfiles="data1 data2 data3 data4 data5 data6" jobinputfilenames="file1 file2"
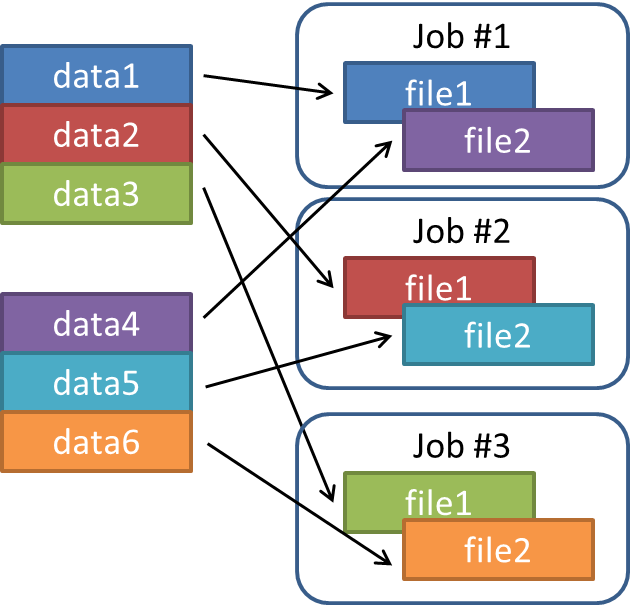
data1) and the first file from batch 2 (data4) are sent to Job #1. Job #2 receives the second files (data2 and data5). Job #3 receives files data3 and data6.Please note that when assigning more than one file per Job, the number of files in the Job Input Bundle must be dividable by the number of entries in the jobinputfilenames parameter. For example, the following parameter combination is not valid because the number of files in the Bundle (three) is not dividable with the number of files (two) assigned with each Job.
jobinputfiles="data_1 data_2 data_3" jobinputfilenames="file1 file2"
4.12. environment
The environment parameter can be used to set an environment variable on the Worker. For example, the following syntax could be used to add the directory /opt/example/directory to the PATH environment of Linux Workers.
environment="PATH;value=%E(PATH):/opt/example/directory"
Respectively, the PATH environment variable of Windows Workers could be modified to contain C:\example\directory with the following parameter:
environment="PATH;value=%E(PATH)\;C:\\example\\directory"
Please note that in the example above, backslashes are used to escape the semicolon (;) and backslashes in the path definition.
4.13. separator
The separator parameter defines the character that is used to separate elements defined in the following parameters:
-
peachvector -
jobinputfiles -
jobinputfilenames
By default, elements are separated by spaces ( ). For example, when using the default separator ( ), a peachvector containing five elements could be created with the following syntax.
peachvector="1 2 3 4 5"
When the elements are separated with a non-default separator, the character used to separate the elements needs to be defined. For example, the syntax shown below defines that the comma (,) character should be used to separate the peachvector elements.
peachvector="1,2,3,4,5" separator=","
4.14. platform
The platform parameter can be used to define a list of operating system platforms. A Worker must be using one of the operating systems on the list in order to accept computational Jobs. When the platforms parameter is not defined, Workers of all platforms are able to accept Jobs.
For example, the following syntax would only allow Workers with either a Windows or a Linux operating system to receive Jobs.
platform="Windows;Linux"
4.15. projectparameters
The projectparameters parameter can be used to:
-
Specify the values of input arguments given to the executable program. As mentioned in [parameters], the values of all input arguments that are referred to with the %P() notation must be defined in the
projectparameters -
Specify general control parameters that control the how Jobs in the Project will be distributed General control parameters can be defined as list of parameter-value pairs. For example, the following syntax would define that only Workers with a minimum of two gigabytes of memory can be assigned Jobs in the Project.
projectparameters="techila_worker_memorymin=2147483648"
Several input argument values and/or control parameters can be defined by simply separating the parameter-value pairs with a comma (,). For example, the value of one input argument and a two gigabyte memory requirement could be defined with the syntax shown below.
projectparameters="param1=13,techila_worker_memorymin=2147483648"
4.16. bundleparameters
The bundleparameters parameter is used to define parameter for the Parameter Bundle.
4.17. messages
The messages parameter can be used to enable or disable all messages that will be displayed during various stages of the Project. By default, messages are enabled. Messages can be disabled with the following syntax.
messages=false
Note that disabling messages will also disable statistical messages.
4.18. statistics
The statistics parameter can be used to enable or disable statistical messages that contain statistical information on the Project. By default, statistical messages will be displayed. Statistics can be disabled with the following syntax.
statistics=false
4.19. destination
The destination parameter determines where the output files will be stored on the End-User`s computer. For example, the following syntax will direct the output files of a Project to a folder called project_output in the current working directory.
destination="project_output/"
4.20. binarybundleparameters
The binarybundleparameter can be used to specify parameters for the binary bundle. These parameters can be used for example to define the name of the snapshot file and snapshot transfer interval. More information on using binarybundleparameters can be found in Snapshots
4.21. imports
The imports parameter can be used to specify additional Bundles that will be transferred to each participating Worker. The imports parameter can be used for example to import previously created Data Bundles, which enables data files stored in the Bundles to be accessed during computational Jobs.
For example, the following parameter would define that a Bundle that is exporting "example.bundle.v1" should be transferred to each Worker that is participating in the computational Project.
imports="example.bundle.v1"
Several Bundles can be imported by separating the values with commas. For example, the syntax shown below defines that Bundles exporting example.bundle.v1 and example.bundle2.v1 will be transferred to each participating Worker.
imports="example.bundle.v1,example.bundle2.v1"
4.22. copy
The copy parameter can be used to stop data files from being copied to the temporary working directory. To disable file copying, use the syntax shown below:
copy=false
When file copying is disabled, the %L(<filename>) notation can be used to retrieve the path of the file on the Worker, where the <filename> notation should be replaced with the name of the file you wish to retrieve the path for. For example, the syntax shown below would define one input argument to the executable program, which would be replaced with the path of the file datafile1 on the Worker:
peach <other parameters> parameters=%L(datafile1) copy=false datafile1
4.23. name
The name parameter specifies the prefix for the .state file that is created on the End-User`s computer when a computational Project is created. This state file is used to store Bundle related metadata. If no changes are made to the files, the metadata stored in the Bundle will allow using the Bundles that were created and uploaded during the previous Project.
For example, the syntax shown below could be used to create a state file called test.state.
name="test"
4.24. remoteexecutable
The remoteexecutable parameter specifies that the command specified in the command refers to a command that executes a piece of preinstalled software on the Worker. For example, the syntax shown below would execute the /bin/ls command, which lists the files in the temporary working directory on the Worker.
command="/bin/ls;osname=Linux" remoteexecutable="true"
Input arguments can be given to the executable program by defining them in the parameters parameter. For example, the syntax shown below would execute the command /bin/ls -la on the Workers.
command="/bin/ls;osname=Linux" parameters="-la" remoteexecutable="true"
The remoteexecutable parameter can also be used to execute preinstalled programs on Workers with a Windows based operating system. For example, the syntax shown below could be used to execute the dir command by using the Windows cmd.exe:
command="C:\\Windows\\system32\\cmd.exe" remoteexecutable="true" parameters="/c dir"
The /c switch acts as a parameter for the cmd.exe and specifies that the CMD shell should be terminated after the dir command has been executed.
4.25. Additional data files and/or directories
Additional data files required on Workers can be transferred by specifying the names of the files as the last input argument to the peach command. For example, the following syntax would transfer files called file1 and file2 from the current working directory to Workers.
%techila% peach <other parameters> file1 file2
Files from different directories can be transferred by specifying the path of the file. For example, the following syntax would transfer the file test.txt from the directory C:\temp\ in addition to the two files from the current working directory.
%techila% peach <other parameters> file1 file2 C:\temp\test.txt
You can also use a wildcard (*) to include several files or directories. For example, the following syntax would transfer all files (or directories) that start with the word test from the C:\temp\ directory.
%techila% peach <other parameters> C:\temp\test*
Please note that when specifying names of directories as the last input arguments, all files from the directory (and sub-directories) will be transferred to Workers. All files will be copied to the same temporary working directory.
5. Tutorial Examples
This chapter contains minimalistic examples on how to implement and control the core features of the peach CLI command. The example material discussed in this Chapter, including batch files, shell scripts and data files can be found in the sub-folders under the following folder in the Techila SDK:
-
techila\examples\CLI\Tutorial
Each of the examples discussed in this Chapter involves three pieces of code:
-
A file called
commandsthat contains the CLI commands and parameters used for creating the computational Project. The CLI commands in thecommandsfile will be given to the CLI interface by using the CLIreadcommand. -
A batch file (
test.bat) containing Worker Code that will be distributed and executed on Workers that have a Windows based operating system. -
A script file (
test.sh) containing Worker Code that will be distributed and executed on Workers that have a Linux based operating system.
5.1. Executing a Simple Script on Workers
This example is intended to be the first application you distribute to the Techila environment by using the CLI interface. The material discussed in this Chapter can be found in the following folder in the Techila SDK:
-
techila\examples\CLI\Tutorial\1_distribution
5.1.1. Local Control Code
The Local Control Code is stored in file called commands, and contains all necessary commands and parameters required to distribute applications to the Techila environment when given to the CLI interface with the read < commands syntax.
# Copyright 2011-2016 Techila Technologies Ltd.

# Create a Project using peach. The parameters are explained below:
# command: defines that 'test.sh' will be executed on Linux Workers and
#          'test.bat' on Windows Workers.
# platform:  defines that only Workers with a Linux or Windows can be assigned
#             Jobs
# outputfiles: defines that the file 'output_1' will be returned from the Worker
# peachvector: defines that the Project should be split into five Jobs.
#              Peachvector elements are 1,2,3,4 and 5.
#
# The result files will be placed in a directory called 'output', which
# is the default destination directory. Backslashes have been used to divide
# the peach command to multiple lines.

peach command="test.sh;osname=Linux,test.bat;osname=Windows" \
platform="Windows;Linux" \
outputfiles="output;file=output_1" \
peachvector="1 2 3 4 5"
The commands file contains the peach command, which creates a Project in the Techila environment according to the specified parameters. The peach parameters used in this example are explained below:
command="test.sh;osname=Linux,test.bat;osname=Windows"
The command parameter determines which program is executed on the Workers. In this example, a script file called test.sh will be executed on Linux Workers and a batch script called test.bat will be executed on Windows Workers.
platform="Windows;Linux"
The platform parameter is used to define the operating systems of the Workers that can participate in the Project. In this example, only Workers with a Windows or a Linux operating system can be assigned Jobs.
outputfiles="output;file=output_1"
The outputfiles parameter specifies which files should be transferred back from the Workers. In this example, a file called output_1 will be transferred back to the End-User`s computer from each participating Worker. This file will be generated when the test.sh and test.bat scripts are executed on the Workers. This will be explained in more detail later on in the Chapter under the Worker Code heading.
peachvector="1 2 3 4 5"
The number of elements in the peachvector parameter specifies the number of Jobs in the Project. In this example, the peachvector contains five elements (numbers 1, 2, 3, 4 and 5) meaning the Project will be split into five (5) Jobs. Elements of the peachvector can also be used as input parameters for the executable program. This will be illustrated in Using Input Parameters.
5.1.2. Worker Code
The Worker Code used in this example is stored in two separate files called test.bat and test.sh. These files will be distributed and executed on the Workers when the computational Project is created. The content of the test.bat file is shown below.
@ECHO OFF
REM Copyright 2011-2013 Techila Technologies Ltd.
REM Set the value of variables 'a' and 'b'
set a=1
set b=2
REM Calculate the sum of variables 'a' and 'b'
set /A sum=%a%+%b%
REM Store the result into the 'output_1' file
echo %sum% > output_1
The content of the test.sh file is shown below.
#!/bin/sh
# Copyright 2011-2013 Techila Technologies Ltd.
# Set the value of variables 'a' and 'b'
a=1
b=2
# Calculate the sum of variables 'a' and 'b'
sum=$(($a+$b))
# Store the result into the 'output_1' file
echo $sum > output_1
Both scripts will perform the same arithmetic operations when executed and will calculate the sum of variables a and b. The values of these variables are set to 1 and 2 respectively, meaning arithmetic operation will simply be 1+2. This value will be stored in the sum variable and the value will also be stored in a file called output_1. This file was defined as the output file in the Local Control Code, meaning the file will be transferred back to the End-User`s computer.
5.1.3. Creating the Computational Project
Before running this example, please ensure that you have defined the environment variable applicable for your system and that the environment variable is available from your command line interface:
-
%techila% (if you have a Windows based operating system)
-
$techila (if you have a Linux based operating system)
Change your current working directory using your command line interface to the directory that contains the example material relevant to this example.
If you have a Windows based operating system, create the computational Project with the following command
%techila% read < commands
If you have a Linux based operating system, create the computational Project with the following command
$techila read < commands
The computational Project will contain five Jobs. When a computational Job has been completed, the generated output file will be automatically streamed to the End-User`s computer and stored in a folder called output, which will be automatically created. The naming convention of the result files is output_<Project ID>_<Job ID>. The contents of the result files can be viewed for example by navigating to the output directory and by opening the result file with a text editor.
5.2. Using Input Parameters
This example will demonstrate how to give input arguments for the executable program. The material discussed in this Chapter can be found in the following folder in the Techila SDK:
-
techila\examples\CLI\Tutorial\2_parameters
5.2.1. Local Control Code
The Local Control Code is stored in the file called commands, and contains all necessary commands and parameters required to distribute applications to the Techila environment when given to the CLI interface with the read < commands syntax. The contents of the commands file is shown below.
# Copyright 2011-2016 Techila Technologies Ltd.

# Create a Project using peach. The parameters are explained below:
# command: defines that 'test.sh' will be executed on Linux Workers and
#          'test.bat' on Windows Workers.
# platform:  defines that only Workers with a Linux or Windows can be assigned
#             Jobs
# parameters: defines that first input argument is the value of multip variable
#            (2) and second input argument will be replaced by a peachvector
#             element (2 for Job #1, 4 for for Job #2 etc)
# projectparameters: sets the value of the 'multip' variable to 2
# outputfiles: defines that the file 'output_1' will be returned from the Worker
# peachvector: defines that the Project should be split into five Jobs.
#              Peachvector elements are 2,4,6,8 and 10.
#
# The result files will be placed in a directory called 'output', which
# is the default destination directory. Backslashes have been used to divide
# the peach command to multiple lines.

peach command="test.sh;osname=Linux,test.bat;osname=Windows" \
platform="Windows;Linux" \
parameters="%P(multip) %P(peachparam)" \
projectparameters="multip=2" \
outputfiles="output;file=output_1" \
peachvector="2 4 6 8 10"
The commands file contains the peach command, which creates a Project in the Techila environment according to the specified parameters. The peach parameters used in this example are explained below.
command="test.sh;osname=Linux,test.bat;osname=Windows"
The command parameter determines which program is executed on the Workers. In this example, a script file called test.sh will be executed on Linux Workers and a batch script called test.bat will be executed on Windows Workers.
parameters="%P(multip) %P(peachparam)"
The parameters parameter determines the input arguments of the executable program. In this example, two parameters have been defined and referenced with the %P() notation. %P(multip) will be same for each Job and the value of the parameter will be set 2, as defined in the projectparameters. %P(peachparam) will be replaced with an element of the peachvector and each Job in the Project will receive a different element.
projectparameters="multip=2"
The projectparameters parameter is used to define any additional Project parameters. In this example, the value of the multip variable is set to 2. This means that the %P(multip) notation defined in parameters will be replaced with the value 2.
outputfiles="output;file=output_1"
The outputfiles parameter specifies which output files should be transferred back from the Workers. In this example, an output file called output_1 will be transferred back to the End-User`s computer from each participating Worker.
peachvector="2 4 6 8 10"
The number of elements in the peachvector parameter specifies the number of Jobs in the Project. Elements of the peachvector will also be used as input parameter, because the %P(peachparam) notation was defined in the parameters parameter. Each Job will receive a different element of the peachvector. In this example, Job #1 will receive the first element (2), Job #2 will receive the second element (4) and so on.
5.2.2. Worker Code
The Worker Code used in this example is stored in two separate files called test.bat and test.sh. These files will be distributed and executed on the Workers when the computational Project is created. The content of the test.bat file is shown below.
@ECHO OFF
REM Copyright 2011-2013 Techila Technologies Ltd.
REM Set the values of variables 'a' and 'b' based on the values defined
REM in the 'parameters' in the Local Control Code.
set a=%1%
set b=%2%
REM Multiply the variables 'a' and 'b'
set /A result=%a%*%b%
REM Store the result in to the result file called 'output_1'
echo %result% > output_1
The content of the test.sh file is shown below.
#!/bin/sh
# Copyright 2011-2013 Techila Technologies Ltd.
# Set the values of variables 'a' and 'b' based on the values defined
# in the 'parameters' in the Local Control Code.
a=$1
b=$2
# Multiply the variables 'a' and 'b'
result=$(($a*$b))
# Store the result in to the result file called 'output_1'
echo $result > output_1
Both files will perform the same arithmetic operations when executed and will multiply two variables; a and b store the result of the multiplication in to the result file called output_1. The values of these variables will be read from the input arguments that were defined in the parameters parameter in the Local Control Code. The value of variable a will be the first input argument and corresponds to the value of the %P(multip) notation. The value of variable b will be set according to the second input argument and corresponds to the value of %P(peachparam) notation.
5.2.3. Creating the Computational Project
Before running this example, please ensure that you have defined the environment variable applicable for your system and that the environment variable is available from your command line interface:
-
%techila% (if you have a Windows based operating system)
-
$techila (if you have a Linux based operating system)
Change your current working directory using your command line interface to the directory that contains the example material relevant to this example.
If you have a Windows based operating system, create the Project with the following command
%techila% read < commands
If you have a Linux based operating system, create the Project with the following command
$techila read < commands
Executing the command will create a computational Project consisting of five (5) Jobs. Each Job will multiply the two input arguments and return the multiplication result in a result file. These result files will be stored in the output directory. The content of these files can be viewed with a text editor.
5.3. Transferring Data Files
Additional data files can be transferred to all participating workers by defining the names of the files as the last input argument to the peach command. This example illustrates how to transfer two additional data files to Workers participating in a computational Project. The material discussed in this Chapter can be found in the following folder in the Techila SDK:
-
techila\examples\CLI\Tutorial\3_datafiles
5.3.1. Local Control Code
The Local Control Code is stored in the file called commands, and contains all necessary commands and parameters required to distribute applications to the Techila environment when given to the CLI interface with the read < commands syntax. The contents of the commands file is shown below.
# Copyright 2011-2016 Techila Technologies Ltd.

# Create a Project using peach. The parameters are explained below:
# command: defines that 'test.sh' will be executed on Linux Workers and
#          'test.bat' on Windows Workers.
# parameters: defines that first input argument is an element of the
#             peachvector element ('5' for Job #1, 'John' for for Job #2)
# platform:  defines that only Workers with a Linux or Windows can be assigned
#             Jobs
# outputfiles: defines that the file 'output_1' will be returned from the Worker
# peachvector: defines that the Project should be split into two Jobs.
#              elements are '5' and 'John'
# separator: defines that the peachvector elements are comma (,) separated
#
# The files 'datafile1' and 'datafile2' will be transferred to each Worker.
# The result files will be placed in a directory called 'output', which
# is the default destination directory. Backslashes have been used to divide
# the peach command to multiple lines.

peach command="test.sh;osname=Linux,test.bat;osname=Windows" \
parameters="%P(peachparam)" \
platform="Windows;Linux" \
outputfiles="output;file=output_1" \
peachvector="5,John" \
separator="," \
datafile1 datafile2
The commands file the peach command, which will create the Project according to the specified parameters. The peach parameters used in this example are explained below.
command="test.sh;osname=Linux,test.bat;osname=Windows"
The command parameter determines which program is executed on the Workers. In this example, a script file called test.sh will be executed on Linux Workers and a batch script called test.bat will be executed on Windows Workers.
parameters="%P(peachparam)"
The parameters parameter determines the input arguments of the executable program. In this example, one input parameter has been defined and referenced to with the %P(peachparam) notation. %P(peachparam) will be replaced with an element of the peachvector and each Job in the Project will receive a different element.
platform="Windows;Linux"
The platform parameter defines the operating system platforms of the Workers that can be assigned Jobs. In this example, only Windows and Linux based Workers can be assigned Jobs.
outputfiles="output;file=output_1"
The outputfiles parameter specifies which output files should be transferred back from the Workers. In this example, an output file called output_1 will be transferred back to the End-User`s computer from each participating Worker.
peachvector="5,John"
The peachvector parameter specifies the number of Jobs in the Project. Elements of the peachvector will also be used as input parameter, because the %P(peachparam) notation was defined in parameters. Each Job will receive a different element of the peachvector. In this example, Job #1 will receive the first element (5), Job #2 will receive the second element (John).
separator=","
The separator parameter defines how peachvector elements are separated. In this example, a comma (,) is used to separate the two peachvector elements; 5 and John.
The last input arguments to the peach command contain the values datafile1 and datafile2. These are names of two files that are located in the same directory with the Local Control Code. These files will be automatically transferred to each participating Worker. After the files have been transferred to Workers, they will be copied to the same temporary working directory with the Worker Code.
5.3.2. Worker Code
The Worker Code used in this example is stored in two separate files called test.bat and test.sh. These files will be distributed and executed on the Workers when the computational Project is created.
The content of the test.bat file is shown below.
@ECHO OFF
REM Copyright 2011-2013 Techila Technologies Ltd.
REM Store the input argument in to variable 'a'. The input argument will be
REM an element of the peachvector.
set a=%1%
REM Append the value of variable 'a' to both data files
echo %a% >> datafile1
echo %a% >> datafile2
REM Store a list of files in the temporary directory to the result file
echo The current working directory contains the following files: >> output_1
echo -------------- >> output_1
dir /b >> output_1
echo -------------- >> output_1
REM Store the contents of 'datafile1' to the result file 'output_1'
echo The content of the modified 'datafile1' is: >> output_1
echo -------------- >> output_1
type datafile1 >> output_1
echo -------------- >> output_1
REM Store the contents of 'datafile2' to the result file 'output_1'
echo The content of the modified 'datafile2' is:  >> output_1
echo -------------- >> output_1
type datafile2 >> output_1
echo -------------- >> output_1
The content of the test.sh file is shown below.
#!/bin/sh
# Copyright 2011-2013 Techila Technologies Ltd.
# Store the input argument in to variable 'a'. The input argument will be
# an element of the peachvector as defined in the Local Control Code.
a=$1
# Append the value of variable 'a' to both data files
echo $a >> datafile1
echo $a >> datafile2
# Store a list of files in the temporary directory to the result file
echo The current working directory contains the following files: >> output_1
echo -------------- >> output_1
ls >> output_1
echo -------------- >> output_1
# Store the contents of 'datafile1' to the result file 'output_1'
echo The content of the modified 'datafile1' is: >> output_1
echo -------------- >> output_1
cat datafile1 >> output_1
echo -------------- >> output_1
# Store the contents of 'datafile2' to the result file 'output_1'
echo The content of the modified 'datafile2' is:  >> output_1
echo -------------- >> output_1
cat datafile2 >> output_1
echo -------------- >> output_1
In this example, file manipulation operations are used to illustrate how transferred data files can be accessed and manipulated. Each script will perform similar operations, modifying the contents of the two data files, which are transferred to the Workers and copied to the same temporary working directory as the executable programs.
The value of the input variable will be replaced by a different peachvector element for each Job. This element will be appended to each file after which the content of the modified files will be stored in the output_1 file. The output_1 file will also contain a list of files in the current working directory on the Worker. This file will be returned from the Worker as it was defined as an output file in the Local Control Code.
5.3.3. Creating the Computational Project
Before running this example, please ensure that you have defined the environment variable applicable for your system and that the environment variable is available from your command line interface:
-
%techila% (if you have a Windows based operating system)
-
$techila (if you have a Linux based operating system)
Change your current working directory using your command line interface to the directory that contains the example material relevant to this example.
If you have a Windows based operating system, create the computational project with the following command
%techila% read < commands
If you have a Linux based operating system, create the computational project with the following command
$techila read < commands
Executing the command will create a Project consisting of two (2) Jobs. Each Job will perform simple file manipulation operations on the data files and return the content of the modified files in a result file. The result files will also contain a list of the files in the temporary working directory on the Worker. The result files will be stored in the output directory. The contents of the result files can be viewed for example by navigating to the output directory and by opening the result file with a text editor.
6. Feature Examples
This Chapter contains examples that demonstrate how to implement features available from the CLI.
6.1. Multiple Output Files
This example illustrates how to return multiple output files from Workers. The material discussed in this Chapter can be found in the following folder in the Techila SDK:
-
techila\examples\CLI\Features\multiple_outputs
6.1.1. Local Control Code
The Local Control Code is stored in file called commands, and contains all necessary commands and parameters required to distribute applications to the Techila environment when given to the CLI interface with the read < commands syntax. The contents of the commands file is shown below.
# Copyright 2011-2016 Techila Technologies Ltd.

# Create a Project using peach. The parameters are explained below:
# command: defines that 'test.sh' will be executed on Linux Workers and
#          'test.bat' on Windows Workers.
# platform:   defines that only Workers with a Linux or Windows can be assigned
#             Jobs
# parameters: defines that first input argument is the value of multip variable
#            (2) and second input argument will be replaced by a peachvector
#             element (2 for Job #1, 4 for for Job #2 etc)
# projectparameters: sets the value of the 'multip' variable to '2'
# outputfiles: defines that the file 'output_1' and the stdout stream will be
#              returned from the the Worker
# peachvector: defines that the Project should be split into five Jobs.
#              Peachvector elements are 2,4,6,8 and 10.
#
# The result files will be placed in a directory called 'output', which
# is the default destination directory. Backslashes have been used to divide
# the peach command to multiple lines.

peach command="test.sh;osname=Linux,test.bat;osname=Windows" \
platform="Windows;Linux" \
parameters="%P(multip) %P(peachparam)" \
projectparameters="multip=2" \
outputfiles="output;file=output_1,stdout;stdout=true" \
peachvector="2 4 6 8 10"
The commands file contains the peach command, which creates a Project according to the specified parameters. The peach parameters used in this example are similar to those used in the examples in Tutorial Examples, with the exception of the outputfiles parameter, which is explained below.
outputfiles="output;file=output_1,stdout;stdout=true"
The outputfiles parameter shown above contains two entries, which are separated with a comma (,). The first entry (output;file=output_1) defines that a file called output_1 should be transferred back to the End-User`s computer. The second entry (stdout;stdout=true) defines that the stdout stream generated during the computational Job should also be stored in a file and returned from the Workers.
As the outputfiles parameter defined more than one output file, these files will be placed in a single ZIP-file, which will be transferred back to the End-User`s computer.
6.1.2. Worker Code
The Worker Code used in this example is stored in two separate files called test.bat and test.sh. These files will be distributed and executed on the Workers when the computational Project is created. The content of the test.bat file is shown below.
@ECHO OFF
REM Copyright 2011-2013 Techila Technologies Ltd.
REM Set the values of variables 'a' and 'b' based on the values defined
REM in the 'parameters' in the Local Control Code.
set a=%1%
set b=%2%
REM Multiply the variables 'a' and 'b'
set /A result=%a%*%b%
REM Store the result in to the result file called 'output_1', which will
REM be returned from the Worker
echo %result% > output_1
REM Echo the values of the variables. This stdout stream will be stored in
REM a file, which will also be returned from the Worker
echo %a% %b% %result%
The content of the test.sh file is shown below.
#!/bin/sh
# Copyright 2011-2013 Techila Technologies Ltd.
# Set the values of variables 'a' and 'b' based on the values defined
# in the 'parameters' in the Local Control Code.
a=$1
b=$2
# Multiply the variables 'a' and 'b'
result=$(($a*$b))
# Store the result in to the result file called 'output_1', which will
# be returned from the Worker
echo $result > output_1
# Echo the values of the variables. This stdout stream will be stored in
# a file, which will also be returned from the Worker
echo $a $b $result
Both scripts perform similar operations when executed. Each script will multiply the two input variables defined in the Local Control Code. The value of the multiplication will be stored in a file called output_1, which was specified as an output file in the Local Control Code, meaning it will be transferred back to the End-User`s computer.
The values of the variables a,` b` and result will also be echoed to the stdout stream. As the stdout stream was defined in the outputfiles parameter in the Local Control Code, the stream will be captured and stored in a file, which will also be transferred back to the End-User`s computer.
6.1.3. Creating the Computational Project
Before running this example, please ensure that you have defined the environment variable applicable for your system and that the environment variable is available from your command line interface:
-
%techila% (if you have a Windows based operating system)
-
$techila (if you have a Linux based operating system)
Change your current working directory using your command line interface to the directory that contains the example material relevant to this example.
If you have a Windows based operating system, create the computational project with the following command
%techila% read < commands
If you have a Linux based operating system, create the computational project with the following command
$techila read < commands
Executing the command will create a computational Project consisting of five (5) Jobs. Each Job will multiply two input arguments and store the multiplication result in a file. The values of the received input arguments and the multiplication result will also be echoed to the standard output stream. The file containing the result and a file containing the standard output stream will be stored in a ZIP file, which will be streamed back to the End-User`s computer. These ZIP files will be copied to the output directory.
6.2. Creating and Importing a Named Data Bundle Example 1
This example illustrates how to create a Bundle and import the Bundle to a computational Project. The files in the Bundle will be copied to the same temporary working directory with the executable programs when imported in to computational Project. For instructions on how to create a Bundle where the files will not be copied to the temporary working directory, please see Creating and Importing a Named Data Bundle Example 2.
The material discussed in this Chapter can be found in the following folder in the Techila SDK:
-
techila\examples\CLI\Features\create_and_import_a_bundle_ex1
6.2.1. Local Control Code
The Local Control Code is stored in file called commands, and contains all necessary commands and parameters required to distribute applications to the Techila environment. The contents of the commands file is shown below.
# Copyright 2011-2013 Techila Technologies Ltd.
# Create a session with the 'init' command.
init

# Create a Bundle using the 'createBundle' command. This Bundle will contain
# two files, which will be transferred to Worker that will participate in the
# Project. 'copy' is set to true, meaning the files in the Bundle will be
# copied to the same temporary directory as the executable program.

createBundle bundlename={user}.example.bundle.v3 \
exports={user}.example.bundle.v3 \
copy=true \
yes=true \
datafile1 datafile2

# Create a Project using peach. The parameters are explained below:
# command: defines that 'test.sh' will be executed on Linux Workers and
#          'test.bat' on Windows Workers.
# parameters: defines that first input argument is an element of the
#             peachvector element ('5' for Job #1, 'John' for for Job #2)
# platform:  defines that only Workers with a Linux or Windows can be assigned
#             Jobs
# imports: imports the bundle, which was created earlier with the 'createBundle'
#          command
# outputfiles: defines that the file 'output_1' will be returned from the Worker
# peachvector: defines that the Project should be split into two Jobs.
#              elements are '5' and 'John'
# separator: defines that the peachvector elements are comma (,) separated
#
# The files 'datafile1' and 'datafile2' will stored in the Data Bundle which
# will be transferred to the server. The files will transferred to each Worker
# by importing the previously created Bundle.
# The result files will be placed in a directory called 'output', which
# is the default destination directory. Backslashes have been used to divide
# the peach command to multiple lines.

peach command="test.sh;osname=Linux,test.bat;osname=Windows" \
parameters="%P(peachparam)" \
platform="Windows;Linux" \
imports={user}.example.bundle.v3 \
outputfiles="output;file=output_1" \
peachvector="5,John" \
separator=","

# Remove the session after the Project has been completed
unload
The commands file contains a createBundle command, which will create a Bundle that contains two data files. The parameters of the createBundle command are explained below:
bundlename={user}.example.bundle.v3
The bundlename parameter determines the name of the Bundle. In this example, the name contains the {user} notation, which will be replaced with the End-User`s Techila Account login (the name they use to login to the Techila Web Interface). For example, if the End-User’s Techila Account login is demouser, the bundlename parameter would be bundlename=demouser.example.bundle.v3.
exports={user}.example.bundle.v3
The exports parameter determines the Bundle exports, which will be used later to import the Bundle to the computational Project. In this example, the value of the exports parameter will be identical to that of the bundlename parameter.
copy=true
The copy parameter determines if the contents of the Bundle will be copied to the same temporary working directory as the executable program. In this example, the files will be copied to the temporary working directory when the Bundle is imported to a computational Project.
datafile1 datafile2
The last entries in the createBundle command determine which files and/or folders will be stored in the Bundle. In this example, two files (datafile1 and datafile2) from the current working directory will be stored in the Bundle.
The peach command will create the computational Project. The peach parameters used in this example are similar to those used in the examples in the Tutorial Examples, with the exception of the imports parameter, which is explained below.
imports={user}.example.bundle.v3
The imports parameter determines additional Bundles that will be imported into the computational Project. In this example the value of the imports parameter is identical to the value of the exports parameter used in the createBundle command. This means that the Bundle created with the createBundle command will be imported to the computational Project created by peach. The files stored in the Bundle will be copied to the same temporary working directory on the Worker with the executable programs (test.sh and test.bat)
6.2.2. Worker Code
The Worker Code used in this example is stored in two separate files called test.bat and test.sh. These files will be distributed and executed on the Workers when the computational Project is created. The content of the scripts is identical to the ones illustrated in Transferring Data Files.
Both scripts will perform simple file manipulation operations that will be used to modify the contents of the files that were extracted from the Bundle. As the Local Control Code defined the parameter copy=true, the files in the bundle will be copied to the same to the same temporary working directory with the scripts, meaning the files can be accessed without any path definitions.
6.2.3. Creating the Computational Project
Before running this example, please ensure that you have defined the environment variable applicable for your system and that the environment variable is available from your command line interface:
-
%techila% (if you have a Windows based operating system)
-
$techila (if you have a Linux based operating system)
Change your current working directory using your command line interface to the directory that contains the example material relevant to this example.
If you have a Windows based operating system, create the computational project with the following command
%techila% read < commands
If you have a Linux based operating system, create the computational project with the following command
$techila read < commands
Executing the command will create the Data Bundle and transfer the Bundle to the Techila Server. After the Bundle has been transferred, a Project will be created that consists of two Jobs. Each Job will import the Data Bundle and performs some simple file manipulation operations on the files in the Bundle. Please note that the Data Bundle will only be created the first time you execute command, after which Projects will automatically use the existing Data Bundle on the Techila Server. Re-creating the Bundle can be achieved by for example replacing the .v3 notation with a .v4 notation in the commands file.
6.3. Creating and Importing a Named Data Bundle Example 2
This example illustrates how to create a Bundle and import the Bundle to a computational Project. In many aspects, this example is similar to the one illustrated in Creating and Importing a Named Data Bundle Example 1. The differentiating factor is that the instructions illustrated in this Chapter can be used to create a Bundle, where the contents of the Bundle will NOT be copied to the same temporary working directory with the executable programs when imported in to a computational Project. This can be beneficial in cases where the data amounts are large, as it reduces the amount of free hard disk space required to process the computational Project.
For instructions on how to create a Bundle where the files will be copied to the temporary working directory with each Job, please refer to Local Control Code in a Shell Script (Linux)
The material discussed in this Chapter can be found in the following folder in the Techila SDK:
-
techila\examples\CLI\Features\create_and_import_a_bundle_ex2
6.3.1. Local Control Code
The Local Control Code is stored in file called commands, and contains all necessary commands and parameters required to distribute applications to the Techila environment. The contents of the commands file is shown below.
# Copyright 2011-2013 Techila Technologies Ltd.
# Create a session with the 'init' command.
init

# Create a Bundle using the 'createBundle' command. This Bundle will contain
# two files, which will be transferred to each Worker that will participate in
# the Project. The files in the Bundle will NOT be copied to the same temporary
# working directory as the executable program, because the 'copy' parameter
# is not defined. Instead, the 'resource' parameter will be used to retrieve
# the location of the files on the Worker.

createBundle bundlename={user}.example.libfile.bundle.v1 \
exports={user}.example.libfile.bundle.v1 \
resource=example.resource yes=true \
datafile1 datafile2

# Create a Project using peach. The parameters are explained below:
# command: defines that 'test.sh' will be executed on Linux Workers and
#          'test.bat' on Windows Workers.
# parameters: the first input argument will be replaced with the path
#             where the files in the data bundle are located on the Worker.
#             The second input argument will be replaced with a peachvector
#             element ('datafile1' for Job #1, 'datafile2' for for Job #2)
# platform:  defines that only Workers with a Linux or Windows can be assigned
#             Jobs
# imports: imports the bundle, which was created earlier with the 'createBundle'
#          command
# outputfiles: defines that the file 'output_1' will be returned from the Worker
# peachvector: defines that the Project should be split into two Jobs.
#              elements are the strings 'datafile1' and 'datafile2'
# separator: defines that the peachvector elements are comma (,) separated
#
# The files 'datafile1' and 'datafile2' will stored in the Data Bundle which
# will be transferred to the server. The files will transferred to each Worker
# by importing the previously created Bundle.
# The result files will be placed in a directory called 'output', which
# is the default destination directory. Backslashes have been used to divide
# the peach command to multiple lines.

peach command="test.sh;osname=Linux,test.bat;osname=Windows" \
parameters="%L(example.resource) %P(peachparam)" \
platform="Linux;Windows" \
imports={user}.example.libfile.bundle.v1 \
outputfiles="output;file=output_1" \
peachvector="datafile1,datafile2" \
separator=","

# Remove the session after the Project has been completed
unload
The commands file contains a createBundle command, which will create a Bundle that contains two data files. The createBundle parameters used in this example are similar to those used in Creating and Importing a Named Data Bundle Example 1, with the exception of the resource parameter, which is explained below.
resource=example.resource
The resource parameter defines the resource the Bundle is offering. This means that by referencing to the value of the resource parameter with the %L() notation, the notation can be used to return the location of the files in the Bundle.
The peach command is used to create a computational Project. Most of the peach parameters used are similar as the ones illustrated in the examples in Tutorial Examples. The most important parameters relevant to this example are explained below.
parameters="%L(example.resource) %P(peachparam)"
The parameters parameter defines two input parameters for the executable program. %L(example.resource) notation will be replaced with the path where the Bundle is located on the Worker. Note that the value enclosed in the parenthesis in the %L() notation is the same value that was defined as the resource parameter in the Bundle creation process.
The second input parameter is %P(peachparam), which will be replaced with a different element of the peachvector for each Job. In this example, the` %P(peachparam)` notation will be replaced with datafile1 for Job #1 and datafile2 for Job #2.
Note that the value of the imports parameter in the peach command is identical to the value of the exports parameter in the createBundle command. This means that the Bundle created with the createBundle command will be imported in the computational Project created with the peach command.
6.3.2. Worker Code
The Worker Code used in this example is stored in two separate files called test.bat and test.sh. These files will be distributed and executed on the Workers when the computational Project is created. The content of the test.bat file is shown below.
@ECHO OFF
REM Copyright 2011-2013 Techila Technologies Ltd.
REM Get the location of the files on the Worker by expanding the %L()
REM notation in the 'parameters' parameter in the 'commands' file.
set location=%1%
REM Set value of the 'filename' variable according to the peachvector
REM element for the Job
set filename=%2%
echo Location of the files in the Bundle on the worker is: >> output_1
REM Store the location of the files on the Worker to the 'output_1' file
echo %location% >> output_1
echo Files in the directory: >> output_1
REM Store a list of files in the directory to the 'output_1' file
dir /b %location% >> output_1
echo Content of file named "%filename%": >> output_1
REM Store the content of the file 'output_1' file. Job #1 will display
REM content of 'datafile1', Job #2 for 'datafile2'
type %location%\%filename% >> output_1
The content of the test.sh file is shown below.
#!/bin/sh
# Copyright 2011-2013 Techila Technologies Ltd.
# Get the location of the files on the Worker by expanding the %L()
# notation in the 'parameters' parameter in the 'commands' file.
location=$1
# Set value of the 'filename' variable according to the peachvector
# element for the Job
filename=$2
echo Location of the files in the Bundle on the worker is: >> output_1
# Store the location of the files on the Worker to the 'output_1' file
echo $location >> output_1
echo Files in the directory: >> output_1
# Store a list of files in the directory to the 'output_1' file
ls $location >> output_1
echo Content of file named "$filename": >> output_1
# Store the content of the file 'output_1' file. Job #1 will display
# content of 'datafile1', Job #2 for 'datafile2'
cat $location/$filename >> output_1
Both scripts will perform similar activities. The scripts will store the location where the files are located on the Worker. This is performed by echoing the value of the first input argument, which was defined to be %L(example.resource) in the Local Control Code. This %L(example.resource) notation will be automatically expanded on the Worker and will contain the location of the file on the Worker. The scripts will also store a list of the files in the folder and the content of one file in that is stored in the Bundle.
6.3.3. Creating the Computational Project
Before running this example, please ensure that you have defined the environment variable applicable for your system and that the environment variable is available from your command line interface:
-
%techila% (if you have a Windows based operating system)
-
$techila (if you have a Linux based operating system)
Change your current working directory using your command line interface to the directory that contains the example material relevant to this example.
If you have a Windows based operating system, create the computational project with the following command
%techila% read < commands
If you have a Linux based operating system, create the computational project with the following command
$techila read < commands
6.4. Local Control Code in a Shell Script (Linux)
A Shell Script is a series of commands written in plain text file which can be executed in a Linux environment. This means that shell scripts can be used for initializing parameters, reading input arguments from the command line and for executing a sequence of commands that will create a computational Project with the given parameters.
The executable program contains an algorithm, which approximates the value of Pi based on the Monte Carlo Method. The binary is provided for two platforms: 64-bit Windows and Linux. The name of the binary is mcpi.exe for Windows and mcpi for Linux. The binaries take three input arguments; two of these will be used to control the Monte Carlo routine and the third will specify the name of the output file. The generic syntax is:
mcpi jobidx loops output
The input arguments are:
-
jobidx. Initializes the random number generator seed
-
loops. Determines the number of iterations
-
output. Determines the name of the output file The binaries can also be executed locally. To execute the Windows binary locally on a computer having a Windows operating system, follow the steps listed below:
-
Open a Command Prompt
-
Change the working directory to the directory containing the mcpi binary
-
Execute the program using command:
mcpi 1 100000 techila_result
-
This executes the binary and performs 100,000 iterations of the Monte Carlo Pi routine. The results will be stored in a file called techila_result. The result file will store two values; the number of points that were located inside the unit circle and the number of iterations.
This example illustrates how to use a shell script for reading input parameters and creating a computational Project using the specified parameters.
The material discussed in this Chapter can be found in the following folder in the Techila SDK:
-
techila\examples\CLI\Features\local_control_script_linux
6.4.1. Local Control Code
The Local Control Code used in this example is stored in a shell script called run_dist.sh.
#!/bin/sh
# Copyright 2011-2016 Techila Technologies Ltd.
# Usage: ./run_dist.sh 10 1000000
# Create a variable for accessing the CLI interface.
techila="java -jar ../../../../lib/techila.jar"

# Remove any possible old result files
if [ ! -z "$(ls -A ./output/output_* 2>/dev/null)" ]
 then
  echo Removing old result files
  rm -f ./output/output_*
fi

# First input argument determines the number of Jobs
jobs=$1

# Second input argument determines the number of iterations per Job
loops=$2

# Define the executable program
command="mcpi.exe;osname=Windows,mcpi;osname=Linux"

# Input parameters for the binary. %P(jobidx) will be replaced with '1' for
# Job #1, '2' for Job #2 etc. %P(loops) will be replaced with the value of
# the second input argument. %O(output) will be replaced with the name of the
# output file.
parameters="%P(jobidx) %P(loops) %O(output)"

# Output files that will be transferred back from the Worker.
outputfiles="output;file=techila_result"

# Defines which platforms will be used in the computational Project
platform="Linux;Windows"

# Create the peachvector based on the number of Jobs
peachvector=`seq -s" " 1 $jobs`

# Create the computational Project.
$techila peach command=$command parameters="$parameters" \
outputfiles="$outputfiles" peachvector="$peachvector" \
platform="$platform" projectparameters="loops=$loops"

# Calculate the sum of the first columns in the result files (points within the unitary circle)
points=`cat ./output/output_* | cut -d " " -f 1 | awk '{for (i=1; i<=NF; i++) s=s+$i}; END{print s}'`

# Calculate the total number of points generated during the Jobs
total=`cat ./output/output_* | cut -d " " -f 2 | awk '{for (i=1; i<=NF; i++) s=s+$i}; END{print s}'`

# Calculate the value of Pi based on the Job results
RESULT=`echo $points $total|awk '{print $1 / $2 * 4}'

# Print the approximated value of Pi`
echo The approximated value of Pi is: $RESULT
The lines in the shell script are explained below:
The script starts by creating a variable techila that executes the techila.jar application. This variable will be used for creating the Project.
Before any other commands are executed, the script removes existing result files that may exist in the output directory. This step is performed to ensure that only result files received from the latest Project will included in the post-processing.
The script will then read the values of the two input arguments, which will be stored in variables jobs and loops. The jobs variable will be used to determine the number of Jobs in the Project and the loops variable will be used to determine the number of iterations performed in each Job. The number of iterations performed in a Job also determines the execution time of the Jobs. Small amounts of iterations will result in short Jobs and respectively, large amounts of iterations will result in long Jobs.
The input arguments are stored in parameters, which will later be passed to the peach function. The stored parameters are explained below:
-
%P(jobidx)will be replaced with a different integer for each Job (1 for Job #1, 2 for Job #2, etc) and will be used to initialize the random number generator on Workers. -
%P(loops)notation will determine the number of iterations performed during the Job. This value will be read from the command line, when executing the run_dist.sh script. -
%O(output)will be replaced with the value defined in the value defined inoutputfilesparameter.
The output file name is stored in outputfiles. This file will be transferred back to the End-User`s computer after the computational Job has been completed. In this example, the file called techila_result will be returned.
The platform parameter defines that both Windows and Linux based Workers will be used.
The peachvector will be used to determine the number of Jobs in the Project. The peachvector is created by executing the seq command, which will produce a sequence of integers. The number of integers is determined by the value of the jobs variable, which is read from the command line, when executing the run_dist.sh script.
The defined parameters are then passed to the peach command, which will create the computational Project.
After the Project has been completed, the remaining lines in the script will be used to read the result files and retrieve the values stored in the files. The points variable will contain number of points that were located inside the unit circle. The count variable will contain the number of iterations performed in the Project.
6.4.2. Worker Code
The Worker Code used in this example is stored in the precompiled binaries located in the directory containing the material for this example. The source code from which the binaries have been compiled is also included in the directory. If you wish, you can use the source code to compile the binaries yourself.
6.4.3. Creating the Computational Project
Change your current working directory using your terminal to the directory that contains the example material relevant to this example. After having changed to the correct directory, create the computational Project with the command shown below:
./run_dist.sh 10 10000000
Executing the command shown above will create a Project consisting of 10 Jobs, each Job performing 10,000,000 Monte Carlo iterations. When a computational Job has been completed, the output file will be streamed back to the End-Users computer. After all output files have been transferred, the values in the result files will be used to calculate an approximated value of Pi, which will be displayed on the screen.
If you wish to experiment, consider entering different input arguments. For example the command shown below could be used to create a Project consisting of 100 Jobs, each Job performing 1,000,000 iterations.
./run_dist.sh 100 1000000
6.5. Local Control Code in a Batch File (Windows)
A batch file is a series of commands written in plain text file which can be executed on Windows based operating systems. This means that batch files can be used for initializing parameters, reading input arguments from the command line and for executing a sequence of commands that will create a computational Project with the given parameters.
This example uses the same precompiled binaries (mcpi.exe for Windows and mcpi for Linux) as in Local Control Code in a Shell Script (Linux).
This example illustrates how to use a batch file for reading input parameters and creating a computational Project using the specified parameters.
The material discussed in this Chapter can be found in the following folder in the Techila SDK:
-
techila\examples\CLI\Features\local_control_script_windows
6.5.1. Local Control Code
The Local Control Code used in this example is stored in a batch file called run_dist.bat, which is shown below.
@ECHO OFF
REM Copyright 2011-2016 Techila Technologies Ltd.
REM Usage: run_dist.bat 10 1000000
set techila=java -jar ..\..\..\..\lib\techila.jar
set jobs=%1%
set loops=%2%
set counter=1
REM Define that 'mcpi.exe' will be executed on Windows Workers and 'mcpi' on
REM Linux Workers.
set command="mcpi.exe;osname=Windows,mcpi;osname=Linux"

REM Input parameters for the binary. %%P(jobidx) is the first input parameter,
REM and will be different for each Job ('1' for Job #1, '2' for Job etc).
REM %%P(loops) will be replaced with the value of the second input argument read
REM from the command line. Note that this parameter has also been defined
REM in 'projectparameters'. %%O(output) defines that the third input argument
REM contains the name of the output file that will be transferred back from the
REM Worker.
set parameters="%%P(jobidx) %%P(loops) %%O(output)"

REM Define that a file called 'techila_result' is the output file. This
REM file will be returned from the Workers to the Techila Server and
REM transferred back to the End-Users computer.
set outputfiles="output;file=techila_result"

REM Define that only Linux and Windows Workers can be assigned Jobs.
set platforms="Linux;Windows"

REM Define the values for the 'loops' parameter based on the value read from
REM the command line arguments
set projectparameters="loops=%loops%"

REM Define that result files should be placed in the 'project_output' directory
REM under the current working directory. The directory will be automatically
REM created if it does not exist allready.
set destination=".\project_output"

REM Create the peachvector. The loop structure will create a peachvector that
REM contains an equal number of elements as the number of Jobs in the Project.
REM Peachvector elements will be '1','2','3',...n, where n is the number of Jobs-
set peachvector=1
if %peachvector%==%jobs% goto skip
:loop
set /A counter=%counter%+1
set peachvector=%peachvector% %counter%
if not %counter%==%jobs% goto loop
:skip

REM Create the Project with the 'peach' command using the parameters defined
REM earlier in the batch file.
%techila% peach command=%command% parameters=%parameters% ^
outputfiles=%outputfiles% destination=%destination% platform=%platforms% ^
projectparameters=%projectparameters% peachvector="%peachvector%"
The script starts by creating a variable called techila that will be used to access the CLI interface and create the Project Please note that setting the %techila% variable in the batch file will override any previous variable with the same name.
The script will then read the values of the two input arguments, which will be stored in variables jobs and loops. The jobs variable will be used to determine the number of Jobs in the Project and the loops variable will be used to determine the number of iterations performed in each Job.
The command parameter will be used to determine which executable will be executed on each participating Worker. In this example, mcpi.exe will be executed on Workers with a Windows based operating system and mcpi on Workers with a Linux based operating system.
The parameters parameter, will be used to define input arguments for the executable programs (mcpi and mcpi.exe) when they are executed on the Workers. The parameters are explained below:
-
%%P(jobidx) will be replaced with a different integer for each Job (1 for Job #1, 2 for Job #2, etc) and will be used to initialize the random number generator on Workers.
-
%%P(loops) notation will determine the number of iterations performed during the Job. This value will be read from the command line, when executing the run_dist.bat script.
-
%%O(output) will be replaced with the value defined in the value defined in outputfiles parameter on line 8.
Line 8 defines the name of the output file, which will be transferred back to the End-User`s computer after the computational Job has been completed. In this example, the file called techila_result will be returned.
The list of platforms that will be used in the computational Project will be stored in platform. In this example, both Windows and Linux based Workers will be used.
The projectparameters parameter defines a value for the loops parameter used in the parameters. The value of the loops parameter will be determined by the second input argument entered to the command line when the End-User is executing the run_dist.bat file.
The destination parameter defines where the result files will be stored on the End-User`s computer after they have been downloaded from the Techila Server. In this example, the result files will be stored in folder called project_output located under the current working directory.
The script also contains a simple loop structure, which is used to create the peachvector. The number of elements in the peachvector will be determined by the first input argument entered to the command line when the End-User is executing the run_dist.bat file.
These parameters are then passed to the peach command, which will create the computational Project.
6.5.2. Worker Code
The Worker Code used in this example is stored in the precompiled binaries located in the directory containing the material for this example. The source code from which the binaries have been compiled is also included in the directory. If you wish, you can also compile the binaries from the source code yourself.
6.5.3. Creating the Computational Project
Change your current working directory using your command line interface to the directory that contains the example material relevant to this example. After having changed to the correct directory, create the computational Project with the command shown below:
run_dist 10 10000000
Executing the command shown above will create a Project consisting of 10 Jobs, each Job performing 10,000,000 Monte Carlo iterations. Each time a computational Job is completed, the output file will be streamed to the End-User`s computer and will be stored in the project_output directory.
Each result file will contain two values, the number of points located inside the unitary circle (first value) and the total number of iterations performed during the Job. The values are stored in plain text and the result files can be opened with any text editor. No further post-processing will be performed on the result files in this example.
If you wish to experiment, consider entering different input arguments. For example the command shown below could be used to create a Project consisting of 100 Jobs, each Job performing 1,000,000 iterations.
run_dist 100 1000000
6.6. Job Input Files with Peach parameters
This example illustrates on how to create a Job Input Bundle by using Peach parameters. Using the method described in this Chapter will enable you to create use Job-specific input files by simply listing the files that you wish to transfer to Workers, without needing to call the createBundle command separately. The procedure described in this Chapter provides an easy-to-use syntax and is recommended for persons who are unfamiliar with using Job Input Bundles from the CLI. If you are familiar with the Bundle creation process and wish to use the createBundle command, instructions can be found in Chapter 6.7.
The material discussed in this Chapter can be found in the following folder in the Techila SDK:
-
techila\examples\CLI\Features\job_input_files_peach_param
Files can be stored in a Job Input Bundle by using the jobinputfiles parameter as illustrated below:
jobinputfiles=<list of filenames>
Where the notation <list of filenames> should be replaced with the names of the files you wish to store in the Job Input Bundle.
For example, the following notation would store files file1,file2,file3 and file4 to the Job Input Bundle:
jobinputfiles="file1 file2 file3 file4"
When Job-specific input files are transferred to Workers, the files will be renamed. If no specific name is defined for the file, the name of the file will be jobinputfile1 on the Worker.
The jobinputfilenames parameter can be used to specify the name of the file after it has been transferred to the Worker as illustrated below.
jobinputfiles="file1 file2 file3 file4" jobinputfilenames="<worker filename>"
Where the notation <worker filename> should be replaced with the name you wish to use for accessing the file in your Worker Code. For example, the following notation would rename each of the Job-specific input file as data1 after the file has been transferred to the Worker.
jobinputfiles="file1 file2 file3 file4" jobinputfilenames="data1"
Multiple Job-specific input files can be used by specifying several filenames for jobinputfiles. For example, the following syntax would assign two (2) files with each Job. Files file1 and file3 would be assigned with Job #1 and files would be assigned file2 and file4 with Job #2. The names of the files on the Worker would be data1 and data2 for both Jobs.
jobinputfiles="file1 file2 file3 file4" jobinputfilenames="data1 data2"
The use of Job-specific input files is illustrated using four text files. Each of the text files used in the example contains a small set of different characters. Two text files will be assigned for each Job, resulting in a Project that contains two (2) Jobs. The content of each file will be echoed on the Workers and stored in the output file. The computational work performed in this example is trivial and is only intended to illustrate the mechanism of using Job-Specific Input Files.
6.6.1. Local Control Code
The Local Control Code is stored in two files called run_job_input.sh and run_job_input.bat`. The shortened version of the run_job_input.bat file is shown below.
@ECHO OFF
REM Copyright 2011-2013 Techila Technologies Ltd.
set techila=java -jar ../../../../lib/techila.jar
REM Define that 'test.bat' will be executed on Windows Workers and 'test.sh' on
REM Linux Workers.
set command="test.bat;osname=Windows,test.sh;osname=Linux"

REM Define that a file called 'techila_result' is the output file. This
REM file will be returned from the Workers to the Techila Server and
REM transferred back to your computer.
set outputfiles="output;file=techila_result"

REM Specify that the list of files to be stored in the Job Input Bundle will
REM be read from stdin given to the command.
set jobinputfiles="<stdin>"

REM Specify that the Job-specific input files should be renamed to 'data1' and
REM 'data2' after the files have been transferred to the Worker.
set jobinputfilenames="data1 data2"

REM Input parameters for the executable. In each Job, the executable script
REM will be given two input arguments. The input arguments 'data1' and 'data2'
REM corresponds to the names of the Job-specific input files as defined
REM in the parameter 'jobinputfilenames'.
set parameters="data1 data2"

REM Define that only Linux and Windows Workers can be assigned Jobs.
set platform="Windows;Linux"

REM Create the Project with the 'peach' command using the parameters defined
REM earlier in the batch file. The output of 'dir /b file*' command will be
REM used to construct the list of files that be stored in the Job Input Bundle.
dir /b file* | %techila% peach command=%command% ^
parameters=%parameters% outputfiles=%outputfiles% ^
jobinputfiles=%jobinputfiles% jobinputfilenames=%jobinputfilenames% ^
platform=%platform%
Respectively, the content of the run_job_input.sh file is shown below.
@ECHO OFF
REM Copyright 2011-2013 Techila Technologies Ltd.
set techila=java -jar ../../../../lib/techila.jar
REM Define that 'test.bat' will be executed on Windows Workers and 'test.sh' on
REM Linux Workers.
set command="test.bat;osname=Windows,test.sh;osname=Linux"

REM Define that a file called 'techila_result' is the output file. This
REM file will be returned from the Workers to the Techila Server and
REM transferred back to your computer.
set outputfiles="output;file=techila_result"

REM Specify that the list of files to be stored in the Job Input Bundle will
REM be read from stdin given to the command.
set jobinputfiles="<stdin>"

REM Specify that the Job-specific input files should be renamed to 'data1' and
REM 'data2' after the files have been transferred to the Worker.
set jobinputfilenames="data1 data2"

REM Input parameters for the executable. In each Job, the executable script
REM will be given two input arguments. The input arguments 'data1' and 'data2'
REM corresponds to the names of the Job-specific input files as defined
REM in the parameter 'jobinputfilenames'.
set parameters="data1 data2"

REM Define that only Linux and Windows Workers can be assigned Jobs.
set platform="Windows;Linux"

REM Create the Project with the 'peach' command using the parameters defined
REM earlier in the batch file. The output of 'dir /b file*' command will be
REM used to construct the list of files that be stored in the Job Input Bundle.
dir /b file* | %techila% peach command=%command% ^
parameters=%parameters% outputfiles=%outputfiles% ^
jobinputfiles=%jobinputfiles% jobinputfilenames=%jobinputfilenames% ^
platform=%platform%
The interesting parameters in this example are jobinputfiles`and `jobinputfilenames.
In this example, the value of the jobinputfiles parameter is set as "<stdin>". This means that the filenames will be received from the stdin stream. This will be generated on the line containing the peach command.
The jobinputfilenames specifies that two files will be assigned with each Job in the Project. The name of the files will be data1 and data2. These same filenames have also been specified as input arguments to the Worker Code by using the parameters parameter.
After setting the parameters, the peach command will be used to create the Project. This line also contains a command used to display all files beginning with file in the current working directory. Typically the output or the dir and ls commands would be displayed in the console, but by using the pipe notation | the stream can be redirected as input for the peach command. This is illustrated in the figure below.
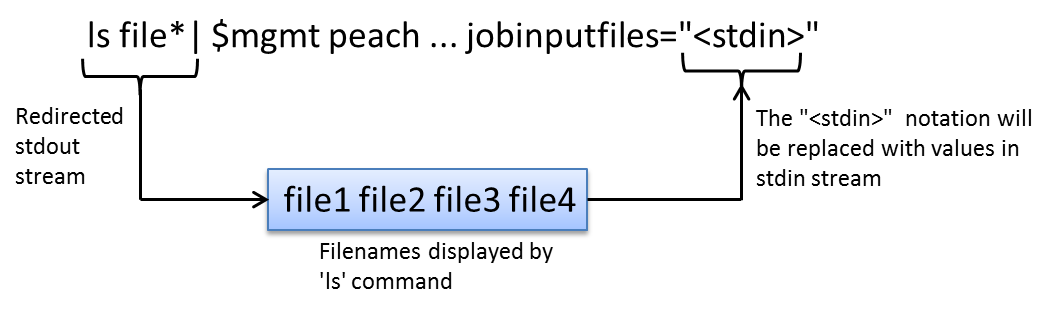
6.6.2. Worker Code
The Worker Code used in this example is stored in two separate files called test.bat and test.sh. These files will be distributed and executed on the Workers when the computational Project is created. The content of the test.bat file is shown below
The content of the test.bat file is shown below.
@ECHO OFF
REM Copyright 2011-2013 Techila Technologies Ltd.
REM Store the name of the Job specific input files to variables
set filename1=%1%
set filename2=%2%

REM Store a list of the files in the temporary directory to the
REM 'techila_result' file
echo Files in the temporary working directory: > techila_result
dir  >> techila_result
echo Content of the Job Input File #1 associated with this Job: >> techila_result
REM Store the name of the Job-specific input file into the 'techila_result'
REM file
type %filename1% >> techila_result
echo Content of the Job Input File #2 associated with this Job: >> techila_result
REM Store the name of the Job-specific input file into the 'techila_result'
REM file
type %filename2% >> techila_result
The content of the test.sh file is shown below.
#!/bin/sh
# Copyright 2011-2013 Techila Technologies Ltd.
# Store the name of the Job specific input files to variables
filename1=$1
filename2=$2
# Store a list of the files in the temporary directory to the
# 'techila_result' file
echo Files in the temporary working directory: > techila_result
ls  >> techila_result
echo Content of the Job Input File "#1" associated with this Job: >> techila_result
# Store the name of the Job-specific input file into the 'techila_result'
# file
cat "$filename1" >> techila_result
echo Content of the Job Input File "#2" associated with this Job: >> techila_result
# Store the name of the Job-specific input file into the 'techila_result'
# file
cat "$filename2" >> techila_result
Both scripts perform similar operations when executed on the Workers. Each script will receive two input arguments, which will be the names of the Job specific input files on the Worker (data1 and data2). The names of the files will be stored in variables and the contents of the files will be echoed and stored into the techila_result file, which will be returned from the Worker to the End-User`s computer. The techila_result file will also contain a listing of the files in the temporary directory on the Worker.
6.6.3. Creating the Computational Project
Change your current working directory using your command line interface to the directory that contains the example material relevant to this example. After having changed to the correct directory, create the computational Project using the commands shown below:
For Linux: ./run_job_input.sh For Windows: run_job_input.bat
Executing the command will create a computational Project containing two Jobs. Each Job will be assigned two Job-specific input files. Job #1 will be assigned files file1 and file3 and Job #2 will be assigned files file3 and file4. Each time a computational Job is completed, the output file will be streamed to the End-Users computer and stored in a folder called output in the current working directory. These result files contain the output generated on the Worker and will contain the following information:
-
List of files located in the temporary working directory on the Worker during the Job
-
Content of the Job-specific input files belonging to the Job The values are stored in plain text and the result files can be opened with any text editor.
6.7. Job Input Files (old method)
This Chapter contains instructions on how you can create a Bundle containing a set of Job-specific input files and how these files can be accessed in computational Jobs. The example described in this Chapter uses the createBundle command for creating the Job Input Bundle and the %B() reference notation for transferring specific files from the Bundle in each Job.
The material discussed in this Chapter can be found in the following folder in the Techila SDK:
-
techila\examples\CLI\Features\job_input_files
Files can be retrieved from a Job Input Bundle by using the %B() notation in the parameters parameter as illustrated below:
parameters="%B(<bundlename>;file=<filename_in_bundle>)"
Where <bundlename> should be replaced with the name of the Bundle containing the files and <filename_in_bundle> with the name of the file that should be transferred to the Worker.
For example, the following notation would transfer a file called file1 from a Bundle named example.bundle to all Workers participating in the Project:
parameters="%B(example.bundle;file=file1)"
The file will be renamed after it has been transferred to the Worker. If a name is not defined for the file, the name of the file will be randomly chosen. With the syntax shown above, the name of the file file1 might be something like input8645024077836755034data on the Worker.
The name of the Job Input File on the Worker can be defined with the destination parameter. For example, the syntax shown below would specify that the name of the file should be renamed to example.file after it has been transferred to the Worker.
parameters="%B(example.bundle;file=file1;destination=example.name)"
Typically the Job Input Bundle contains several files each file having a different name. These files can be retrieved from the Bundle by referring to the name of the file by using the %P() notation. For example, if a Bundle contains two files named file1 and file2, these files could be retrieved from the Bundle by using the syntax shown below:
parameters=%B(example.bundle;file=file%P(jobidx);destination=example.name)
The %P(jobidx) notation would expand to 1 for the first Job and 2 for the second Job. This means that file file1 would be transferred with Job #1 and file file2 with Job #2. Each file would be renamed to example.file on the Workers.
As mentioned earlier, parameters is also used to define input arguments for the executable function. This means that the value returned from the %B() notation will also be interpreted as an input argument for the executable program. If this behaviour is not desired, the returnfile=false parameter can be used to make the %B() notation to return an empty string. This is illustrated in the syntax below:
parameters=%B(example.bundle;file=file%P(jobidx);destination=example.name;returnfile=false)
6.7.1. Local Control Code
The Local Control Code is stored in file called commands, and contains all necessary commands and parameters required to distribute applications to the Techila environment. Please note that a line ending in a backslash (\) indicates that the command extends to the next line.
# Copyright 2011-2013 Techila Technologies Ltd.
# Create a session with the 'init' command.
init

# The createBundle command will create the Job Input Bundle, which will contain
# four files. The {user} notation will be replaced by the 'alias' defined in
# the  techila_settings.ini file. This Bundle will be exported to the
# computational Project by using the value defined in the 'exports' parameter
# in the 'imports' parameter.

createBundle bundlename={user}.example.jobinput.bundle \
  exports={user}.example.jobinput.bundle yes=true datafile1 \
  datafile2 datafile3 datafile4

# Create a Project using peach. 'test.sh' will be executed on Linux Workers and
# 'test.bat' on Windows Workers.  Job #1 will retrive the file called 'datafile1',
# Job #2 will retrieve the file called 'datafile2' etc. 'outputfiles' defines
# that the file 'techila_result' will be transferred back from the Workers.
# 'platform' defines that only Linux and Windows will be used in the Project.

peach command="test.sh;osname=Linux,test.bat;osname=Windows" \
  parameters="%B({user}.example.jobinput.bundle;file=datafile%P(jobidx);destination=data.txt)" \
  platform="Linux;Windows" \
  outputfiles="output;file=techila_result" \
  peachvector="1 2 3 4"

# Remove the session after the Project has been completed
unload
The commands file contains two lines, where each line contains a separately executable command.
The first line contains the createBundle command, which will create a Bundle that will contain the four data files (datafile1, datafile2, datafile3 and datafile4) that will be used as Job Specific Input files. The {user} notation used in the bundlename will be replaced with the value of the alias parameter in the techila_settings.ini file. The value of the bundlename parameter will be used to determine the Bundle from which the Job specific input files will be retrieved.
The second line contains the peach function call, which will create the Project. Apart from the %B() notation in the parameters parameter, the parameters used in this example are similar to the ones illustrated in the examples in Tutorial Examples. The %B() notation used in this example defines the name of the Bundle in which the files are located in, the name of the file that should be transferred to the Worker and the name of the file on the Worker. This is illustrated below in Figure 7.
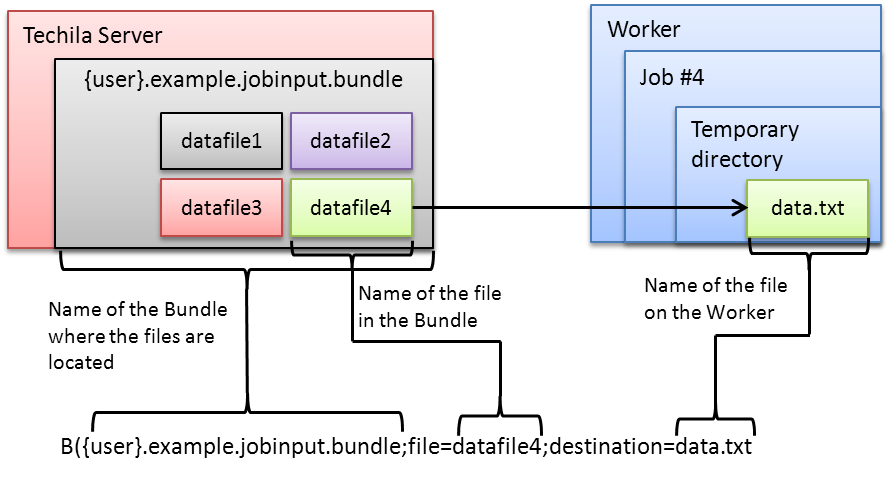
file parameter. As the definition of the file parameter is file=datafile%P(jobidx), the value will be datafile4 for Job #4. The destination parameter defines the name of the file on the Worker.6.7.2. Worker Code
The Worker Code used in this example is stored in two separate files called test.bat and test.sh. These files will be distributed and executed on the Workers when the computational Project is created. The content of the test.bat file is shown below
The content of the test.bat file is shown below.
@ECHO OFF
REM Copyright 2011-2013 Techila Technologies Ltd.
REM Store the name of the Job specific input file to a variable
set filename=%1%
REM Store a list of the files in the temporary directory to the
REM 'techila_result' file
echo Files in the temporary working directory: > techila_result
dir /b  >> techila_result
echo Content of the Job Input File associated with this Job: >> techila_result
REM Store the name of the Job-specific input file into the 'techila_result'
REM file
type %filename% >> techila_result
The content of the test.sh file is shown below.
#!/bin/sh
# Copyright 2011-2013 Techila Technologies Ltd.
# Store the name of the Job specific input file to a variable
filename=$1
# Store a list of the files in the temporary directory to the
# 'techila_result' file
echo Files in the temporary working directory: > techila_result
ls  >> techila_result
echo Content of the Job Input File associated with this Job: >> techila_result
# Store the name of the Job-specific input file into the 'techila_result'
# file
cat "$filename" >> techila_result
Both scripts perform similar operations when executed. Each script will receive one input argument, which will be the name of the Job specific input file on the Worker (data.txt). The name of the file will be stored in a variable and the contents of the file will be stored into the techila_result file, which will be returned from the Worker to the End-User`s computer. The techila_result file will also contain a listing of the files in the temporary directory on the Worker.
6.7.3. Creating the Computational Project
Before running this example, please ensure that you have defined the environment variable applicable for your system and that the environment variable is available from your command line interface:
-
%techila% (if you have a Windows based operating system)
-
$techila (if you have a Linux based operating system)
Change your current working directory using your command line interface to the directory that contains the example material relevant to this example.
If you have a Windows based operating system, create the computational project with the following command
%techila% read < commands
If you have a Linux based operating system, create the computational project with the following command
$techila read < commands
Result files will be stored in a folder called output in the current working directory. These result files contain the output generated on the Worker. If you wish to view the contents of the files, simply navigate to the output directory and open the files with a text editor.
6.8. Snapshots
Snapshotting is a mechanism where intermediate results of computations are stored in snapshot files and transferred to the Techila Server at regular intervals. Snapshotting is used to improve the fault tolerance of computations and to reduce the amount of computational time lost due to interruptions.
Snapshotting is done by storing the state of the computation at regular intervals in snapshot files on the Worker. The snapshot files will then be transferred over to the Techila Server at regular intervals from the Workers. If an interruption should occur, these snapshot files will be transferred to other available Workers, where the computational process can be resumed by using the intermediate results stored in the Snapshot file.
The material discussed in this Chapter can be found in the following folder in the Techila SDK:
-
techila\examples\CLI\Features\snapshots
Snapshotting is enabled by defining the parameters SnapshotFiles and SnapshotInterval in the binarybundleparameters as shown below:
binarybundleparameters="SnapshotFiles=<snapshot_file_name>,SnapshotInterval=<interval>"
-
SnapshotFilesdetermines the name of the snapshot file that will be transferred from the Worker to the Techila Server. This snapshot file will also be automatically transferred to a new Worker if the Job is being resumed after an interruption. -
SnapshotIntervaldefines how often the snapshot file is transferred from the Worker to the Techila Server. For example, the syntax shown below defines that a file calledsnapshot.datshould be transferred every five minutes to the Techila Server from the Worker.binarybundleparameters="SnapshotFiles=snapshot.dat,SnapshotInterval=5"
Please note that you also need to implement a method for creating the snapshot file during the Job and updating the content of the snapshot file at suitable intervals.
This example demonstrates how to implement a snapshotting routine in a Monte Carlo routine approximating the value of Pi.
6.8.1. Local Control Code
The Local Control Code is stored in two files called run_dist.sh and run_dist.bat.The run_dist.bat file contains the Local Control Code for computers with a Windows based operating system. The content of the run_dist.bat file is shown below.
@ECHO OFF
REM Copyright 2011-2016 Techila Technologies Ltd.
REM Usage: run_dist.bat 10 2000000000
REM Create a variable for accessing the CLI interface.
set techila=java -jar ..\..\..\..\lib\techila.jar
set jobs=%1%
set loops=%2%
set counter=1
REM Define that 'mcpi-snap.exe' will be executed on Windows Workers and
REM 'mcpi-snap' on Linux Workers.
set command="mcpi-snap.exe;osname=Windows,mcpi-snap;osname=Linux"

REM Input parameters for the binary. %%P(jobidx) is the first input parameter,
REM and will be different for each Job ('1' for Job #1, '2' for Job etc).
REM %%P(loops) will be replaced with the value of the second input argument read
REM from the command line. Note that this parameter has also been defined
REM in 'projectparameters'. %%O(output) defines that the third input argument
REM contains the name of the output file that will be transferred back from the
REM Worker.
set parameters="%%P(jobidx) %%P(loops) %%O(output)"

REM Define that a file called 'techila_result' is the output file. This
REM file will be returned from the Workers to the Techila Server and
REM transferred back to the End-Users computer.
set outputfiles="output;file=techila_result"

REM Define that a file called 'snapshot.dat' is the snapshot file and the
REM snapshot interval is five minutes.
set binarybundleparameters="SnapshotFiles=snapshot.dat, SnapshotInterval=5"

REM Define that only Linux and Windows Workers can be assigned Jobs.
set platforms="Linux;Windows"

REM Define the values for the 'loops' parameter based on the value read from
REM the command line arguments
set projectparameters="loops=%loops%"

REM Define that result files should be placed in the 'project_output' directory
REM under the current working directory. The directory will be automatically
REM created if it does not exist allready.
set destination=".\project_output"

REM Create the peachvector. The loop structure will create a peachvector that
REM contains an equal number of elements as the number of Jobs in the Project.
REM Peachvector elements will be '1','2','3',...n, where n is the number of Jobs-
set peachvector=1
if %peachvector%==%jobs% goto skip
:loop
set /A counter=%counter%+1
set peachvector=%peachvector% %counter%
if not %counter%==%jobs% goto loop
:skip

REM Create the Project with the 'peach' command using the parameters defined
REM earlier in the batch file.
%techila% peach command=%command% parameters=%parameters% ^
binarybundleparameters=%binarybundleparameters% ^
outputfiles=%outputfiles% destination=%destination% platform=%platforms% ^
projectparameters=%projectparameters% peachvector="%peachvector%"
The run_dist.sh file contains the Local Control Code that can be executed on computers with a Linux based operating system. Respectively, the content of the run_dist.sh file is shown below.
#!/bin/sh
# Copyright 2011-2016 Techila Technologies Ltd.
# Usage: ./run_dist.sh 10 2000000000
techila="java -jar ../../../../lib/techila.jar"

# Remove any possible old result files
if [ -e ./output/result_1 ]
 then
  echo Removing old result files
  rm ./output/result*
fi

# First input argument determines the number of Jobs
jobs=$1

# Second input argument determines the number of iterations per Job
loops=$2

# Define the executable program
command="mcpi-snap.exe;osname=Windows,mcpi-snap;osname=Linux"

# Input parameters for the binary.
parameters="%P(jobidx) %P(loops) %O(output)"

# Output files that will be generated on the worker.
outputfiles="output;file=techila_result"

# Define that a file called 'snapshot.dat' is the snapshot file and the
# snapshot interval is five minutes.
binarybundleparameters="SnapshotFiles=snapshot.dat, \
SnapshotInterval=5"
# Defines which platforms will be used in the computational Project
platform="Linux;Windows"

# Create the peachvector based on the number of Jobs
peachvector=`seq -s" " 1 $jobs`

# Create the computational Project.
$techila peach command=$command parameters="$parameters" \
binarybundleparameters="$binarybundleparameters" \
outputfiles="$outputfiles" peachvector="$peachvector" \
platform="$platform" projectparameters="loops=$loops"

# Calculate the sum of the first columns in the result files (points within the unitary circle)
points=`cat ./output/output_* | cut -d " " -f 1 | awk '{for (i=1; i<=NF; i++) s=s+$i}; END{print s}'`

# Calculate the total number of points generated during the Jobs
total=`cat ./output/output_* | cut -d " " -f 2 | awk '{for (i=1; i<=NF; i++) s=s+$i}; END{print s}'`

# Calculate the value of Pi based on the Job results
RESULT=`echo $points $total|awk '{print $1 / $2 * 4}'

# Print the approximated value of Pi`
echo The approximated value of Pi is: $RESULT
Apart from the binarybundleparameters, the parameters used in the batch and shell scripts are similar as those used in the earlier examples in Chapters Local Control Code in a Shell Script (Linux) and Local Control Code in a Batch File (Windows). The SnapshotFiles parameter defines that a file called snapshot.dat is the snapshot file and will be transferred from the Worker to the Techila Server. The transfer interval will be set to five (5) minutes with the SnapshotInterval parameter.
6.8.2. Worker Code
The Worker Code used in this example is stored in the precompiled binaries located in the directory containing the material for this example. The source code from which the binaries have been compiled is also included in the directory. If you wish, you can also compile the binaries from the source code yourself.
A pseudo code representation of the executable program and the snapshot routine is shown below.
---
IF job_is_being_resumed THEN
  SET point_counter and loop_counter from 'snapshot.dat'
ELSE
  SET point_counter and loop_counter to zero
ENDIF
FOR loop_counter = loop_counter to total number of loops generate random point on unit square IF loop_counter dividable by 10000000 IF time since last snapshot generated more than 60 seconds save point_counter and loop_counter to 'snapshot.dat' ENDIF ENDIF ENDFOR
The snapshot generation routine is implemented by using two IF clauses, which are placed in the actual FOR loop that contains the computationally intensive operations. A new snapshot file will be generated each time both of the IF clauses are true. Typically a new snapshot file will be generated at 60 second intervals. This snapshot file will be called snapshot.dat and will be automatically transferred to the Techila Server at regular intervals (five minutes as defined in the Local Control Code)
6.8.3. Creating the Computational Project
Change your current working directory using your command line interface to the directory that contains the example material relevant to this example. After having changed to the correct directory, create the computational Project using the commands shown below:
For Linux: ./run_dist.sh 5 1000000000 For Windows: run_dist 5 1000000000
Executing the command will create a Project consisting of five (5) Jobs, each Job performing 1,000,000,000 Monte Carlo iterations. Each Job will take a relatively long time to complete (several minutes). Snapshot files will be automatically generated in the computational Jobs and information on the snapshot files can be viewed from the Techila Web Interface. If no snapshot information is visible for the Project, consider increasing the number of iterations that will be performed by modifying the second input argument. This will increase the time required to complete the computational Job.
Each time a computational Job is completed, the output file will be streamed to the End-User`s computer and stored in the project_output directory. Each result file will contain two values, the number of points located inside the unitary circle (first value) and the total number of iterations performed during the Job. The values are stored in plain text and the result files can be opened with any text editor.
The run_dist.sh also contains commands that will calculate the approximate value of Pi based on the values in the result files.
7. Appendix
7.1. Appendix 1: Peach parameters
The table below contains a summary of the parameters available for the peach CLI command.
| Parameter | Example | Description |
|---|---|---|
command |
command="test.bat;osname=Windows" |
Mandatory parameter. Specifies the program that will be executed on Workers. Platform specific programs can be defined with the osname parameter. |
outputfiles |
outputfiles="output;file=techila_result" |
Mandatory parameter. Specifies the names of the output files that will be returned from the Worker. |
peachvector |
peachvector="1 2 3 4 5" |
Mandatory parameter. The length of the peachvector determines the number of jobs. Parameter %P(peachparam) retrieves peachvector elements. |
parameters |
parameters="%P(jobidx) %P(param1) %O(output)" |
Optional parameter. Specifies input arguments for the executable program. |
jobs |
jobs=100 |
Optional parameter. Can be used to specify the number of Jobs in the Project. |
streaming |
streaming="false" |
Optional parameter. Can be used to disable result streaming. |
priority |
priority=5 |
Optional parameter. Can be used to specify the Project priority. |
description |
description="Example Project" |
Optional parameter. Can be used to define a Project description. |
jobinputfiles |
jobinputfiles="data_1 data_2 data_3" |
Optional parameter. Can be used to define a list of Job-specific input files. |
jobinputfilenames |
jobinputfilenames="file1" |
Optional parameter. Can be used to specify the name(s) of the Job-specific input files on the Worker. |
separator |
separator="," |
Optional parameter. Specifies the separator that separates peachvector elements. |
platform |
platform="Windows" |
Optional parameter. Specifies the platforms of the Workers that can be assigned Jobs in the Project. |
environment |
environment="PYTHONPATH; |
value=%P(tmpdir)/custombundle" Optional parameter. Sets an environment variable on the Worker. |
projectparameters |
projectparameters="param1=42, techila_stream_stdout=true" |
Optional parameter. Sets control parameters to control the Project execution. Defines the values of input parameters. |
bundleparameters |
bundleparameters="ExpirationPeriod=1h" |
Optional parameter. Determines Parameter Bundle parameters. |
messages |
messages=false |
Optional parameter. Determines if any messages will be displayed. |
statistics |
statistics=false |
Optional parameter. Determines is statistics will be displayed. |
destination |
destination="output/" |
Optional parameter. Specifies the output directory where the result files will be stored. |
binarybundleparameters |
binarybundleparameters="SnapshotFiles=snapshot.dat,SnapshotInterval=5" |
Optional parameter. Determines parameters for the binary bundle. |
imports |
imports="example.library.bundle" |
Optional parameter. Specifies additional Bundles that will be transferred to participating Workers. |
copy |
copy=false |
Optional parameter. Can be used to prevent files from being copied to the temporary working directory on Worker. |
remoteexecutable |
remoteexecutable=true |
Optional parameter. Defines if the |
name |
name="test" |
Optional parameter. Defines the prefix for the state file that is created on the End-User`s computer. |