1. Introduction
This document is intended for End-Users who wish to access the Techila Distributed Computing Engine (TDCE) environment from applications developed with C#. If you are unfamiliar with the terminology or the operating principles of the TDCE system, information on these can be found in Introduction to Techila Distributed Computing Engine.
The structure of this document is as follows:
Introduction contains a brief introduction on the naming convention of the C# source code files and introduces the functions that are used for distributing computations from applications developed with C# to the TDCE environment.
Preparation contains information regarding the preparation steps required to use TDCE with applications developed with C#.
Tutorial Examples contains walkthroughs of simple example codes. The example material illustrates how to define input arguments for the executable program and transfer data files to Techila Workers participating in the computations. After examining the material in this Chapter you should be able convert a simple locally executable program to a TDCE-enabled version, which in turn can be used to perform the computations in the TDCE environment.
Feature Examples contains walkthroughs of more advanced code examples, which illustrate how to use different features available in the TDCE system. These advanced features include using semaphores to limit the number of simultaneous operations and using Active Directory (AD) impersonation to access restricted data resources.
Interconnect Examples contains walkthroughs of examples that illustrate how to use the Techila interconnect feature. This feature can be used to process parallel workloads in a TDCE environment by allowing Jobs to transfer information to other Jobs in the same Project.
1.1. Prerequisites
To access TDCE from applications developed with C#, you will need the following components:
-
Keystore file containing a signed End-User Key
-
Techila SDK (or just the Techila SDK C# library components)
-
A
techila_settings.inifile that has been configured for your TDCE environment
1.2. Techila Distributed Computing Engine C# API
The Techila Distributed Computing Engine (TDCE) C# API functionality is included in the following folders:
-
.NET Framework 4.x components located in
techila\libin the Techila SDK -
.NET 5 components located in
techila\lib\net5in the Techila SDK
These libraries provide the Techila.Management.TechilaProject class, that can be used to to create Projects and distribute computations to the TDCE environment.
Local Control Code and Techila Worker Code contain information about the most commonly used commands when accessing a TDCE environment from an application developed with C# using the Techila.Management.TechilaProject class.
1.2.1. Local Control Code
Local Control Code refers to the code that will be used for creating the computational Project.
In order to access the TDCE API from applications developed with C#, the TDCE library functions will need to be imported with the using statement as shown below:
using Techila.Management;After the library functions have been imported, a new TechilaManager object can be created with the following command:
TechilaManager tm = TechilaManagerFactory.TechilaManager;After creating the object, a network connection with the Techila Server can be initialized with the following command:
tm.InitFile();The command will only execute successfully if a properly configured configuration file (typically named techila_settings.ini) can be accessed. When tm.Initfile() is executed without input arguments (as in the example above), the techila_settings.ini file will be searched from the following locations in the order they are listed here:
-
The file specified in environment variable TECHILA_SETTINGS_FILE
-
The current working directory
-
The following files from the user’s home directory
-
.techilarc
-
techila_settings.ini
-
-
The path specified with the environment variable TECHILA_SDKROOT
-
The
techilafolder in the Techila SDK (based on the location of the TDCE library components. Will not work with the TDCE C# API, due to TDCE library components being copied to the build directory.)
It is also possible to define the location of the configuration file when executing the command. In the example below, the file C:\techila\techila_settings.ini would be used when initializing the connection.
tm.InitFile("c:\\techila\\techila_settings.ini");After the network connection has been initialized, a new instance of the TechilaProject class needs to be created. This will be used for creating a computational Project in the TDCE environment. The object can be created with the following command:
TechilaProject tp = new TechilaProject(tm, "Name of your project");When creating the object, the constructor for the TechilaProject takes two input arguments. The first input argument is the instance of the TechilaManager class (which was created earlier). The second input argument is a string, which will be used to define the name of your Project.
After creating the tp object, new instances of classes that you wish to execute in the TDCE environment can be added to the list in the tp object. These classes should be computationally intensive. For example, the following lines could be used to add two instances of the SerializableClass class with different input arguments into the list.
int i = 1;
tp.Add(new SerializableClass(i));
i = 2;
tp.Add(new SerializableClass(i));
Each object in the list will correspond to one Job in the TDCE environment. This means that when using the example code shown above, the computational Project would consist of two Jobs. Each object in the list will be serialized into a separate file and transferred to the TDCE environment in a Job Input Bundle. These files will be deserialized on the Techila Workers after the files have been transferred from the Techila Server.
If you wish to create and execute a large number of objects, the tp.Add commands can be placed within a loop structure. For example, the following syntax would add 1000 instances of SerializableClass with different input arguments:
int jobs = 1000;
for (int i = 0; i < jobs; i++)
{
    tp.Add(new SerializableClass(i));
}
After adding all objects to the list, the computational Project can be created with the following command.
tp.Execute();After executing the command, the computational Project will be created and all required files will be transferred to the Techila Server. Typically at least the following files will be transferred:
-
All serialized class files
-
Compiled binary containing your C# application
-
Any additional shared libraries (DLL-files) used in your C# application
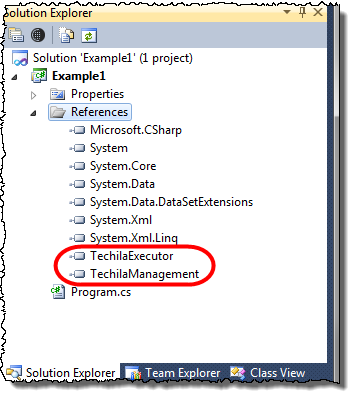
-
TechilaExecutor.exe (included in the Techila SDK)
-
TechilaManagement.dll (included in the Techila SDK)
The tp.Execute() method will return after all computational Jobs have completed and all results have been downloaded from the Techila Server to your computer. The object tp will contain all the results that were generated in the computational Project. The result of each Job is stored as a separate list element.
Individual Job results can be accessed with the tp.Get(int i) method, where int i should be replaced with the index of the Job you want to process. For example if SerializableClass defines an integer value for variable Result (that has been declared as public), the value generated in Job #1 could be retrieved with the following syntax:
int jobresult = ((SerializableClass)tp.Get(1)).Result;If your Project contains a large number of Jobs, accessing the results can be easily achieved by placing the Get operations inside a loop structure. For example, the following syntax could be used to retrieve the Result variables generated in a Project containing 1,000 Jobs and store them in an array.
int jobresult;
int jobs = 1000;
int[] table;
table = new int[jobs];
for (int i = 0; i < jobs; i++)
{
    int jobresult = ((SerializableClass)tp.Get(i)).Result;
    table[i] = jobresult;
}
1.2.2. Techila Worker Code
Techila Worker Code refers that code that will be executed on Techila Workers in each computational Job.
As mentioned in Local Control Code, the objects that are sent to the TDCE environment and executed on the Techila Workers will need to be serialized. This can be done by marking the class with the Serializable attribute.
The TDCE C# API contains an abstract class called TechilaThread. This abstract class has to be used to create a derived class that contains the code that you want to execute in the TDCE environment.
The derived class needs to contain the implementation of the abstract Execute() method defined in the TechilaThread class. This derived class defines the operations that will be executed in each computational Job.
Any changes performed by the Execute method will be stored in the objects when they are serialized and returned from the Techila Workers to the End-User’s computer.
For example, the following class defines the implementation for Execute method, which simply sums integers 1 + 1 and stores the result in the Result variable. This means that each Job in the TDCE environment would consist of this same summation operation. The Result variable with the new value will be included in the serialized object that will be returned from the Techila Worker to the End-User’s computer.
[Serializable]
class SerializableClass : TechilaThread
{
    public int Result;
    public override void Execute()
    {
        Result = 1 + 1;
    }
}
1.3. Project Process Flow
The list below contains some of the C# specific operations that are performed when the End-User uses the TDCE C# API to create a computational Project.
-
TechilaProjectobjecttpis created on the End-User’s computer in their C# application. When the object is created, the object list will be empty.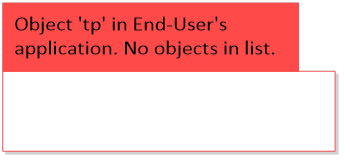 Figure 1. A TechilaProject object with an empty list.
 -
Objects are created and added (using
tp.add) to the list in thetpobject on the End-User’s computer. Each object will need to contain a definition for theExecutemethod.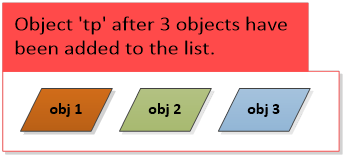 Figure 2. A
tpobject, which contains a list of three objects. -
The
tp.executemethod is called on the End-Users computer. This creates the computational Project.Objects in the list (in
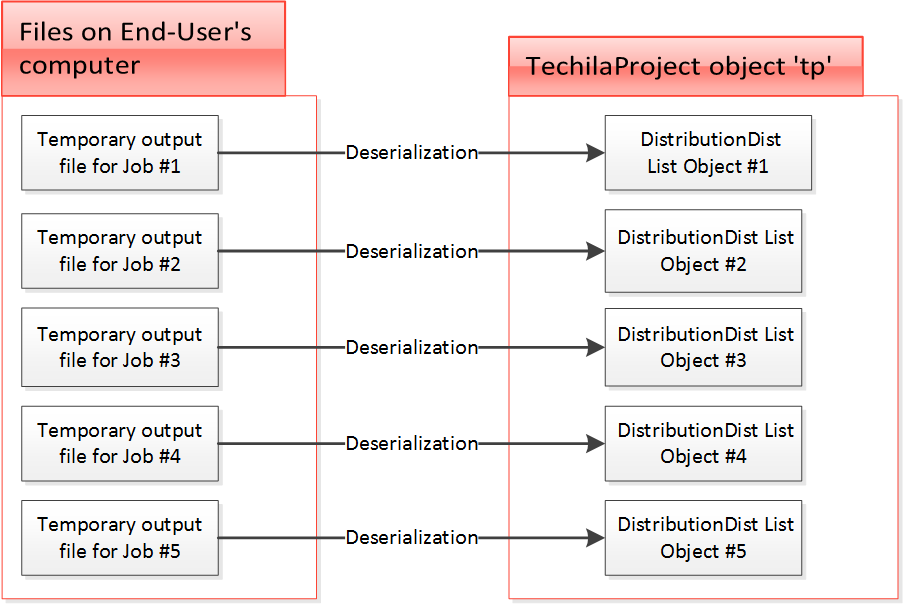
tp) are serialized into files and the files are stored on the End-User’s computer in the temporary directory (under %TMP%)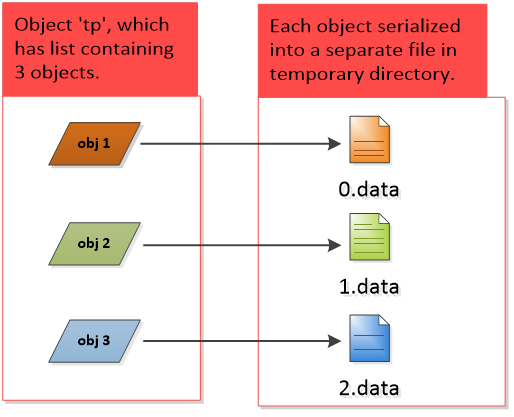 Figure 3. In this example, the
tpcontains a list of three objects. Each object in the list will be serialized into a separate file, meaning three files will be created. -
Files containing the serialized class files are stored in a Job Input Bundle and transferred to the Techila Server
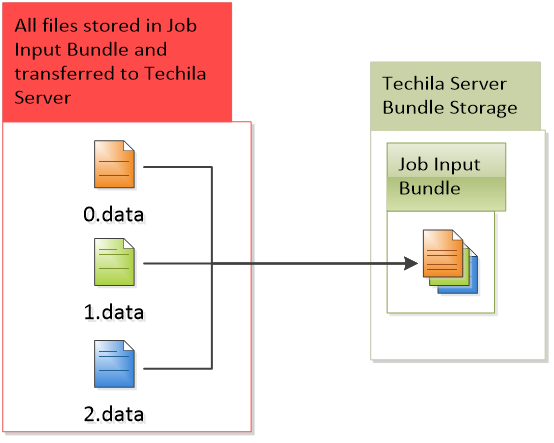 Figure 4. All serialized files will be stored in a Job Input Bundle and transferred to the Techila Server. In this example, the Job Input Bundle contains three files.
 -
The following components are stored in Bundles and transferred to the Techila Server:
-
The compiled binary containing your C# application
-
Any additional shared libraries (DLL-files) used by your application
-
File
TechilaExecutor.exe -
File
TechilaManagement.dll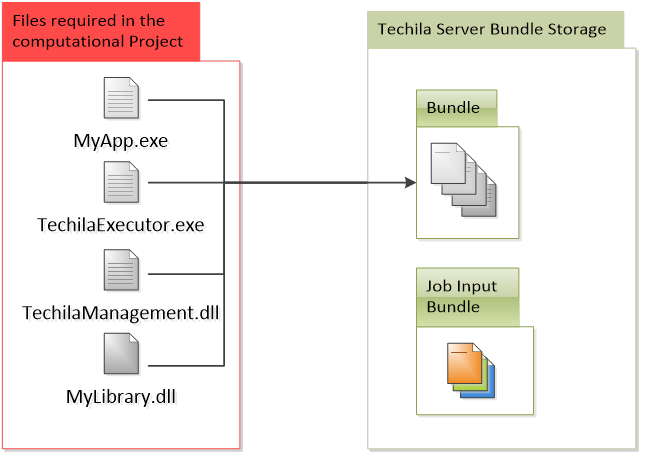 Figure 5. All files required in the computational Project will be stored into separate Bundle and transferred to the Techila Server.
-
-
Jobs are assigned to Techila Workers and all Bundles belonging to the Project are transferred to the Techila Workers (except the Job Input Bundle). Files in the Bundles will be extracted to a temporary working directory on the Techila Worker.
Each Job will also download a separate input file from the Job Input Bundle (Job #1 will download the 1st serialized file, Job #2 will download the 2nd serialized file and so on)
 Figure 6. The number of Jobs in the Project will be equal to the number of serialized files in the Job Input Bundle. In this example, the Job Input Bundle contains three files, which means the Project contains three Jobs.
 -
The
TechilaExecutor.exeexecutable is called, which deserializes the object from the file that was transferred from the Job Input Bundle.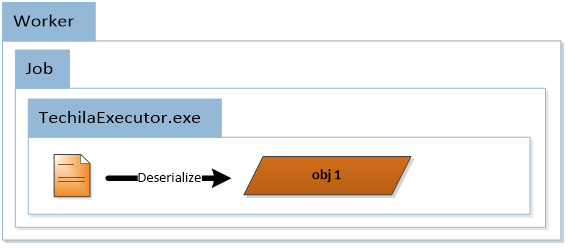 Figure 7. In each Job, the serialized file containing the object will be deserialized into an object.
 -
The
TechilaExecutor.execalls theExecutemethod defined in the End-User’s C# application.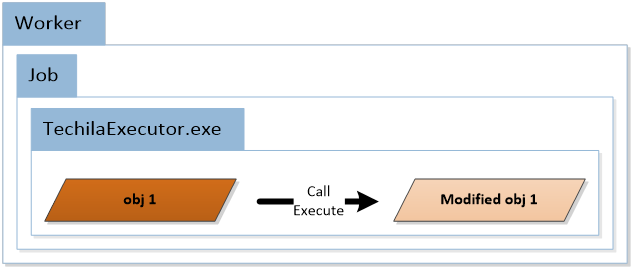 Figure 8. In each Job, the
Executemethod defined in the object will be called. -
The
TechilaExecutor.exeserializes the object into a result file. This contains the modifications made to the object during the computational Job.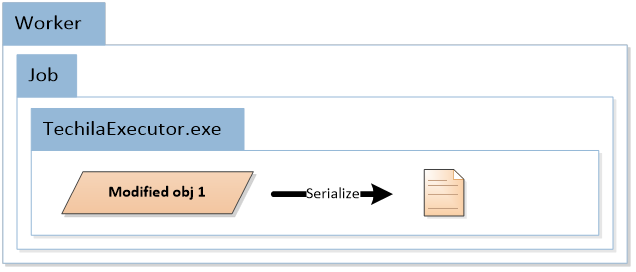 Figure 9. After the
Executemethod has been executed, the object will be serialized in to a result file. -
The result files (serialized objects) are transferred from the Techila Workers to the Techila Server and from the Techila Server to the End-User’s computer
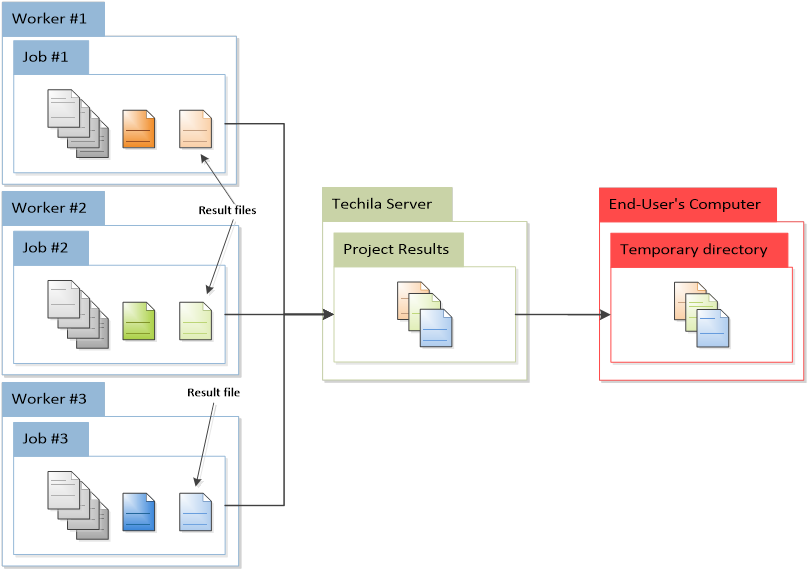 Figure 10. The result file (that contains the object) will be transferred to the End-User’s computer.
 -
On the End-User’s computer, the data structures in the result files are deserialized and stored in the list in the
tpobject. If the End-User has defined event handlers (ThreadCompleted), the event handler will also be automatically called each time a new result file has been deserialized.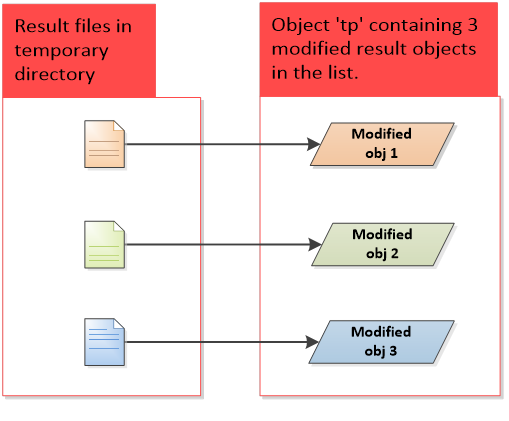 Figure 11. Result files will be deserialized into objects and stored in the list in the
tpobject. -
If the End-User has defined a
ProjectCompletedevent handler, the event handler will be called after all result files have been deserialized. If the Project fails and the End-User has defined aProjectFailedevent handler, this event handler will be called.
1.4. Supported .NET / Framework Versions
In order to use all available features of the TDCE C# API, the following .NET / Framework version must be used when building your application:
-
.NET Framework 4.x
-
.NET 5
-
.NET 6
1.5. Supported Techila Worker Platforms
When using .NET Framework 4.x, you will be able to use the following Techila Worker platforms:
-
Microsoft Windows, 64-bit
When using .NET 5 or .NET 6, you will be able to use the following Techila Worker platforms:
-
Microsoft Windows, 64-bit
-
Linux, 64-bit
1.6. Example Material
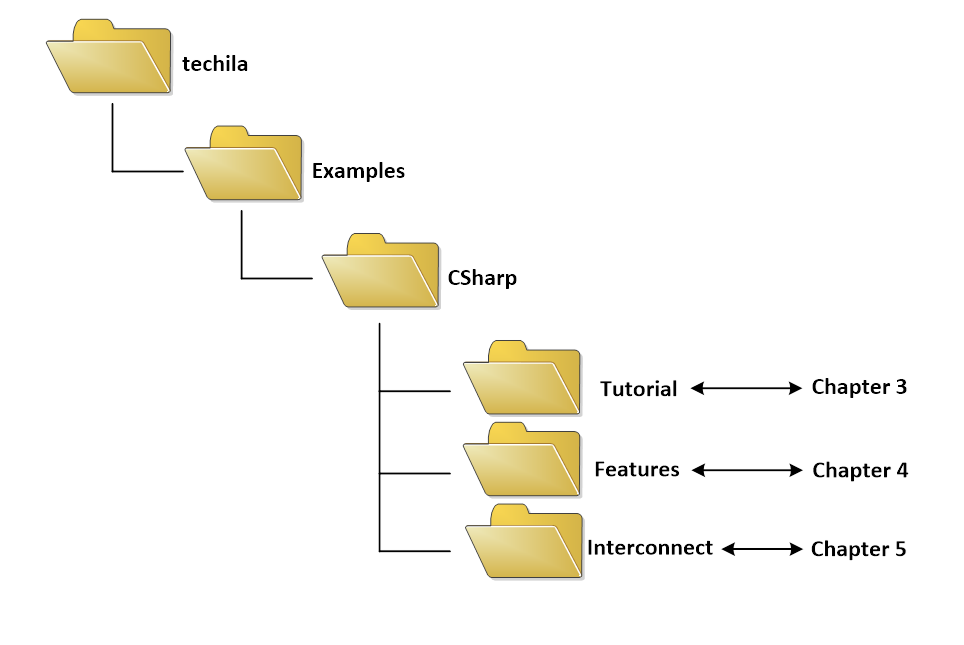
The example material discussed in this document can be found under the following folders in the Techila SDK:
-
techila\examples\CSharp\Tutorial
-
techila\examples\CSharp\Features
-
techila\examples\CSharp\Interconnect
Examples located in the "Tutorial" folder are examined in Tutorial Examples, examples in the "Features" folder in Feature Examples and examples in "Interconnect" folder in Chapter Interconnect Examples.
1.6.1. Naming Convention of the C# Source Code Files
The typical naming convention of C# source code files containing the example material presented in this document is explained below:
-
Files beginning with "Run" contain the distributed version of the program where the computational operations will be distributed and performed in the TDCE environment.
-
Files beginning with "Local" contain locally executable code, which does not communicate with the TDCE environment.
Please note that some files and/or functions might be named differently, depending on their role in the computations.
2. Preparation
This Chapter contains steps for creating an environment variable that will need to be used to define the location of the techila_settings.ini configuration file.
2.1. Create TECHILA_SETTINGS_FILE Environment Variable
The TECHILA_SETTINGS_FILE environment variable will need to be used to define the location of your techila_settings.ini configuration file. This will ensure that the configuration file is automatically found when executing the example material included in the Techila SDK.
|
Note
|
If this environment variable is not set, the system might not be able find the configuration file. |
The steps below describe how to create the environment variable on a Windows 7 operating system.
-
Launch the Windows Control Panel
-
Select "System" and "Advanced system settings"
-
In the "System Properties" select the "Advanced" tab
-
Click the "Environment Variables.." button
-
In the "Environment Variables" window, under "User variables" click the "New.." button
-
Enter the following information to the fields:
-
Variable name: TECHILA_SETTINGS_FILE
-
Variable value: <path to your techila_settings.ini file>
In the example below, the
techila_settings.iniin directoryC:\techilawould be usedClick the OK button to create the environment variable.
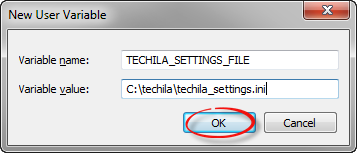 Figure 13. Creating the environment variable
-
After creating the environment variable, please continue with updating the project dependencies.
If you are using .NET Framework 4.x, please see Updating Visual Studio References
If you are using .NET 5 or .NET 6, please see Updating Visual Studio References for .NET 5 and .NET 6
2.2. Updating Visual Studio References
In order to access use Techila Distributed Computing Engine functionality from your application, the following two components from the Techila SDK will need to be added as Visual Studio references. These files contain the Techila Distributed Computing Engine C# API functionality.
-
TechilaManagement.dll (located in 'techila\lib' in the Techila SDK)
-
TechilaExecutor.exe (located in 'techila\lib' in the Techila SDK)
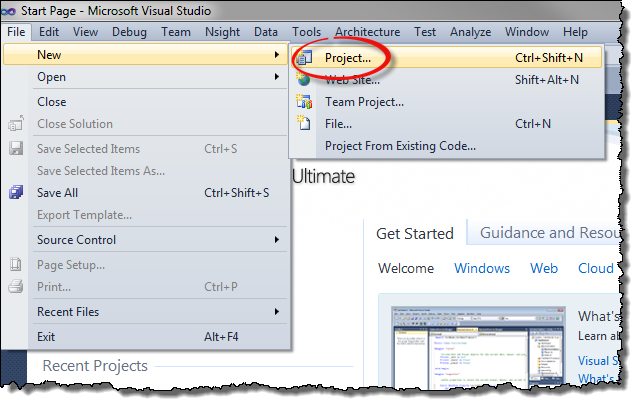
Please add these references whenever developing a new application. Below are step-by-step instructions for adding the references to a new C# console application using Visual Studio 2010.
-
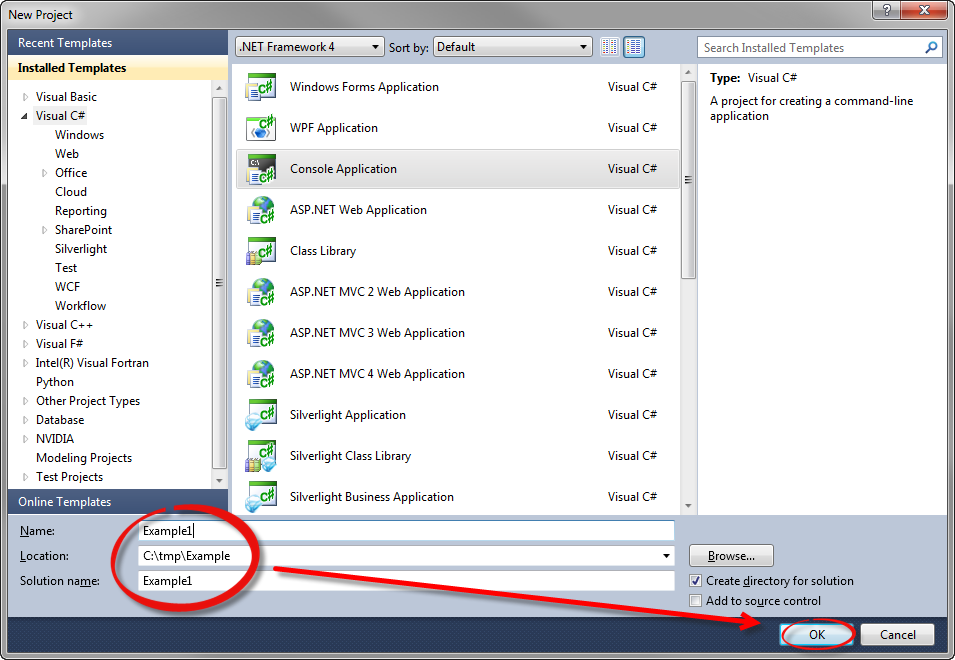
Launch Visual Studio and create the project.
-
Define name and location for the project.
-
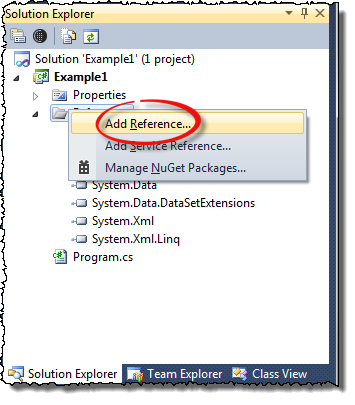
In the Solution Explorer view, right-click on References and click Add Reference
-
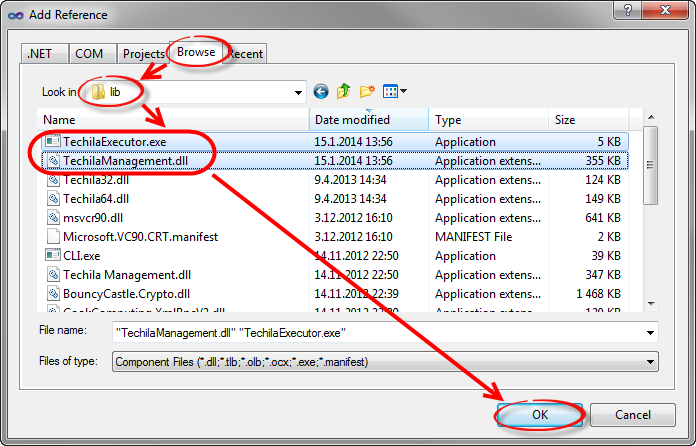
Using the file dialog, select the Browse tab and navigate to the 'techila/lib' directory in the Techila SDK. Select the following files from the directory and click OK.
-
TechilaManagement.dll
-
TechilaExecutor.exe
-
-
The new references should now be visible in the project references as shown below.
-
Set the
Copy Localsetting toTruefor both of the references that you added. This is required in orders to ensure that references will be copied to the same directory with the executable code when the solution is compiled in visual studio.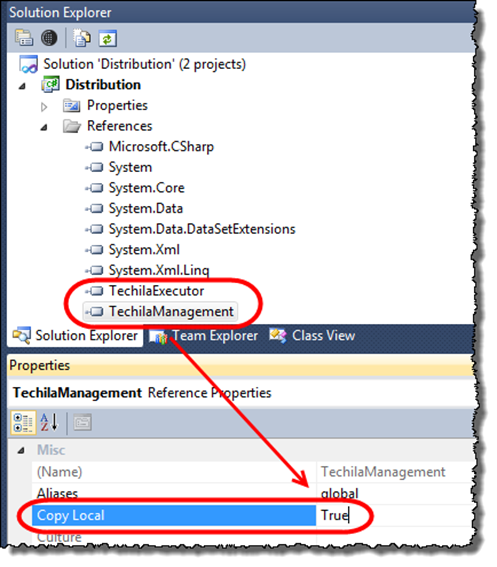 Figure 14. Enable the
Copy Localsetting.
2.3. Updating Visual Studio References for .NET 5 and .NET 6
This Chapter contains instructions for updating Visual Studio references when using .NET 5 and .NET 6.
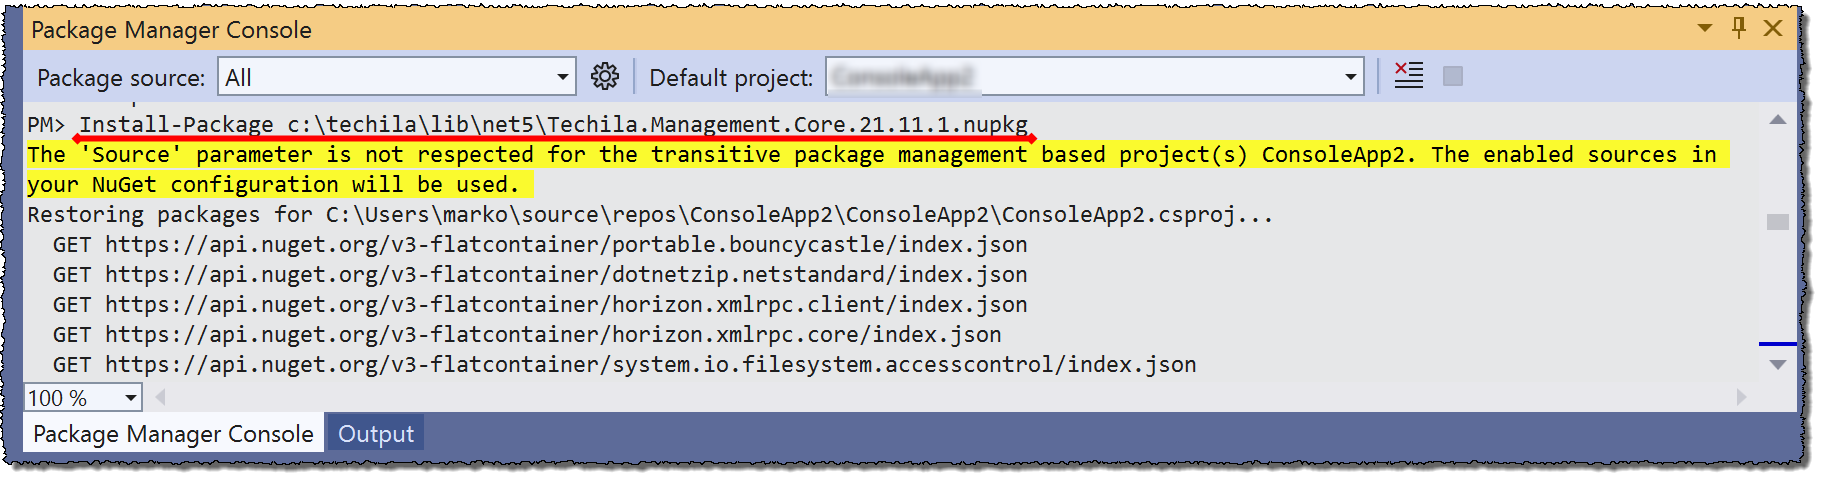
Techila related .NET 5 and .NET 6 components are located in the following folder in the Techila SDK:
techila\lib\net5
The required components can be installed by using the Package Manager Console in Visual Studio. The example command shown below could be used to install the components when the path of the Techila SDK’s 'techila' directory is C:\techila. You will need to modify the path so it matches the location where you extracted the Techila SDK.
Install-Package c:\techila\lib\net5\Techila.Management.Core.<version>.nupkg
The screenshot below shows the Package Manager Console view when executing the command.
Please note that in order to use the graphical status window, you will also need to install the Techila.Management.Graphical.<version>.nupkg and set the target framework to net5.0-windows. If you choose to not install the Techila.Management.Graphical.<version>.nupkg package, you can still use the system but will not be able to access the graphical status window. The package can be installed with the following command:
Install-Package c:\techila\lib\net5\Techila.Management.Graphical.<version>.nupkg
3. Tutorial Examples
This Chapter contains walkthroughs of minimalistic examples that illustrate how to implement and control the core features of the TDCE C# API. The example material discussed in this Chapter, including C#-source code files and data files can be found under the following folder in the Techila SDK:
-
techila\examples\CSharp\Tutorial
Each of the examples contains two pieces of code:
-
A locally executable program that can be executed locally and will not communicate with the distributed computing environment in any way. This program is provided as reference material to illustrate how operations in a locally executable program can be performed in the TDCE environment.
-
A file containing the TDCE-enabled version of the program. This file contains calls to the TDCE C# library functions, which are used to distribute the computational operations to the TDCE environment.
Please note that the example material in this Chapter is only intended to illustrate the core mechanics related to distributing computations from applications developed with C#. The code snippets used in the examples are computationally trivial, meaning using distributed computing will not increase performance due to overheads.
3.1. Executing the First Example
The walkthrough in this Chapter is intended to provide an introduction on distributed computing using the TDCE C# API. The purpose of this example is to demonstrate:
-
Modifying a simple, locally executable program so that the computational operations will be executed on Techila Workers
-
The basic syntax used for creating a computational Project with the TDCE C# API
-
Configuring your Visual Studio and building your first TDCE-enabled C# console application
The C# source code files used in this example are located in the following folder in the Techila SDK:
techila\examples\CSharp\Tutorial\1_distribution
3.1.1. Locally executable program
The source code of the locally executable program is located in the following file:
techila\examples\CSharp\Tutorial\1_distribution\LocalProgram.cs
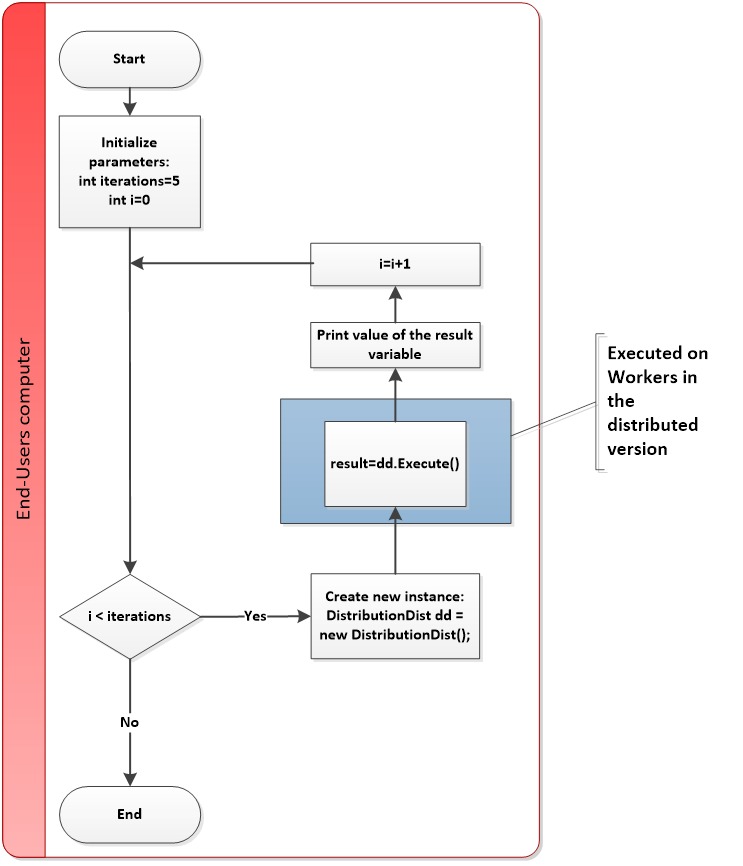
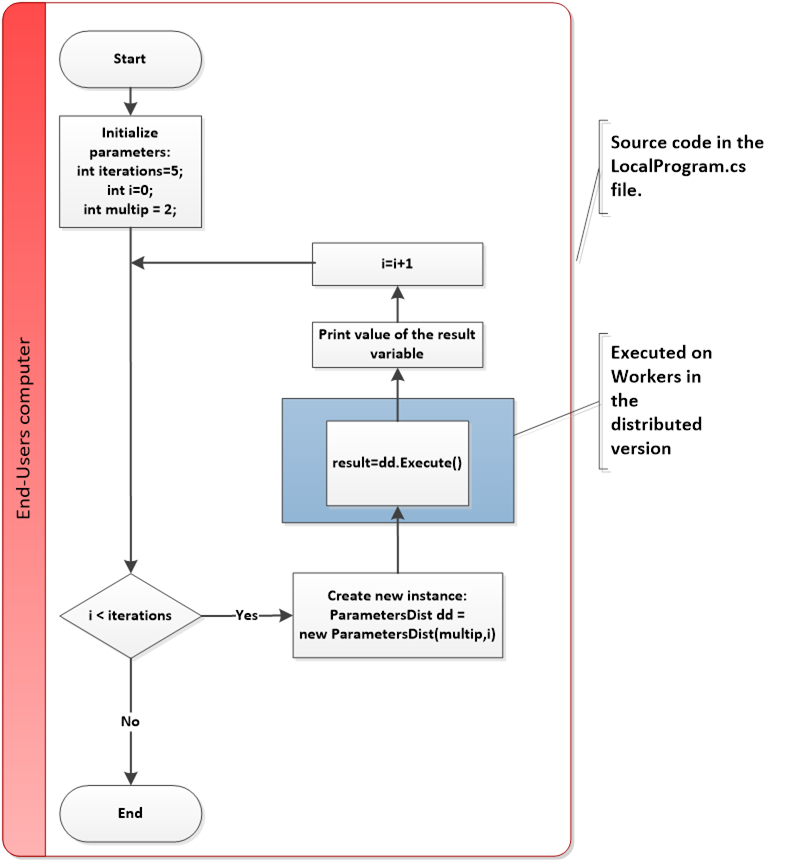
To view the entire source code, please open the file in an editor of your choosing. The process flow of the locally executable program is shown below.
The program contains one for-loop structure. During each for-loop iteration, a new instance of the DistributionDist class will be created. After the instance has been created, the program will call the Execute method defined in the DistributionDist class. In this example, the Execute method consists of a simple summation operation (1+1). The value of the summation will be stored in the result variable, which will then be printed to the standard output stream.
After all five (5) iterations have been completed, the program will exit. The operations taking place within Execute method represent the computationally intensive part of the program. This section has been highlighted in blue and is the code block that will be executed on the Techila Workers in the distributed version.
3.1.2. Distributed version
The source code of the distributed version is located in the following file:
techila\examples\CSharp\Tutorial\1_distribution\RunDistribution.cs
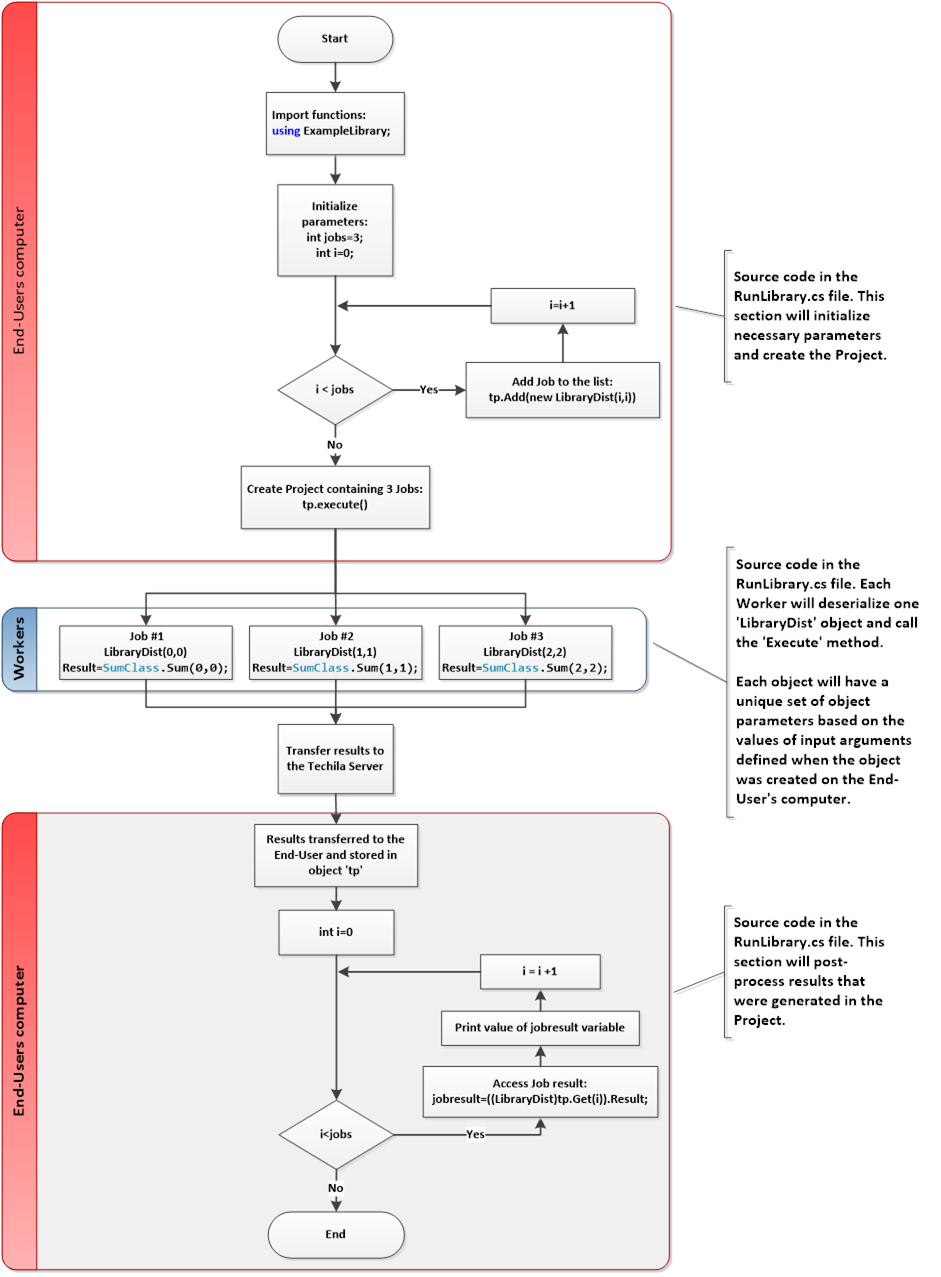
The process flow of the distributed program is shown below. Sections highlighted with red indicate parts of the program that are executed on the End-User’s computer. The section highlighted with blue indicates operations that take place on the Techila Workers.
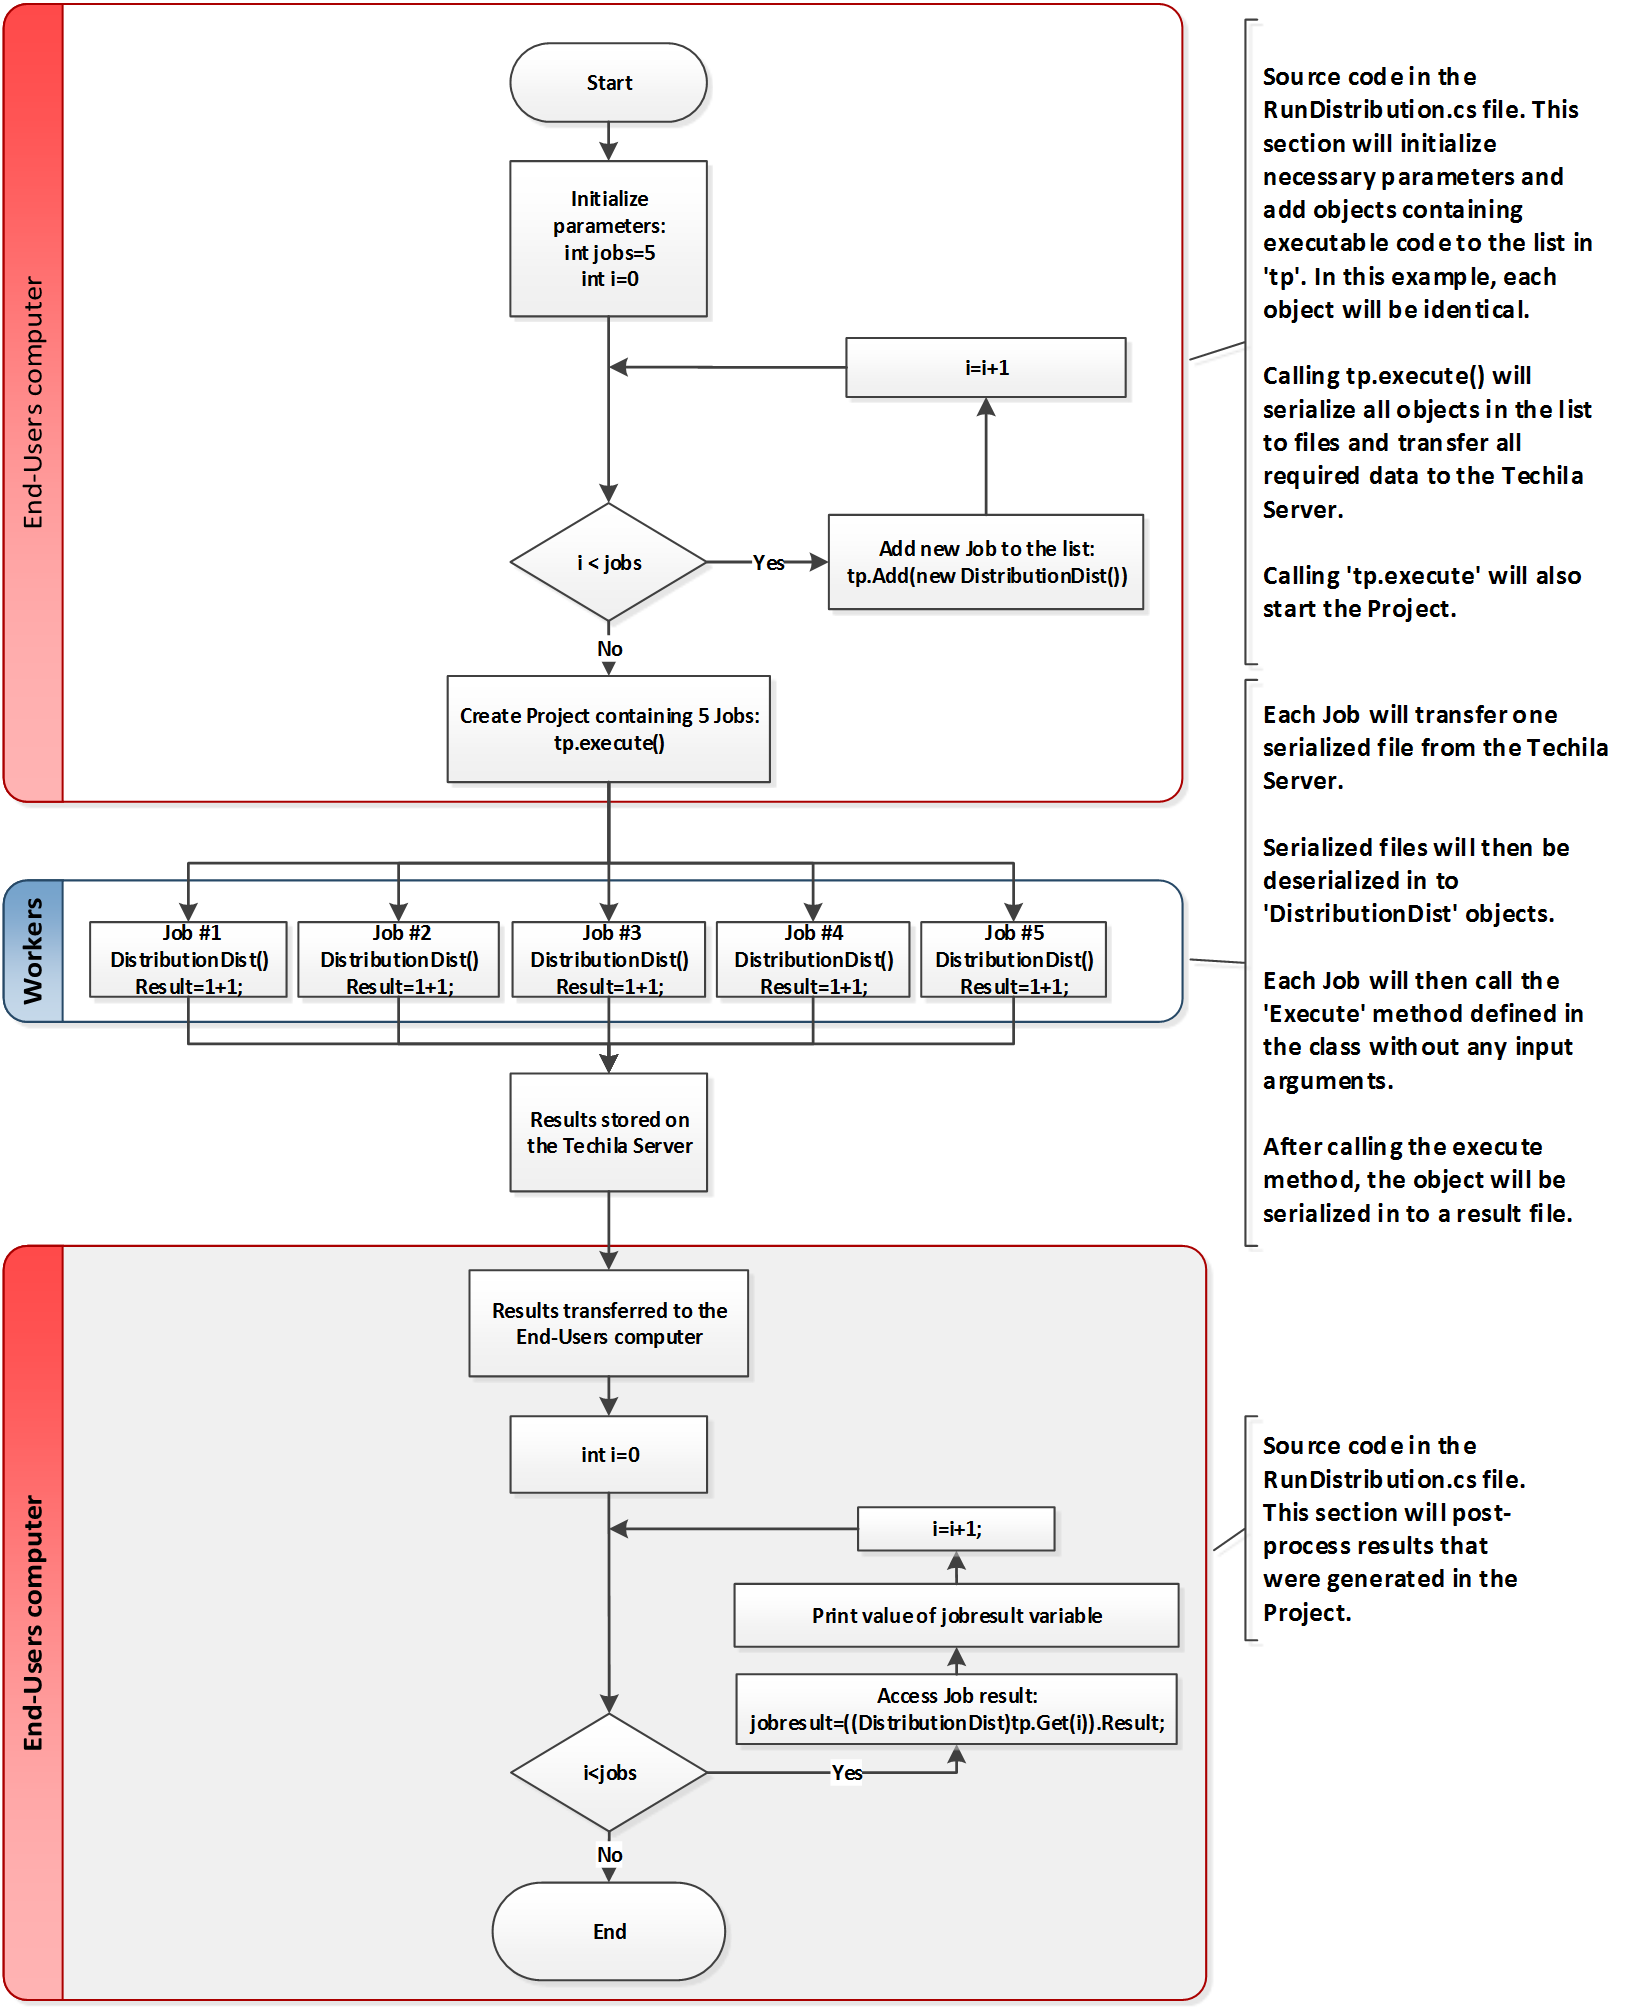
DistributionDist class without any input arguments.The program starts by setting an initialization value for the variable jobs, which will be used to define the number iterations in the for-loop. Each for-loop iteration will create a new DistributionDist object, which will be added to the list in the tp object. After all objects have been added to the list, the computational Project will be created by calling the tp.Execute method.
After the Project has been created, Jobs will be assigned to Techila Workers. After Jobs have been assigned, each Job will retrieve one serialized file (containing a DistributionDist object) from the Techila Server. This file will then be deserialized into a DistributionDist object and the Execute method in the object will be called once.
This means the operations performed during one Job correspond to the operations that would take place during one iteration of the for-loop structure in the locally executable program.
The result value of the summation operation will be stored in the variable Result. Note that in the distributed version, the Result variable will need to be declared as public so that it can be accessed when processing Job results. The image below illustrates the modifications between the locally executable version and the distributed version.
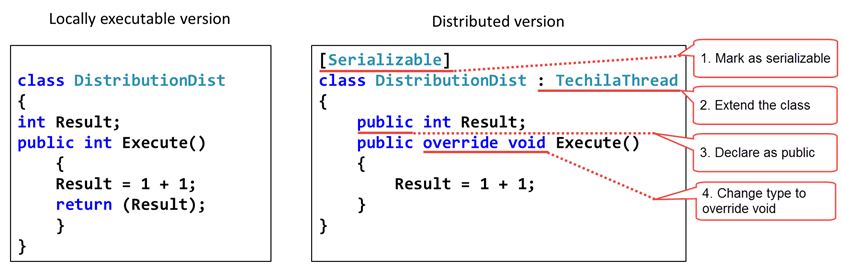
After a Job is completed on a Techila Worker, the DistributionDist object will be serialized to a result file, which will be transferred back to the Techila Server. All modifications made to the values of variables during the Job will be included in the new serialized file. This means that also the new value for the Result variable will be included.
After all the Jobs in the computational Project have completed, result files will be automatically downloaded from the Techila Server to the End-User’s computer. After result files have been downloaded, the data structures in the files (i.e. the DistributionDist objects) will be deserialized and stored in the tp object in a list.
tp object by deserializing the result data.Job results will be accessed in the second for-loop. Each for-loop iteration will access the result generated in one Job and print the value of the result in the standard output stream. The syntax for accessing individual Job results (instances of DistributionDist classes) is illustrated below:

3.1.3. Building and running the example
This Chapter contains step-by-step instructions on how to configure your Visual Studio and run the first C# tutorial example included in the Techila SDK.
Please note that building instructions are only provided for this example. When building other example C# applications included in the Techila SDK, please refer to the instructions provided in this Chapter.
-
Launch Visual Studio and create a new project
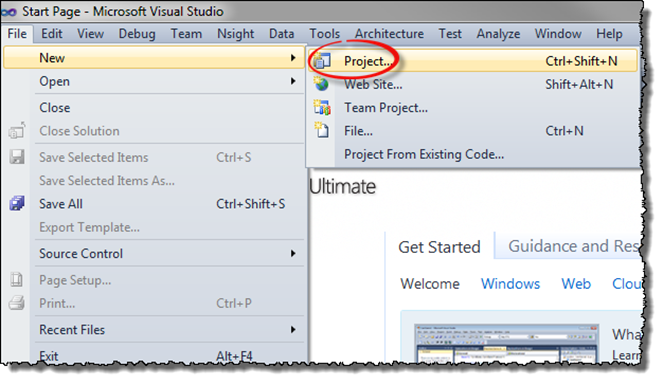 Figure 20. Creating a new Project.
 -
Choose Visual C# template and select .NET Framework 4. Select Console Application and enter a descriptive project and solution name. In this example, the following properties are set:
-
Name: Distribution
-
Location: C:\techila\examples\CSharp\Tutorial\1_distribution
-
Solution Name: TutorialExample_1
-
-
Click OK to create the project.
 Figure 21. Specifying the Project type.
 -
In the Solution Explorer, right click on the
Program.csfile and choose Delete.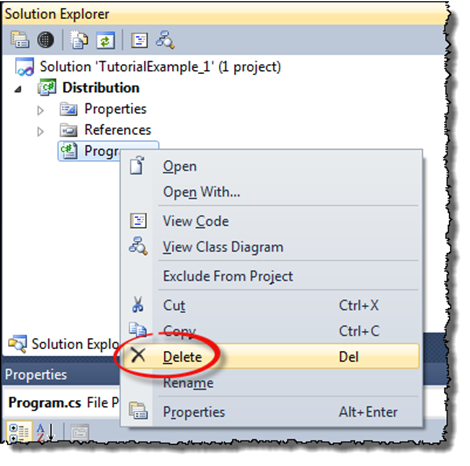 Figure 22. Delete the
Program.cs. -
When prompted, confirm the action.
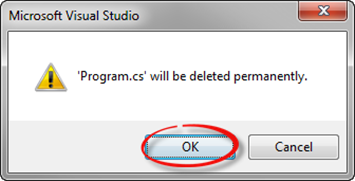 Figure 23. Confirm the action.
 -
In the Solution Explorer, right click on the project and choose Add → Existing Item…
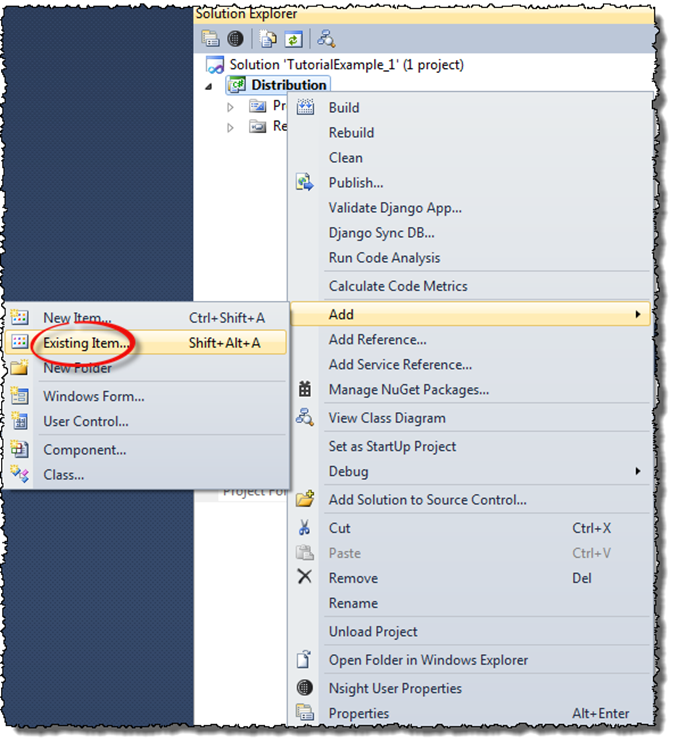 Figure 24. Adding an existing item.
 -
Using the "Add Existing Item" window, navigate to the following Techila SDK directory:
<full path>\techila\examples\CSharp\Tutorial\1_distribution
Replace the <full path> notation with the path leading to your Techila SDK. After navigating to the directory select the following file:
-
RunDistribution.cs
Click the Add button to add the file to the project.
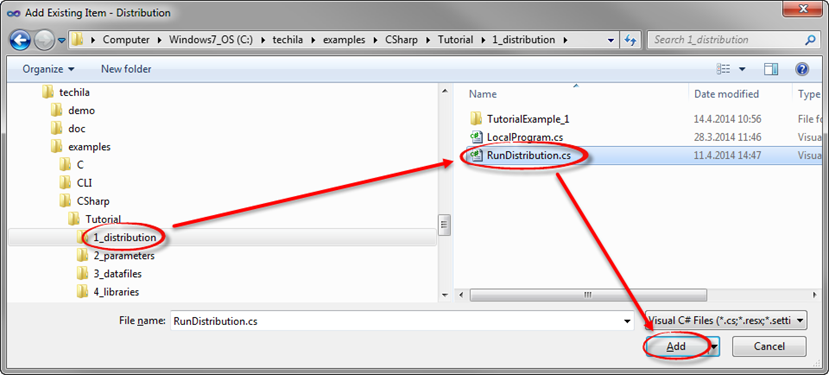 Figure 25. Adding the
RunDistribution.csfile.
-
-
In the Solution Explorer view, right-click on References and click Add Reference.
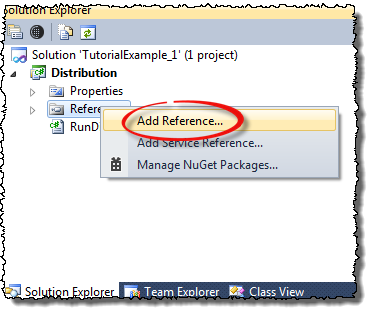 Figure 26. Adding references.
 -
Using the file dialog, select the Browse tab and navigate to the following directory in the Techila SDK:
<full path>\techila\lib
Select the following files from the directory:
-
TechilaManagement.dll
-
TechilaExecutor.exe
Click OK to add the files.
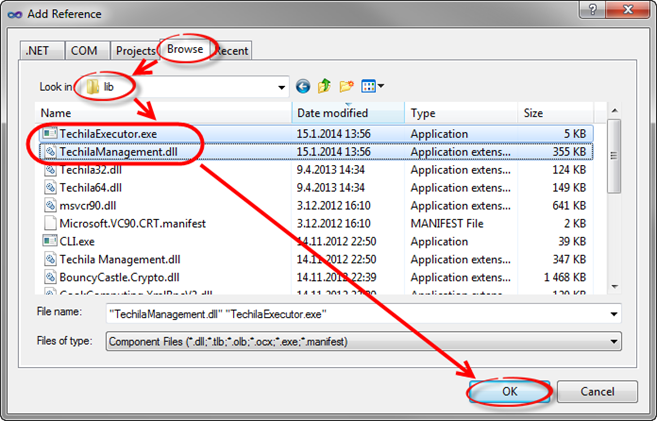 Figure 27. Required references are found in the
techila/libdirectory in the Techila SDK.
-
-
The new references should now be visible in the project references as shown below.
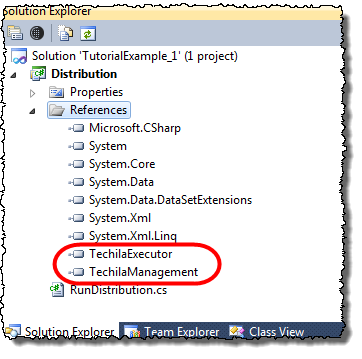 Figure 28. View after references have been added to the project.
 -
Set the
Copy Localsetting toTruefor both of the references that you added. This is required in order to ensure that references will be copied to the same directory with the executable code when the solution is compiled in Visual Studio.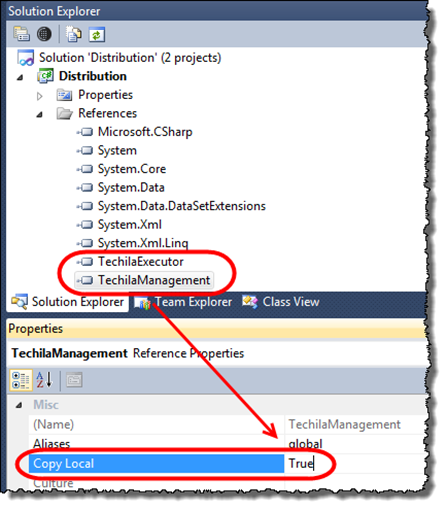 Figure 29. Enable the
Copy Localsetting. -
In the Solution Explorer, right click on the solution and select Add New Projec…
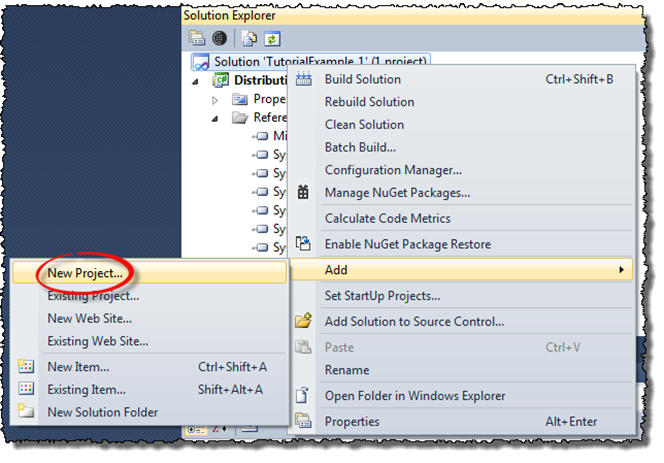 Figure 30. Adding another project.
 -
Choose Visual C# template and select .NET Framework 4. Select Console Application and enter a descriptive project and solution name. In this example, the following properties are set:
-
Name: LocalProgram
-
Location: C:\techila\examples\CSharp\Tutorial\1_distribution
-
Click OK to create the project.
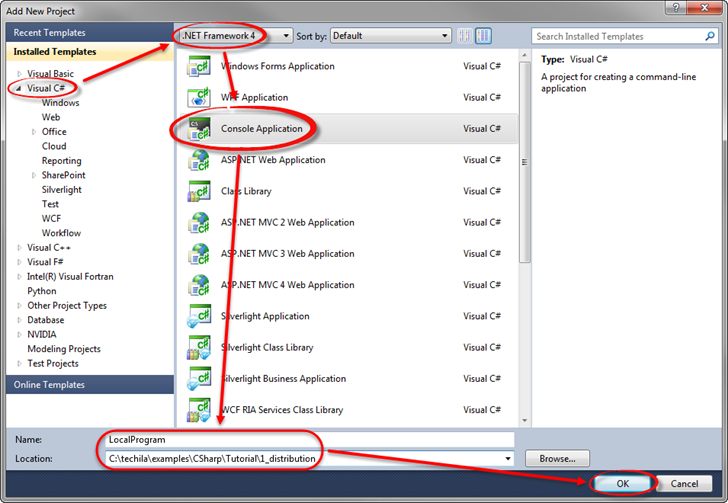 Figure 31. Creating the project.
-
-
In the Solution Explorer, right click on the
Program.csfile under the project you just created and choose Delete.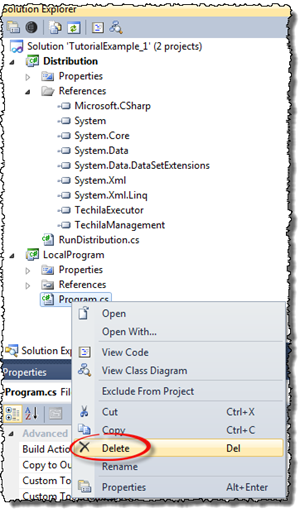 Figure 32. Deleting the existing file.
 -
When prompted, confirm the action.
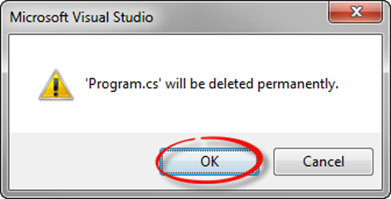 Figure 33. Confirm the action.
 -
In the Solution Explorer, right click on the
LocalProgramproject and select Add → Existing Item…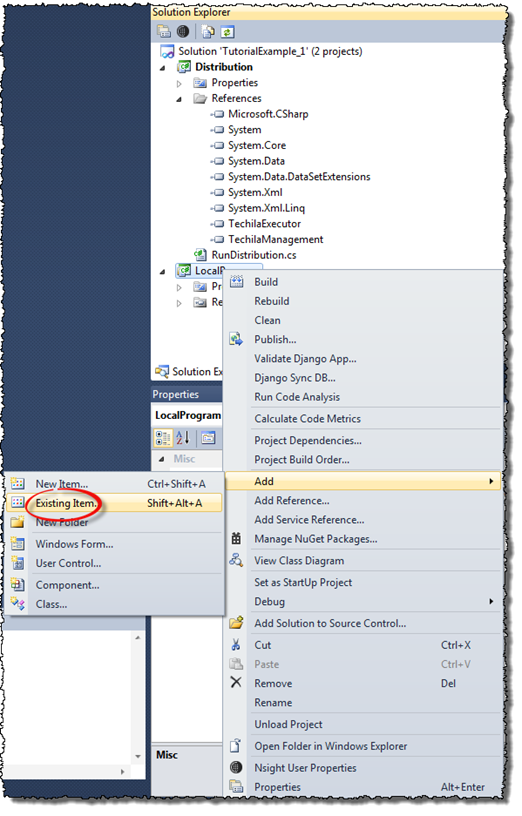 Figure 34. Adding an existing item.
 -
Using the "Add Existing Item" window, navigate to the following Techila SDK directory:
<full path>\techila\examples\CSharp\Tutorial\1_distribution
Replace the <full path> notation with the path leading to your Techila SDK.
After navigating to the directory select the following file:
-
LocalProgram.cs
Click the Add button to add the file to the project.
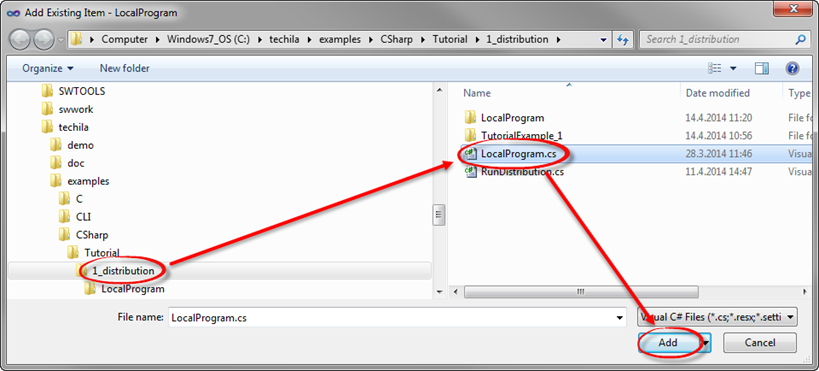 Figure 35. Selecting the
LocalProgram.csfile.
-
-
In the Solution Configuration, select Release and x64.
Note! If
x64is not available in the drop down menu, use the Configuration Manager to add the configuration.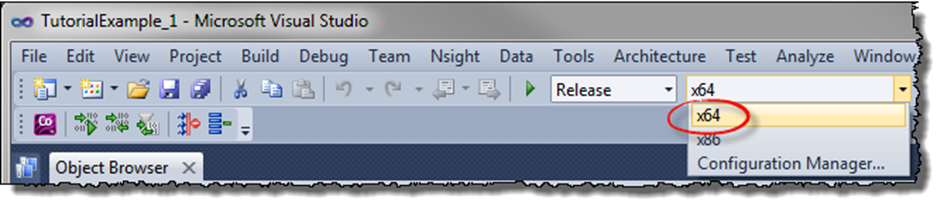 Figure 36. Choose x64 as the processor architecture.
 -
Build the solution by selecting Build Solution.
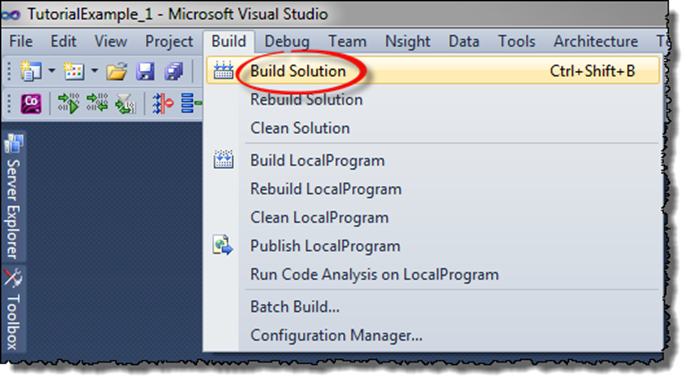 Figure 37. Build the solution.
 -
The build process will create two executable files. If you have chosen your project names as shown in this document, the executable names will be:
-
Distribution.exe
-
LocalProgram.exe
The locations of the executables are also displayed in the Output window.
 Figure 38. Paths to compiled binaries are displayed in the Output window.
-
-
Next steps will show how you can run the local and distributed versions of the application
Launch a windows command prompt and navigate to the directory containing the
LocalProgram.exefile. Run the program using command:LocalProgram.exe
When the program is executed, the result of each iteration will be displayed.
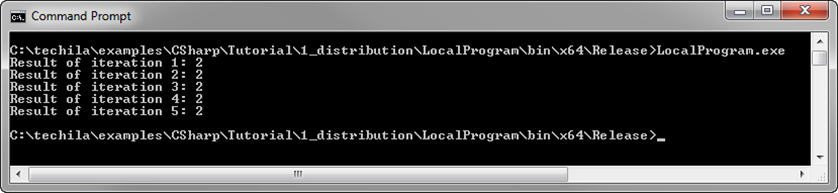 Figure 39. Executing the locally executable program.
 -
Using the command prompt, navigate to the directory containing the
Distribution.exefile. Create the Project using command:distribution.exe
When prompted, enter your keystore file password and click the OK button to continue.
 Figure 40. Entering the keystore password.
 -
After entering your keystore password, the Project will be created. The status messages will be displayed in the console window.
-
After the Project has been completed, the result of each Job will be displayed on a separate line as shown below.
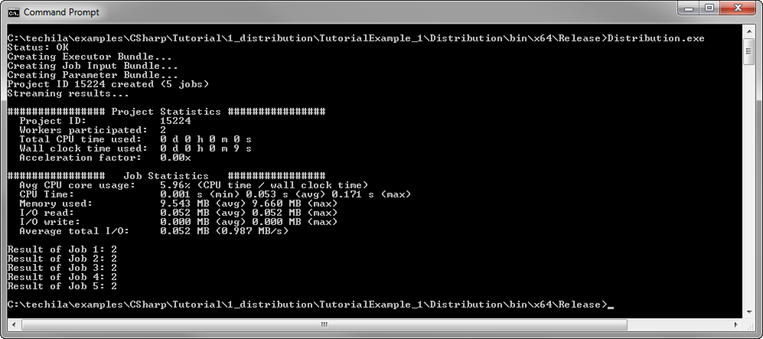 Figure 41. Executing the distributed application where computational operations are executed in the Techila Distributed Computing Engine environment.
Note! If errors occur in your Project, the status window will remain unclosed. As long as the status window remains open, the windows command prompt will be unresponsive.
-
If required, close the status window manually by clicking the Close Window button.
You can also configure the status window to be always closed automatically by adding a comment mark (#) in the
techila_settings.inifile on the following line:#statuswindow.nocloseonerror=true
3.2. Using Input Arguments
The walkthrough in this Chapter is intended to provide an introduction on how you can pass input arguments to the code that will be executed on Techila Workers.
The material discussed in this example is located in the following folder in the Techila SDK:
-
techila\examples\CSharp\Tutorial\2_parameters
Input arguments can be passed to executable code by defining the input arguments when creating a new instance of the serializable class. For example, the following code could be used to create two instances of class ParametersDist with different input arguments.
TechilaProject tp = new TechilaProject(tm, "Example");
int multip = 2;
int i = 1;
tp.Add(new ParametersDist(multip,i)); // First instance with args: ParametersDist(2,1)
i = 2;
tp.Add(new ParametersDist(multip,i)); // Second instance with args: ParametersDist(2,2)
When using input arguments in your serializable class, you will also need to define a suitable constructor. This constructor will be called when creating instances of the class, meaning it must be able to process the input arguments. For example, the following constructor could be used to create objects that take two input arguments.
[Serializable]
class ParametersDist : TechilaThread
{
   public int Multip;
   public int Index;
   // Constructor to read the input arguments
   public ParametersDist(int multip, int index) {
       this.Multip = multip;
       this.Index = index;
   }
// Executable code should be here.
}
3.2.1. Locally executable program
The source code of the locally executable program is located in the following file:
techila\examples\CSharp\Tutorial\2_parameters\LocalProgram.cs
To view the entire source code, please open the file in an editor of your choosing. The process flow of the locally executable program is shown below in the image below.
The program starts by initializing the parameters values for the following variables:
-
iterations(Will be used to define the number of iterations in the for-loop) -
multip(Will be used in the multiplication operation. Value is same for each iteration.) -
i(Will be used in the multiplication operation. Value changes in each iteration.)
After variables have been initialized, the program enters a for-loop. During each for-loop iteration, a new ParametersDist object will be created with two input arguments. After the object has been created, the program will call the Execute method defined in the class. In this example, the Execute method consists of a multiplication operation where the iteration counter (variable i) and the variable with the fixed value (variable multip) are multiplied.
The value of the multiplication operation will be stored in the result variable, which will then be printed to the standard output stream.
After all five (5) iterations have been completed, the program will exit. The operations taking place within Execute method represent the computationally intensive part of the program. This section has been highlighted in blue and is the code block that will be executed on the Techila Workers in the distributed version.
3.2.2. Distributed version
The source code of the distributed version is located in the following file:
techila\examples\CSharp\Tutorial\2_parameters\RunParameters.cs
The process flow of the distributed program is shown in the image below. Sections highlighted with red indicate parts of the program that are executed on the End-User’s computer. The section highlighted with blue indicates operations that take place on the Techila Workers.
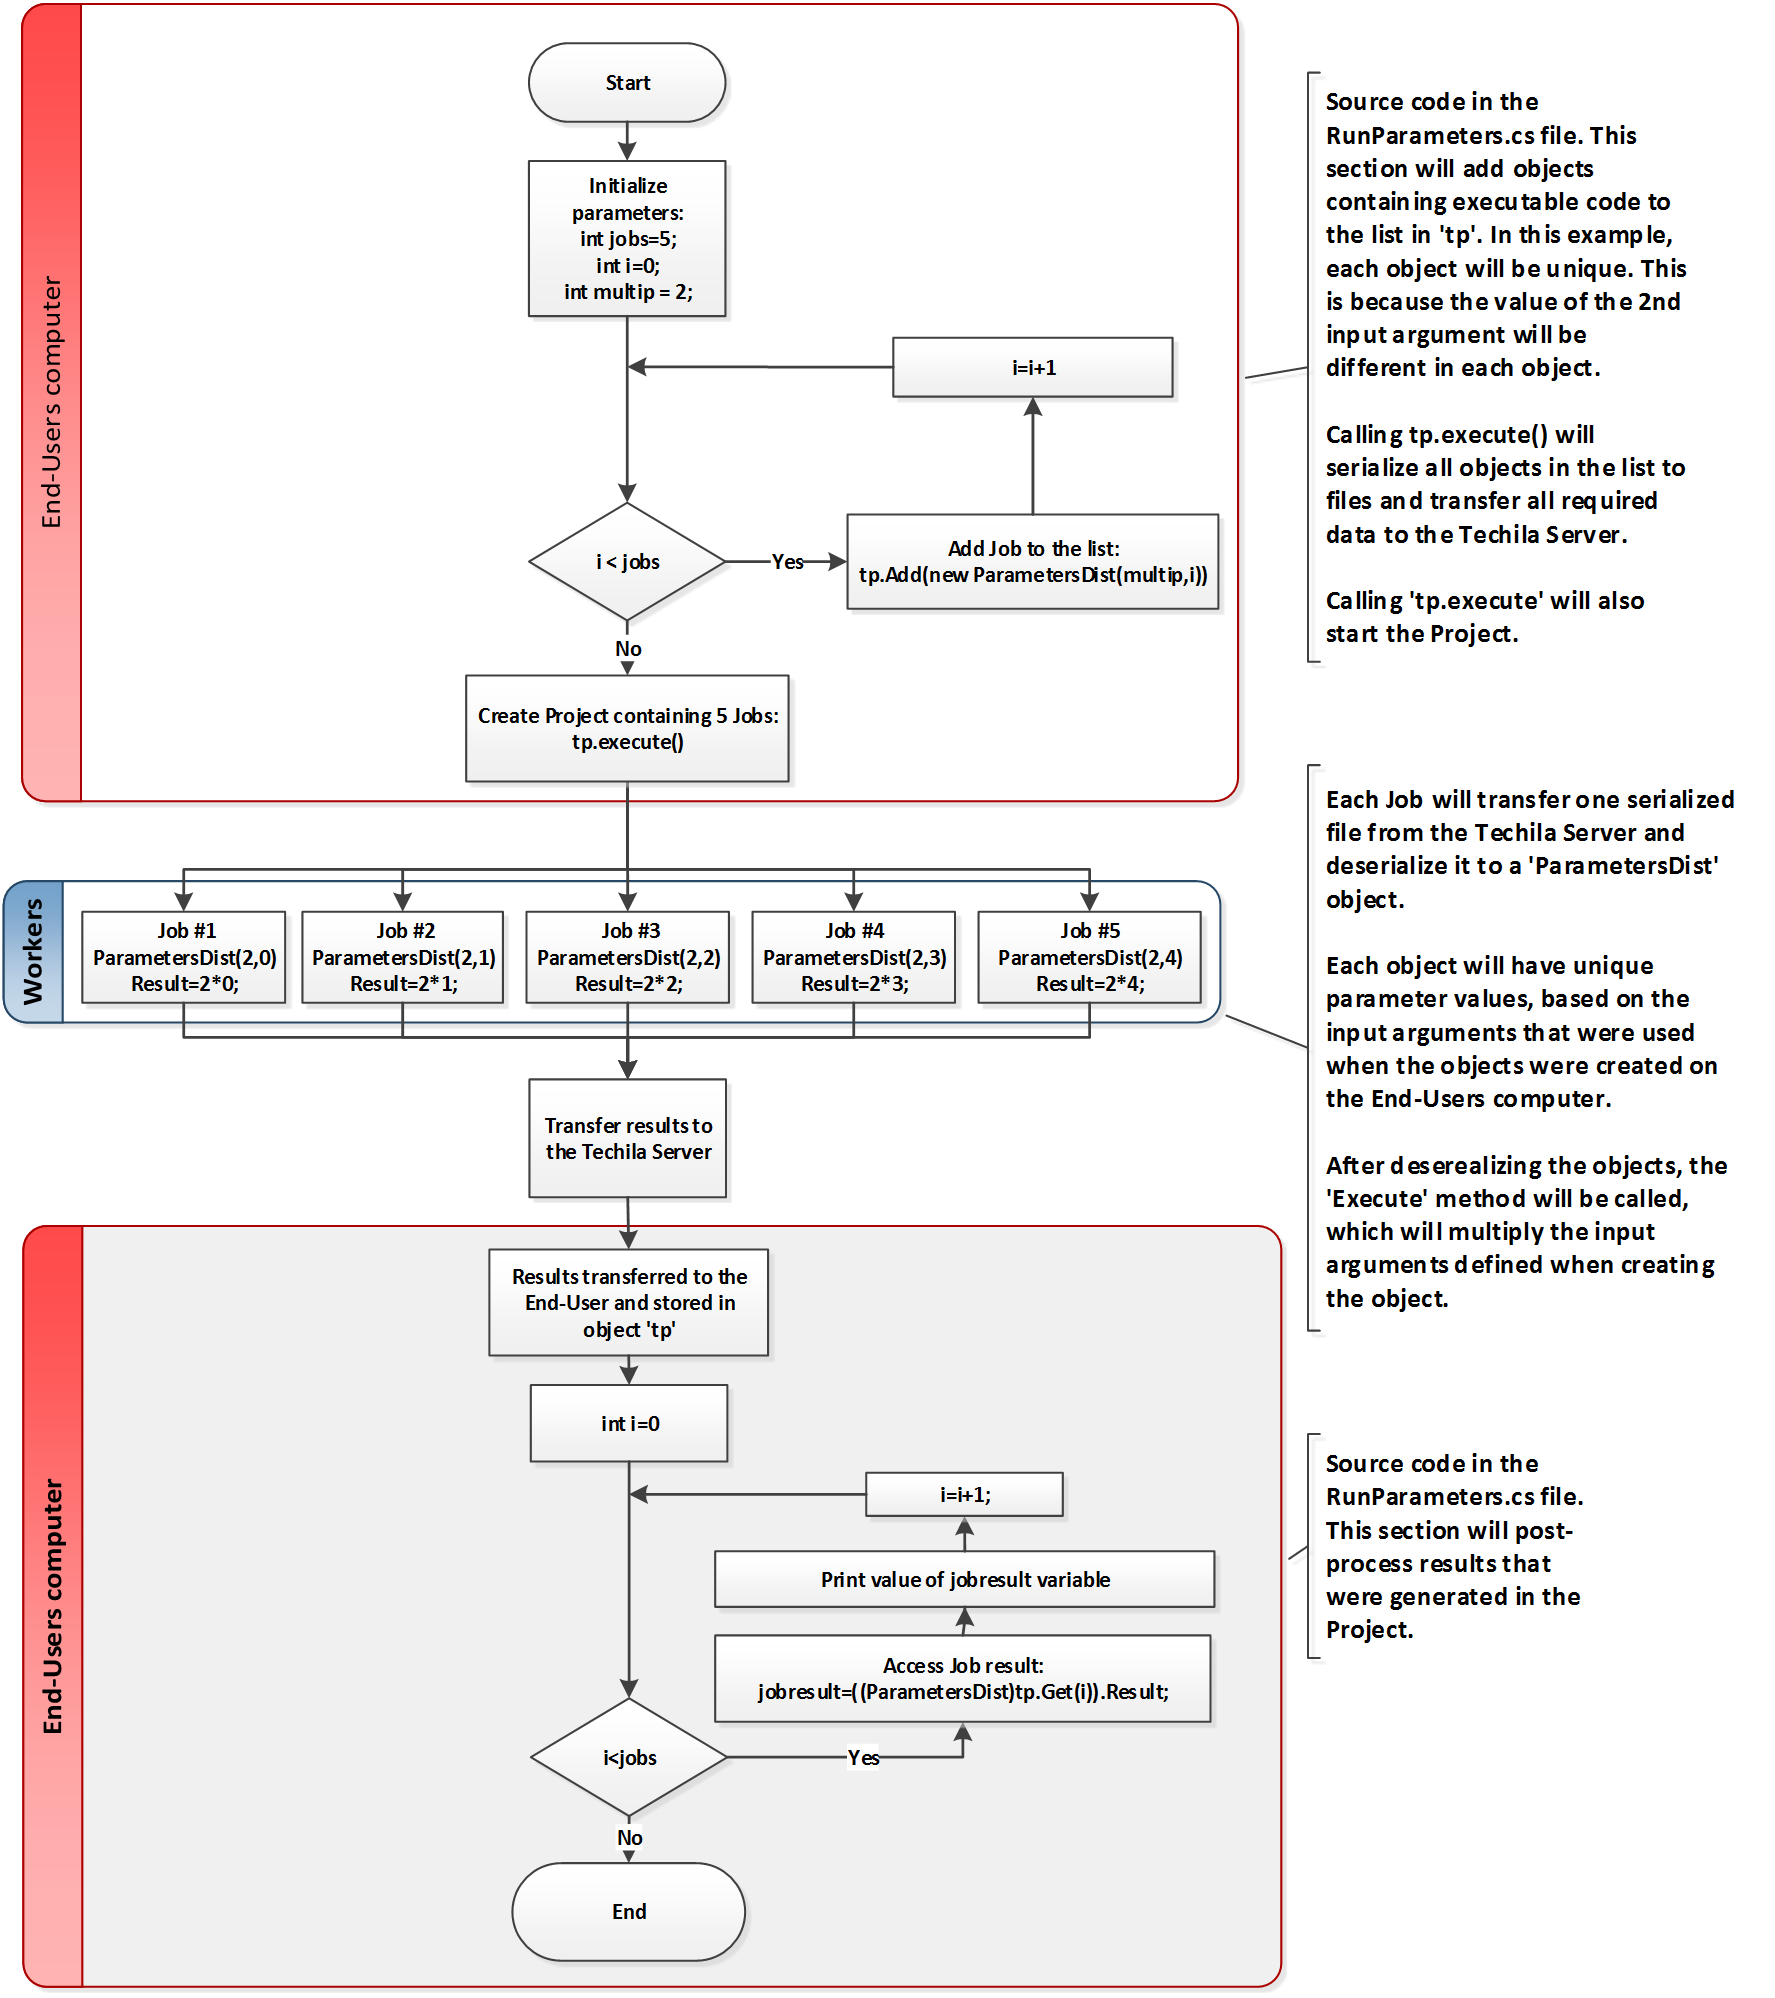
The program starts by setting an initialization value for the variable jobs, which will be used to define the number iterations of in the for-loop. Each for-loop iteration will create a new ParametersDist object, where the value of the second input argument will depend on the value of the loop counter (variable i). The values of the input arguments will be stored in the objects and will be used when the computations are executed on the Techila Workers
After all of the objects have been added, the computational Project will be created by calling the tp.Execute method.
After the Project has been created, Jobs will be assigned to Techila Workers. In this example, each Techila Worker will transfer one serialized file, which contains a ParametersDist object. The variable values in these objects will match the values defined as input arguments when the objects were created on the End-User’s computer.
After deserialization, the Execute method will be called. This method will multiply the values defined as input arguments when the object was created. Job #1 will multiply 2*0, Job #2 will multiply 2*1 and so on.
This means that the operations that occur in each Job can be thought to correspond with the operations that take place in one iteration of the for-loop in the locally executable program.
The result value of the summation operation will be stored in the variable Result. Again, please note that in the distributed version, the Result variable will need to be declared as public so that it can be accessed when processing Job results
3.2.3. Running the example
This Chapter contains illustrations on how to run the example program described in this Chapter.
|
Tip
|
If you need help building the example material, please follow the steps described in Building and running the example. |
After building the LocalProgram.cs file, you can run the locally executable program from the Windows Command Prompt using command:
LocalProgram.exe
After executing the command, the program should generate the following output.

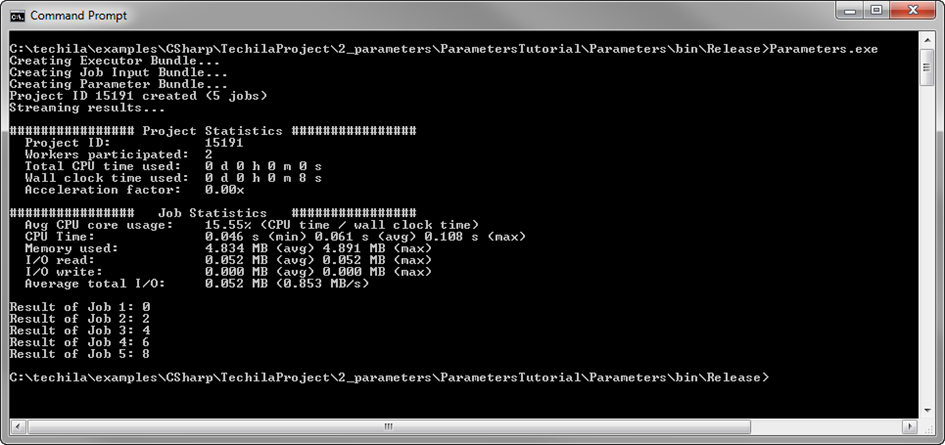
After building the RunParameters.cs file, you can run the distributed version of the program from the Windows Command Prompt using command:
Parameters.exe
After executing the command, the program should generate the following output.
3.3. Transferring Data Files
The walkthrough in this Chapter is intended to provide an introduction on how you can transfer additional data files to Techila Workers.
Material discussed in this example is located in the following folder in the Techila SDK:
-
techila\examples\CSharp\Tutorial\3_datafiles
Additional files can be transferred to the Techila Workers by using the methods listed below:
-
Peach.NewDataBundle() -
Peach.AddDataFile(string file) -
Peach.AddDataFile(string file, string targetName) -
Peach.AddDataFileWithDir(string dir, string file)
These methods are explained below.
Peach.NewDataBundle() method is used state that a new Data Bundle should be created. This function must be called before files can be added to the Data Bundle.
Peach.AddDataFile(string file) method can be used add files to a Data Bundle, enabling you to transfer files from your current working directory to the Techila Server and Techila Workers. The input argument (string file) will be used to define the name of the file that should be transferred. For example, the syntax shown below would transfer a file called datafile.txt from the current working directory to all Techila Workers participating to the Project.
TechilaProject tp = new TechilaProject(tm, "Example");
tp.GetPeach().NewDataBundle();
tp.GetPeach().AddDataFile("datafile.txt");
Multiple files can be transferred by using multiple method calls. For example, the syntax shown below would transfer files datafile1.txt and datafile2.txt to all Techila Workers participating to the Project.
TechilaProject tp = new TechilaProject(tm, "Example");
tp.GetPeach().NewDataBundle();
tp.GetPeach().AddDataFile("datafile1.txt");
tp.GetPeach().AddDataFile("datafile2.txt");
Peach.AddDataFile(string file, string targetName) method can be used to transfer file to the Techila Worker and copy the files to a different target name on the Techila Worker. The first input argument is the name of the file on your computer. The second input argument is the name of the file after it has been transferred to the Techila Worker. For example, the syntax shown below would transfer a file called datafile.txt to the Techila Worker, where it would be renamed to workerfile.txt.
TechilaProject tp = new TechilaProject(tm, "Example");
tp.GetPeach().NewDataBundle();
tp.GetPeach().AddDataFile("datafile.txt","workerfile.txt");
Peach.AddDataFileWithDir(string dir, string file) method can be used to transfer files that are NOT located in the current working directory. The first input argument defines where the directory where the file is (null for current directory). The second input argument defines the name of the file that should be transferred. For example, the following syntax would transfer a file called datafile.txt located in the directory C:\temp to all participating Techila Workers.
TechilaProject tp = new TechilaProject(tm, "Example");
tp.GetPeach().NewDataBundle();
tp.GetPeach().AddDataFileWithDir("C:\\temp","datafile.txt");
Please note that all files transferred using these functions will be copied to the same temporary working directory with the executable binary when the computational Job is processed on the Techila Worker. If you wish to preserve the directory structure of the transferred files, this can be achieved by creating a named data bundle by using the Techila Bundle Creator Tool (as described in the Bundle Guide) and importing the named Data Bundle to the computational Project.
Another option for preserving the directory structure is to create a zip-archive of the files/folders you want to transfer and place the zip-archive in the Bundle. After transferring the Bundle to the Techila Worker, you can extract the zip-archive, which will preserve the directory structure.
After a Data Bundle has been created, it can be automatically reused in subsequent computational Projects assuming that nothing has changed regarding following properties:
-
The number of Data Bundles created
-
Timestamps of files in the Bundles
-
Content of the files in the Bundles
If you wish to create a Bundle that can be reused in several different computational Projects, it is recommended that you use the CLI createBundle command or the Techila Bundle Creator tool for creating the Data Bundle. More information on the use of these tools can be found in Bundle Guide. The Bundle can then be imported in to a computational Project using the following function:
tp.GetPeach().AddExeImport(string importName);3.3.1. Locally executable program
The source code of the locally executable program is located in the following file:
techila\examples\CSharp\Tutorial\3_datafiles\LocalProgram.cs
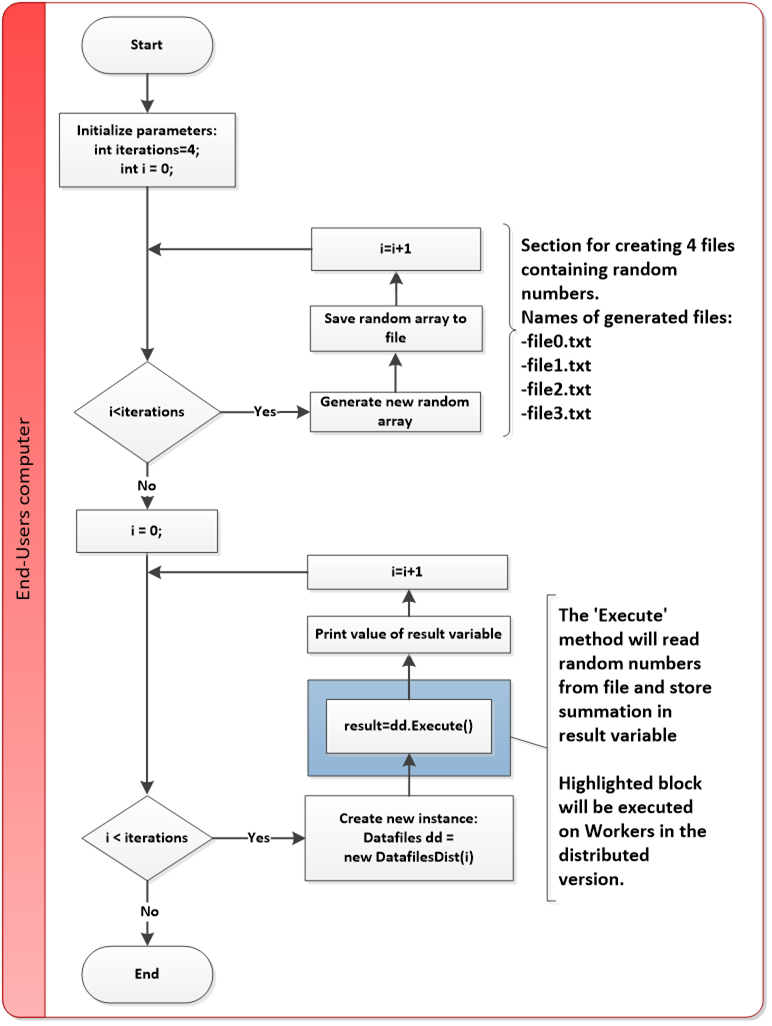
To view the entire source code, please open the file in an editor of your choosing. The process flow of the locally executable program is shown below in the image below.
The program starts by initializing the parameters values for the following variables:
-
iterations(Will be used to define the number of iterations in the for-loops) -
i(Will be used to define the name of the file. Will also be used to select which file will be processed during each iteration in the second for-loop.)
After variables have been initialized, the program enters the first for-loop structure. During each for-loop iteration, the program generates one text file in the current working directory. Each file will contain a list of random numbers. Each file will have a unique name based on the value of the loop counter i.
After generating four files, the program will enter the second for-loop structure. This loop structure will be used to read the random numbers from each file that was generated and calculate the sum of these random numbers (per file).
At the start of each for-loop iteration, a new DatafilesDist object will be created with one input argument (variable i). The value of this input argument will be stored in the object and will be used to select which file will be processed during the iteration.
After the instance has been created, the program will call the Execute method defined in the DatafilesDist class. In this example, the Execute method consists of reading the content of the specified file and calculating the sum of random numbers in the file.
The value of the summation operation will be stored in the result variable, which will then be printed to the standard output stream.
After all four (4) iterations have completed, the program will exit. The operations taking place within Execute method represent the computationally intensive part of the program. This section has been highlighted in blue and is the code block that will be executed on the Techila Workers in the distributed version.
3.3.2. Distributed version
The source code of the distributed version is located in the following file:
techila\examples\CSharp\Tutorial\3_datafiles\RunDatafiles.cs
The process flow of the distributed program is shown below. Sections highlighted with red indicate parts of the program that are executed on the End-User’s computer. The section highlighted with blue indicates operations that take place on the Techila Workers.
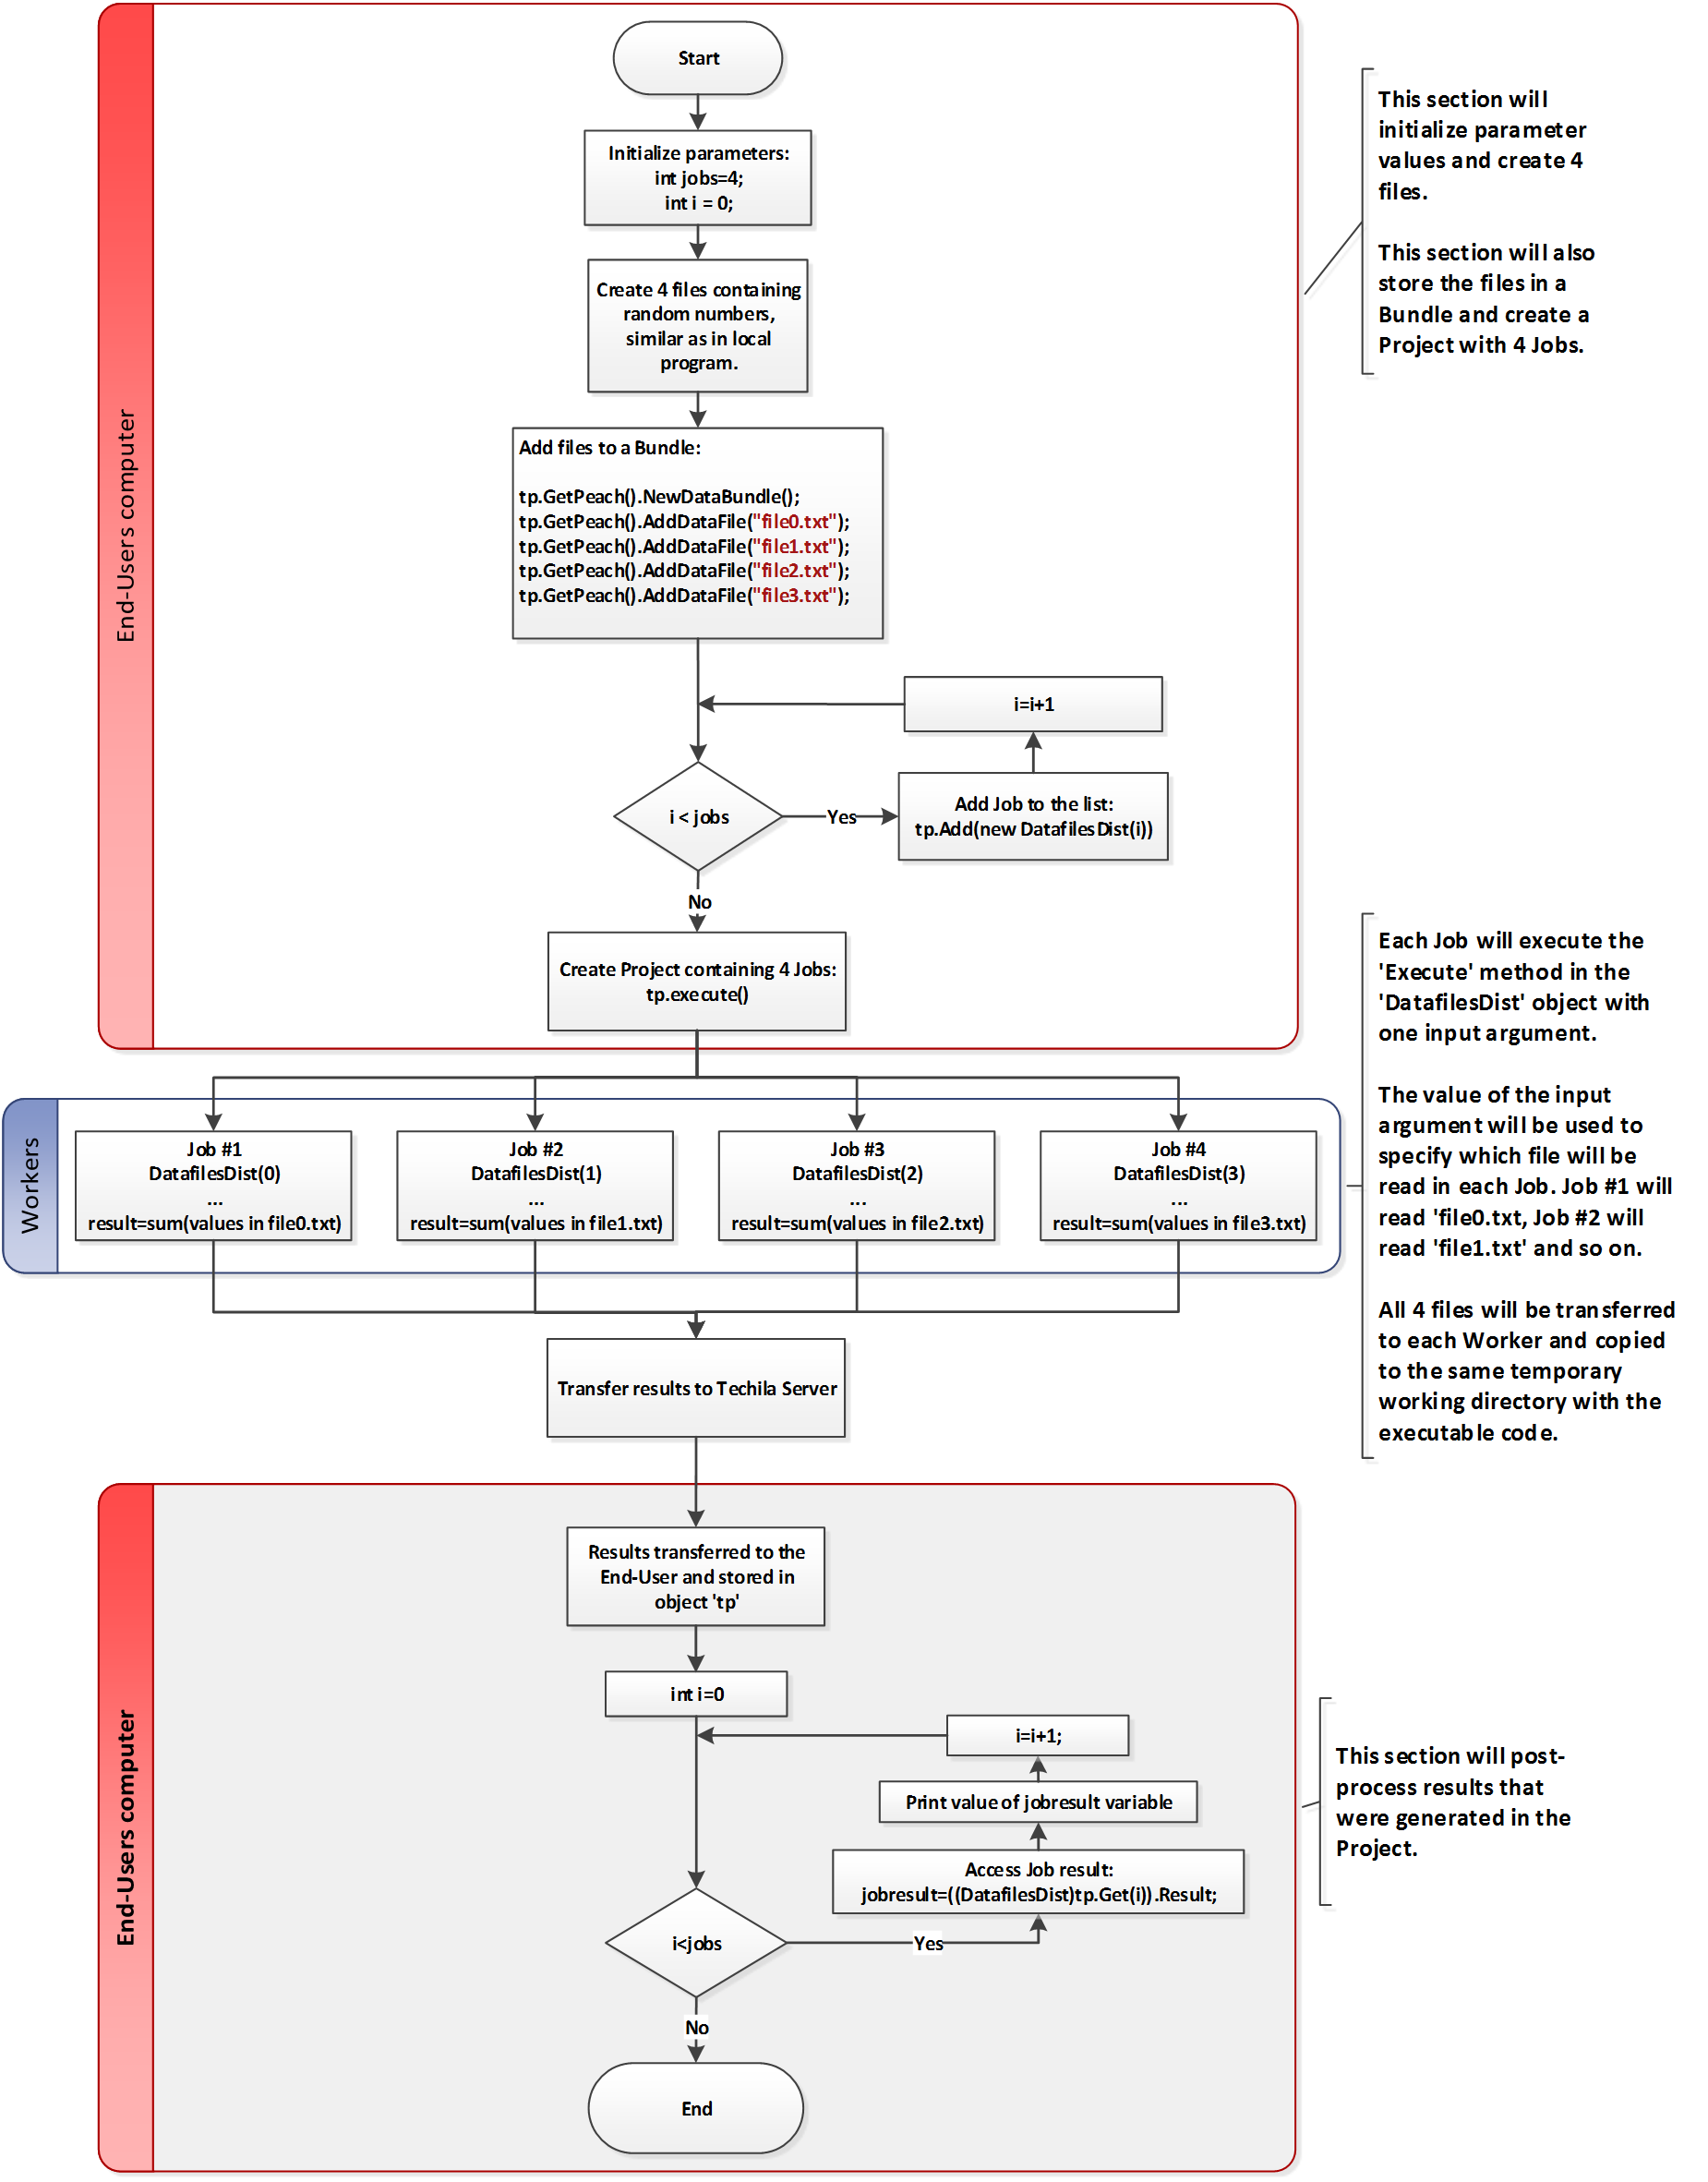
The program starts by creating four text files containing random numbers, similarly as in the locally executable program. After generating the files, the program will add the files to a Bundle by using the NewDataBundle and AddDataFile commands. This will mark all four files to be transferred to the Techila Server when the tp.execute() is called.
After the files have been added to the Bundle, the program will enter a for-loop. Each for-loop iteration will create a new DatafilesDist object with a different input argument. These objects will be added to the list in the tp object.
After all objects have been added to the list, the computational Project will be created by calling the tp.Execute method. Calling the tp.Execute method will also create the Bundle that contains the four text files. This Bundle will then be automatically transferred to the Techila Server.
After the Project has been created, Jobs will be assigned to Techila Workers. At this point, the Bundle containing the four text files will also be automatically transferred to each participating Techila Worker. After the Bundle has been transferred to the Techila Worker, the text files will be extracted from the Bundle and copied to the same temporary working directory that contains the executable code.
After all files required for the Job have been copied to the temporary working directory, the DatafilesDist object will be deserialized. After deserialization, the Execute method in the DatafilesDist class will be called. This means that the operations that occur in each Job can be thought to correspond with the operations that take place in one iteration of the for-loop in the locally executable program.
The result value of the summation operation will be stored in the variable Result. Again, please note that in the distributed version, the Result variable will need to be declared as public so that it can be accessed when processing Job results
3.3.3. Running the example
This Chapter contains illustrations on how to run the example program described in this Chapter.
|
Tip
|
If you need help building the example material, please follow the steps described in Building and running the example. |
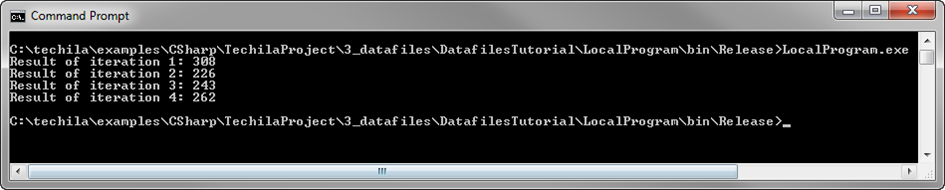
After building the LocalProgram.cs file, you can run the locally executable program from the Windows Command Prompt using command:
LocalProgram.exe
After executing the command, the program should generate the following output.
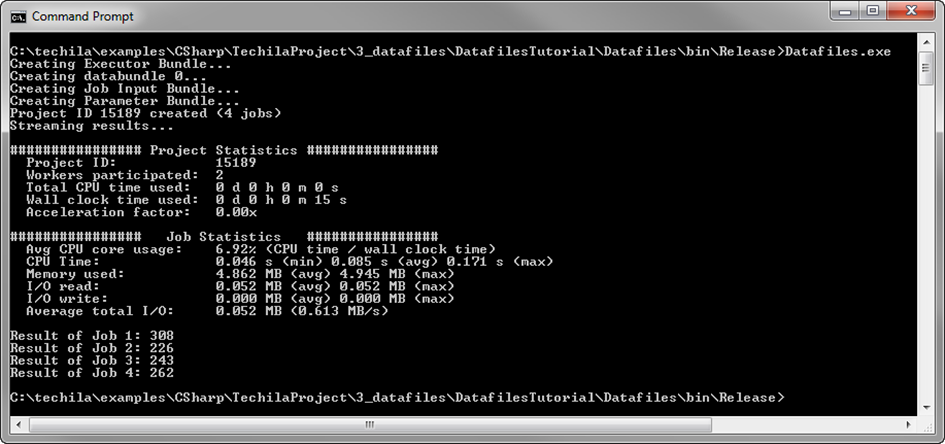
After building the RunDatafiles.cs file, you can run the distributed version of the program from the Windows Command Prompt using command:
Datafiles.exe
After executing the command, the program should generate the following output.
3.4. Using Dynamically Linked Libraries
The walkthrough in this Chapter is intended to provide an introduction on how you can use dynamically linked libraries in the code that is executed on Techila Workers.
Material discussed in this example is located in the following folder in the Techila SDK:
-
techila\examples\CSharp\Tutorial\4_libraries
Dynamically linked libraries (.dll’s) are files that can contain additional functions that can be accessed by loading the library during runtime execution. If the program that is executed on a Techila Worker needs access to functions in a dynamically linked library, the file containing the function definitions needs to be transferred to the Techila Workers.
Dynamically linked libraries used in your C# application will be automatically transferred to all Techila Workers participating in your computational Project if the following conditions are met:
-
The dynamically linked library has been added as a project reference
-
The dynamically linked library has been imported in your code with the
usingstatement -
The dynamically linked library is NOT listed in the global assembly cache
In the example image below, a dynamically linked library called ExampleLibrary.dll has been added as a project reference and the functions have been imported with the using statement. With these modifications, the file ExampleLibrary.dll would be transferred to all participating Techila Workers and copied to the same temporary working directory with the executable code. This means functions defined in the ExampleLibrary.dll could be used in code that will be executed on the Techila Workers during computational Jobs.
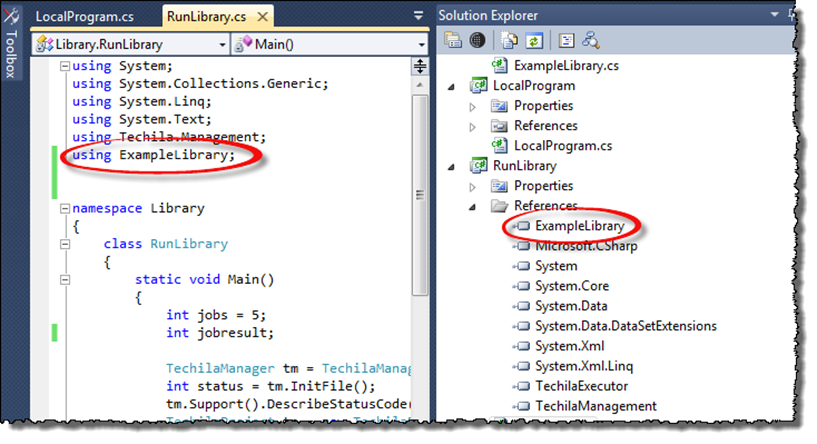
using directive will cause the .dll-file to be transferred to Techila Workers.3.4.1. Locally executable program
The source code of the locally executable program is located in the following file:
techila\examples\CSharp\Tutorial\4_libraries\LocalProgram.cs
To view the entire source code, please open the file in an editor of your choosing. The process flow of the locally executable program is shown below.

The program starts by importing the functions in the library ExampleLibrary.dll with the using directive. This will make the methods defined in the library available for use later in the program.
After importing the functions, the following variables will be initialized:
-
iterations(Will be used to define the number of iterations in the for-loops) -
i(Will be used as an input argument when creating objects)
After variables have been initialized, the program enters the for-loop structure. At the start of each for-loop iteration, a new LibraryDist object will be created with two input arguments. The values of these input arguments will be stored in the object variables and will be used later when calling the Execute method. After the object has been created, the program will call the Execute method defined in the class. In this example, the Execute method consists of calling the Sum method defined in ExampleLibrary.
The Sum method will sum the two given input arguments and store the value of the summation operation in the result variable, which will then be printed to the standard output stream.
After all three (3) iterations have completed, the program will exit. The operations taking place within Execute method represent the computationally intensive part of the program. This section has been highlighted in blue and is the code block that will be executed on the Techila Workers in the distributed version.
3.4.2. Distributed version
The source code of the distributed version is located in the following file:
techila\examples\CSharp\Tutorial\4_libraries\RunLibrary.cs
The process flow of the distributed program is shown in the image below. Sections highlighted with red indicate parts of the program that are executed on the End-User’s computer. The section highlighted with blue indicates operations that take place on the Techila Workers.
The program starts by importing the library functions in the ExampleLibrary.dll file (in a similar manner as in the locally executable program). After importing the library functions and initializing the variables, the program enters a for-loop structure. Each for-loop iteration will create a new LibraryDist object with different input arguments. The values of the input arguments will be stored in object variables and the object will then be added to the list in the tp object.
After three iterations, three objects have been added to the list. The computational Project will then be created by calling the tp.Execute method. At this point, the following files will be transferred from your computer to the Techila Server:
-
TechilaExecutor.exe (Always transferred)
-
TechilaManagement.dll (Always transferred)
-
ExampleLibrary.dll (Transferred because listed as a reference and functions imported with
using ExampleLibrary.dll) -
Library.exe (File containing the compiled C# application. Generated when compiling the
RunLibrary.csfile.) -
All files containing serialized class instances
After all data has been transferred to the Techila Server, Jobs will be assigned to Techila Workers. After Jobs have been assigned, all necessary data will be transferred from the Techila Server to the Techila Workers. This will include the file ExampleLibrary.dll file, which will be copied to the same temporary working directory with other files.
Each Job will then deserialize file containing a LibraryDist object and call the Execute method in the class once. This means that the operations that occur in each Job can be thought to correspond with the operations that take place in one iteration of the for-loop in the locally executable program.
3.4.3. Running the example
This Chapter contains illustrations on how to run the example program described in this Chapter.
|
Tip
|
If you need help building the example material, please follow the steps described in Building and running the example. |
Note! In order to compile the LocalProgram.cs or RunLibrary.cs you will need to compile the ExampleLibrary.cs file to a dynamically linked library. After building the ExampleLibrary.dll file, this file will need to be added as a reference to the locally executable program and the distributed version.
After building the LocalProgram.cs file, you can run the locally executable program from the Windows Command Prompt using command:
LocalProgram.exe
After executing the command, the program should generate the following output.

Sum method in the ExampleLibrary.dll.After building the RunDatafiles.cs file, you can run the distributed version of the program from the Windows Command Prompt using command:
Library.exe
After executing the command, the program should generate the following output.
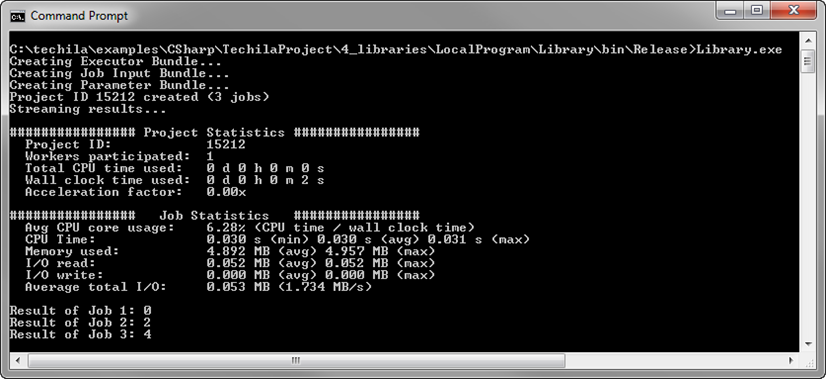
Sum method in the ExampleLibrary.dll was executed on the Techila Worker.4. Feature Examples
This Chapter contains walkthroughs of examples that illustrate how to implement and control some of the more advanced features available in the TDCE system. The example material discussed in this Chapter, including C#-source code files and data files can be found under the following folder in the Techila SDK:
-
techila\examples\CSharp\Features
Please note that the example material in this Chapter is only intended to illustrate how different features in the TDCE system can be used when using C#. The code snippets used in the examples are computationally trivial, meaning using distributed computing will not increase performance due to overheads.
4.1. Active Directory Impersonation
The walkthrough in this Chapter is intended to provide an introduction on how to use Active Directory (AD) impersonation. Using AD impersonation will allow you to execute code on the Techila Workers so that the entire code, or parts of code, are executed using your own AD user account.
The material discussed in this example is located in the following folder in the Techila SDK:
-
techila\examples\CSharp\Features\ad_impersonate
Note! Using AD impersonation requires that the Techila Workers are configured to use an AD account and that the AD account has been configured correctly. These configurations can only be done by persons with administrative permissions to the computing environment.
More general information about this feature can be found in Introduction to Techila Distributed Computing Engine.
Please consult your local Techila Administrator for information about whether or not AD impersonation can be used in your TDCE environment.
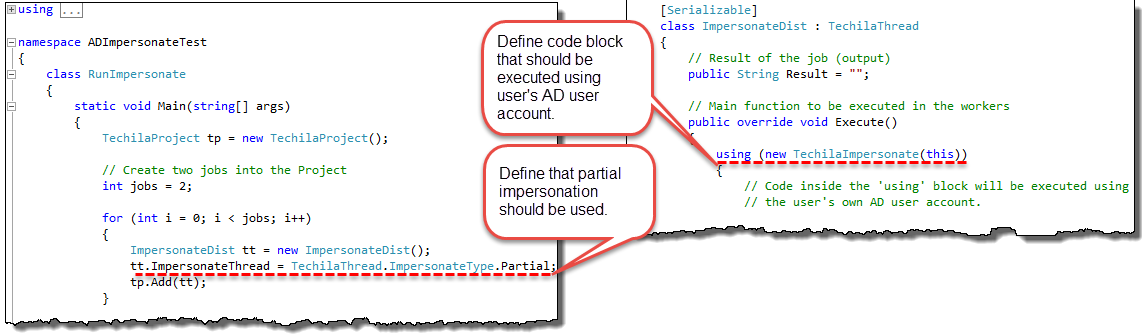
Using AD impersonation requires small modifications to the code used to create the Projects and to the code that will be executed on the Techila Workers. The example figure below illustrates how to use AD impersonation to execute the Job on Techila Workers so that the processes are running under the user’s own AD user account.
The example figure below illustrates how to use AD impersonation. In the code snippet illustrated on the left, the value of the ImpersonateThread member variable has been set to TechilaThread.ImpersonateType.Partial. This defines that only specified blocks of code (in the Job) should be executed using the users own AD user account.
The code on the right will be executed on the Techila Workers and contains an Execute method, which starts with a using-block. This using-block also instantiates the TechilaImpersonate object, which contains a constructor that will transfer all Kerberos security tokens needed for AD impersonation. The code inside the using-block will be executed under the user’s own AD user account.
As illustrated in the figure above, AD impersonation is enabled by defining the value of the ImpersonateThread member variable. The following values can be used to define the scope of the AD impersonation:
-
Techila.ImpersonateType.On -
Techila.ImpersonateType.Partial -
Techila.ImpersonateType.Off
The Techila.ImpersonateType.On can be used to define that the entire process should be executed under the user’s AD user account. This means that the actual computational process (as listed in the Windows Task Manager) will be running under the user’s AD user account. When this setting is used, no changes are needed to the code that will be executed on the Techila Worker.
The Techila.ImpersonateType.Partial can be used to define that only specified blocks of code should be executed under the user’s AD user account. This means that the computational process will be running under the Techila Worker’s own user account, but the specified code blocks will be executed under the user’s own AD user account. When this setting is used, the code blocks that should be executed using the users own AD account will need to be encapsulated in using-blocks, which instantiate the TechilaImpersonate object.
The Techila.ImpersonateType.Off can be used to disable AD impersonation. When this setting is defined, any using-blocks which instantiate the TechilaImpersonate object will be executed using the Techila Worker’s own user account. This is also the default impersonation scope, meaning if not otherwise specified, AD impersonation will not be used.
4.1.1. Example material walkthrough
The source code of the example discussed here can be found in the following file in the Techila SDK:
techila\examples\CSharp\Features\ad_impersonate\RunImpersonate.cs
The code used in this example is shown below:
using System;
using System.Collections.Generic;
using System.Linq;
using System.Text;
using Techila.Management;
using System.IO;
using System.Security.Principal;

namespace ADImpersonateTest
{
    class RunImpersonate
    {
        static void Main(string[] args)
        {

            TechilaProject tp = new TechilaProject();

            // Define how many Jobs will be created.
            int jobs = 1;

            // Create one Job in the Project.
            for (int i = 0; i < jobs; i++)
            {
                ImpersonateDist tt = new ImpersonateDist();

                // Enable partial Active Diretory impersonation
                tt.ImpersonateThread = TechilaThread.ImpersonateType.Partial;
                tp.Add(tt);
            }

            // Create the Project.
            tp.Execute();

            // Print results
            for (int i = 0; i < jobs; i++)
            {
                ImpersonateDist job = (ImpersonateDist)tp.Get(i);
                foreach (String line in job.Result) {
                    Console.WriteLine(line);
                }
            }
        }
    }

    // Mark the class as serializable
    [Serializable]
    class ImpersonateDist : TechilaThread // Extend the TechilaThread class
    {
        // Mark the result of the Job as public.
        public List<String> Result = new List<String>();

        // Override the 'Execute' method in the 'TechilaThread' class with code that we want to execute.
        public override void Execute()
        {
            using (new TechilaImpersonate(this)) // Create a new TechilaImpersonate object for the duration of the 'using'-statement.
            {   // Block 1
                // Code inside the 'using' block will be executed using
                // the user's own AD user account.

                // Get information which Windows identity is currently used. This will return the End-User's own  user account.
                String b1 = "Block 1 executed under following user credentials: "
                    + WindowsIdentity.GetCurrent().Name;
                Result.Add(b1);
            }

            // Block 2 start. Code outside the using block will be executed
            // using the  Techila Worker's own user account.

            // Get information which Windows user account is currently used. This will return the Techila Worker's default user account.
            String b2 = "Block 2 executed under following user credentials: "
                    + WindowsIdentity.GetCurrent().Name;
            Result.Add(b2);
            // Block 2 end

            using (new TechilaImpersonate(this)) // Create a new TechilaImpersonate object for the duration of the 'using'-statement.
            {
                // Code inside the 'using' block will be executed using
                // the user's own AD user account.

                // Get information which Windows identity is currently used. This will return the End-User's own  user account.
                String b3 = "Block 3 executed under following user credentials: "
                    + WindowsIdentity.GetCurrent().Name;
                Result.Add(b3);
            } // Block 3 ends
        }
    }
}
The relevant lines for this example are explained below:
tt.ImpersonateThread = TechilaThread.ImpersonateType.Partial;The above line sets the value of the ImpersonateThread member variable to TechilaThread.ImpersonateType.Partial. This means that only specified sections of the code executed on the Workers will be run under the user’s own AD user account. This is the only code modification that is required in order to allow partial AD impersonation to be used on the Techila Workers.
The Execute method that will be executed on the Techila Workers starts by defining a using-statement, which will also create a new TechilaImpersonate object. The constructor for this object will transfer necessary authentication tokens from the Techila Server to the Techila Worker that are needed for the AD impersonation. After the object has been created, any code inside the using-statement will be executed using the End-User’s own AD user account.
The Execute method contains three logical sections, where impersonation has toggled on and off by placing code inside (or outside) using-statements. Block 2 is executed without impersonation and will return the name of the user account used to run the Techila Worker processes. Blocks 1 and 3 are executed using impersonation blocks and will return the name of your AD user account.
4.1.2. Running the example
This Chapter contains a description on how to run the example program described in this Chapter.
|
Tip
|
If you need help building the example material, please follow the steps described in Building and running the example. |
After building the RunImpersonate.cs file, you can run the distributed version of the program from the Windows Command Prompt using command:
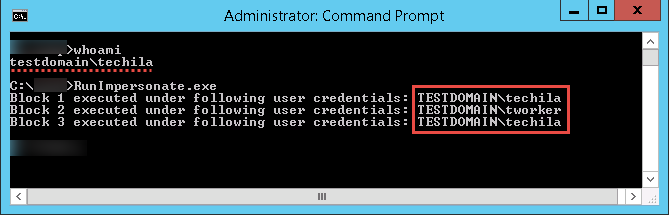
RunImpersonate.exe
Please note that the output generated by the program will change based your domain and AD account user names. The example screenshot below illustrates the program output when the End-User’s own AD account name is techila and the name of the Techila Worker’s AD account is tworker. The domain used in the example is testdomain.
4.2. Using Semaphores
The walkthrough in this Chapter is intended to provide an introduction on how to create Project-specific semaphores, which can be used to limit the number of simultaneous operations.
The material discussed in this example is located in the following folder in the Techila SDK:
-
techila\examples\CSharp\Features\semaphores
More general information about this feature can be found in Introduction to Techila Distributed Computing Engine.
Semaphores can be used to limit the number of simultaneous operations performed in a Project. There are two different types of semaphores:
-
Project-specific semaphores
-
Global semaphores
Project-specific semaphores will need to be created in the code that is executed on the End-User’s computer. Respectively, in order to limit the number of simultaneous processes, the semaphore tokens will need to be reserved in the code executed on the Techila Workers. Global semaphores can only be created by Techila Administrators.
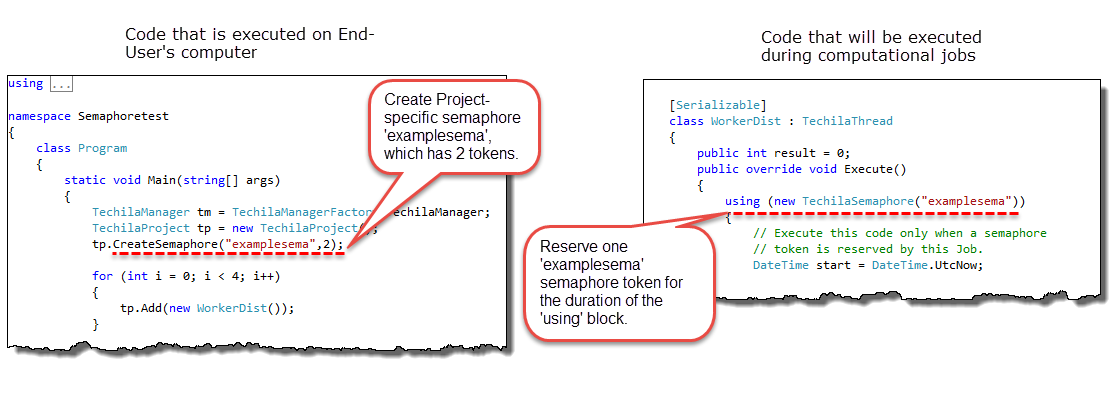
The example figure below illustrates how to use Project-specific semaphores. The code snippet illustrated on the left will create a Project-specific semaphore called examplesema and sets the maximum number of tokens to two. The code on the right will be executed on the Techila Workers and contains an Execute method, which starts with a using-block. This using-block will automatically create a TechilaSemaphore object. This object can only be created when a semaphore token named examplesema is available on the Techila Server. If no semaphore token is available, the process will wait until a token becomes available.
As illustrated in the figure above, Project-specific semaphores are created by using the CreateSemaphore method in the TechilaProject class. The CreateSemaphore is an overloaded method, which has the following signatures:
-
CreateSemaphore(string name); -
CreateSemaphore(string name, int size); -
CreateSemaphore(string name, int size, int expiration);
The CreateSemaphore(string name) method creates a Project-specific semaphore with the defined name and sets the maximum number of tokens to 1. The semaphore token does will not have an expiration time, meaning it can be reserved indefinitely.
For example, the following syntax could be used to define a semaphore with the name examplesema, which would have 1 token. This means that a maximum of 1 tokens can be reserved at any given time.
TechilaProject tp = new TechilaProject(tm, "Example");
tp.CreateSemaphore("examplesema");
The CreateSemaphore(string name, int size) method creates a Project-specific semaphore with the defined name and sets the maximum number of tokens according to the value of the size argument.
For example, the following syntax could be used to define a semaphore with the name examplesema2, which would have 10 tokens. This means that a maximum of 10 tokens can be reserved at any given time.
TechilaProject tp = new TechilaProject(tm, "Example");
tp.CreateSemaphore("examplesema2",10);
The CreateSemaphore(string name, int size, int expiration) method defines the name and size of the semaphore similarly as the earlier method. In addition, the method can be used to define an expiration time for the token by using the expiration argument. If a Job reserves a semaphore token for a longer time period than the one defined in the expiration argument, the Project-specific semaphore token will be automatically released and made available for other Jobs in the Project. The process that exceeded the expiration time will be allowed to continue normally.
As illustrated earlier in image above, semaphores are reserved by creating a new instance of the TechilaSemaphore class. The TechilaSemaphore class has the following constructors:
-
TechilaSemaphore(string name); -
TechilaSemaphore(string name, bool global); -
TechilaSemaphore(string name, bool global, int timeout); -
TechilaSemaphore(string name, bool global, int timeout, bool ignoreError);
TechilaSemaphore(string name) constructor will reserve one token from the semaphore, which has the same name as defined with the name input argument. This constructor can only be used to reserve tokens from Project-specific semaphores.
For example, the following syntax could be used to reserve one token from a semaphore named examplesema for the duration of the using-block.
using (new TechilaSemaphore("examplesema")) {
                // Code that should be executed only when a Project-specific semaphore
                // token named `examplesema` is available and can be reserved by this Job.
     }
TechilaSemaphore(string name, bool global) constructor will reserve one token from the semaphore defined with the name argument. The global argument is used to define whether or not the token you wish to reserve belongs to a global semaphore (i.e. created by a Techila Administrator in the Techila Web Interface) or to a Project-specific semaphore (i.e. defined during Project creation.)
When global is set to true, it defines that the semaphore is global. Respectively, when the value is set to false, it defines that the semaphore is Project-specific.
For example, the following syntax could be used to reserve one token from a global semaphore called globalsema.
using (new TechilaSemaphore("globalsema", true)) {
             // Code that should be executed only when a global semaphore
             // token named `globalsema` is available and can be reserved by this Job.

            }
TechilaSemaphore(string name, bool global, int timeout) constructor will define the name and global arguments similarly as explained earlier. In addition, this constructor requires a timeout argument, which is used to define a timeout period (in seconds) for the reservation process. When a timeout period is defined, a timer is started when the constructor requests a semaphore token. If no semaphore token can be reserved within the specified time window, the Job will be terminated and the Job will generate an error.
For example, the following syntax could be used to reserve one token from Project-specific semaphore called projectsema. The syntax also defines a 10 second timeout value for token. This means that the constructor will wait for a maximum of 10 seconds for a semaphore token to become available. If no token is available after 10 seconds, the code will generate an error, which will cause the Job to be terminated.
using (new TechilaSemaphore("projectsema", false, 10)) {
             // Code that should be executed only when a Project-specific semaphore
             // token named `projectsema` is available and can be reserved by this Job.
             // If no token is has been reserved after waiting 10 seconds, the Job will be
             // terminated.
            }
TechilaSemaphore(string name, bool global, int timeout, bool ignoreError) constructor can be used to define the name, global and timeout arguments in a similar manner as explained earlier. The ignoreError argument can be used to define that problems during the semaphore token reservation process should be ignored.
When the ignoreError argument is set to true, the code is allowed to continue even if a semaphore token could not be reserved in the time window specified in timeout. The code is also allowed to continue even if there is no matching semaphore on the Techila Server.
When the value of ignoreError is set to true, the following methods can be used to check the semaphore status.
-
TechilaSemaphore.IsTimedOut() -
TechilaSemaphore.IsOk()
IsTimedOut() method returns true if the semaphore exists, but no token could be reserved during the time specified in the timeout argument.
IsOk() method returns true if the semaphore was reserved successfully. If this method returns false, it is an indication that there was a problem when trying to reserve the semaphore from the Techila Server. Some of the typical reasons why this returns a false value are:
-
The semaphore type on the Techila Server is different than the one specified in the
TechilaSemaphoreconstructor (global vs Project-specific) -
No semaphore with a matching name exists on the Techila Server
The example code snippet below illustrates how to reserve a global semaphore token called globalsema with a 10 second timeout window. If the semaphore is reserved successfully within 10 seconds, the operations inside the if (ts.IsOk()) statement are processed. If the semaphore exists, but could not be reserved within 10 seconds, operations inside the if (ts.IsTimedOut()) statement will be processed. If there was a problem with the actual reservation process, the if (!ts.IsOk()) statement will be processed.
using (TechilaSemaphore ts = new TechilaSemaphore("globalsema", true, 10, true)) {
                if (ts.IsOk()) {
                   // Semaphore was checked out ok. Do meaningful computation
                }
                else if (ts.IsTimedOut()) {
                   // Semaphore exists, but could not be reserved within 10 seconds.
                   // Process e.g. alternative workload that can be processed without
                   // reserving a semaphore.
                }
                else if (!ts.IsOk()) {
                   // Error when trying to reserve semaphore token.
                   // E.g. throw an error as an indication about missing semaphores
                }
            }
}
4.2.1. Example material walkthrough
The source code of the example discussed here can be found in the following file in the Techila SDK:
-
techila\examples\CSharp\Features\semaphores\RunSemaphore.cs
The code used in this example is shown below:
using System;
using System.Collections.Generic;
using System.Linq;
using System.Text;
using Techila.Management;
using System.Threading;

namespace Semaphoretest
{
    class Program
    {
        static void Main(string[] args)
        {
            // Create a new TechilaProject object.
            TechilaProject tp = new TechilaProject();

            // Create a Project-specific semaphore named 'examplesema'.
            // This semaphore will have two tokens, meaning the maximum number
            // of tokens that can be received by Jobs is two.
            tp.CreateSemaphore("examplesema",2);

            // Create four Jobs in the Project
            for (int i = 0; i < 4; i++)
            {
                tp.Add(new SemaphoreDist());
            }

            // Create the Project.
            tp.Execute();

            // Print the results.
            for (int x = 0; x < tp.Count; x++)
            {
                Console.WriteLine("Results from Job #{0}:", x);
                List<String> res = ((SemaphoreDist)tp.Get(x)).reslist;
                foreach (String pres in res)
                {
                    Console.WriteLine(pres);
                }
            }

        }
    }

    // Mark the class as serializable
    [Serializable]
    class SemaphoreDist : TechilaThread // Extend the TechilaThread class
    {
        // Mark the result of the Job (output) as public.
        public List<String> reslist = new List<String>();

        // Override the 'Execute' method in the 'TechilaThread' class with code that we want to execute.
        public override void Execute()
        {
            // Get current timestamp.
            DateTime jobStart = DateTime.UtcNow;

            // The following using-block will only be executed when this Job has reserved a token from the Project-specific 'examplesema' semaphore.
            // When the using-block is completed, the semaphore token will be automatically released.
            using (new TechilaSemaphore("examplesema")) {
                DateTime start = DateTime.UtcNow; // Get current timestamp
                generateLoad(start, 30); // Generate CPU load for 30 seconds

                // Calculate when the CPU load was generated relative to the start of the Job.
                double twindowstart = Math.Round((start - jobStart).TotalSeconds, 0);
                double twindowend = Math.Round((DateTime.UtcNow - jobStart).TotalSeconds,0);

                // Build a result string that contains the time window.
                String resultproject = "Project-specific semaphore reserved successfully for the following time window: " + twindowstart  + "-" + twindowend;
                reslist.Add(resultproject);
            }

            // The following using-statement attempts to reserve a token from the global semaphore 'globalsema'
            // The status of the semaphore reservation process will be stored 'ts' object.
            using (TechilaSemaphore ts = new TechilaSemaphore("globalsema", true, 10, true)) {
                String resultglobal;
                if (ts.IsOk()) { // This block will be executed if the semaphore was reserved ok.
                    DateTime start2 = DateTime.UtcNow;
                    generateLoad(start2, 5);
                    double twindowstart2 = Math.Round((start2 - jobStart).TotalSeconds, 0);
                    double twindowend2 = Math.Round((DateTime.UtcNow - jobStart).TotalSeconds, 0);
                    resultglobal = "Global semaphore reserved successfully for the following time window: " + twindowstart2  + "-" + twindowend2;
                    reslist.Add(resultglobal);
                }
                else if (!ts.IsOk()) { // This block will be executed a semaphore token could not be reserved (can happen e.g. if the semaphore does not exist)
                    resultglobal = "Error when using global semaphore.";
                    reslist.Add(resultglobal);
                }
            }
        }

        // Simple method for generating CPU load for X seconds.
        public void generateLoad(DateTime start, int seconds)
        {

            Random r = new Random();
            while ((DateTime.UtcNow - start).TotalSeconds < seconds)
            {
                r.Next();
            }

        }

    }
}
The code lines relevant for this example are explained below:
tp.CreateSemaphore("examplesema",2);The above line creates the Project-specific semaphore. The semaphore will be named examplesema and will contain two semaphore tokens. This means that a maximum of two tokens can be reserved at any given time. No other modifications are required in the code that is used to create the Project.
The Execute method that will be executed on Techila Workers contains two separate using-statements.
The code inside the first using-statement will be executed when a semaphore token is available in the examplesema semaphore. The using statement will automatically create a TechilaSemaphore object, which will reserve one token from the Project-specific semaphore examplesema. As the Project will contain four Jobs and the semaphore contains two tokens, this means that only two Jobs can be processing the code inside the above using-block at the same time while the remaining Jobs will wait for tokens to become available. Each Job will reserve the token for 30 seconds. When a Job exits the using block, the Dispose method will be automatically called which will release the token.
The second using-statement will attempt to reserve one token from the global semaphore globalsema. The constructor defines a 20 second timeout limit, meaning the Job will wait for a maximum of 20 seconds for the token. The fourth input argument in the constructor defines the value true, which means that errors related to the semaphore reservation process should be ignored. This means that the execution of the using-block will start after 20 seconds, even if no global semaphore token could be reserved. Depending on whether or not the global semaphore exists in your Techila Distributed Computing Engine environment, different if statements will be executed during this using-block.
The example figure below illustrates how Jobs in this example are processes in an environment where all Jobs can be started at the same time. In this example figure, the global semaphore globalsema is assumed to exist and that it only contains one token.
The activities taking place during the example Project are explained below.
After the Jobs have been assigned to Techila Workers, two of the Jobs start processing the first using-statement. This processing is illustrated by the Computing, Project-specific semaphore reserved bars. During this time, the remaining two Jobs will wait until semaphore tokens become available. After the first Jobs have released the Project-specific semaphores, Jobs #3 and #4 can reserve semaphore tokens and start processing the first using-block.
The global semaphore only contains one token, meaning only one Job can process the second using-block at any given time. In the example figure below, Job #1 reserves the token and starts processing the second using-statement first. This processing is represented by the Computing, global semaphore reserved bars. After Job #1 has completed processing the second using-block, the global semaphore is released and Job #2 can start processing.
After Jobs #3 and #4 complete processing the first using-statement, the Jobs will start reserving tokens from the global semaphore.
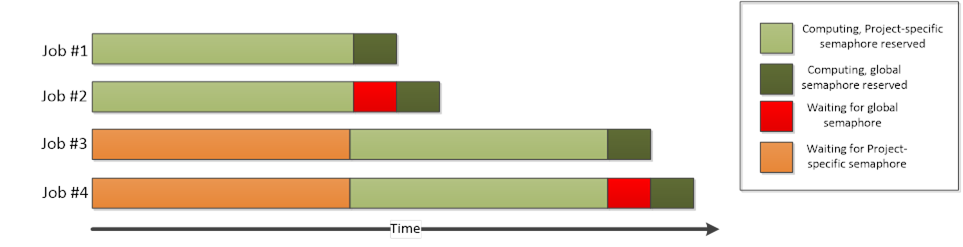
4.2.2. Running the example
This Chapter contains a description on how to run the example program described in this Chapter.
|
Tip
|
If you need help building the example material, please follow the steps described in Building and running the example. |
After building the RunSemaphore.cs file, you can run the distributed version of the program from the Windows Command Prompt using command:
RunSemaphore.exe
Please note that the output generated by the program will change based on whether or not the global semaphore named globalsema is available. The two example screenshots below illustrate the output in both scenarios.
The example screenshot below illustrates the generated output when the global semaphore exists.
Please note that there might be overlap in the reported time windows. This is because the time windows are measured from the timestamp generated at the start of the Execute method, which means that e.g. initialization delays can cause the reported times to overlap.
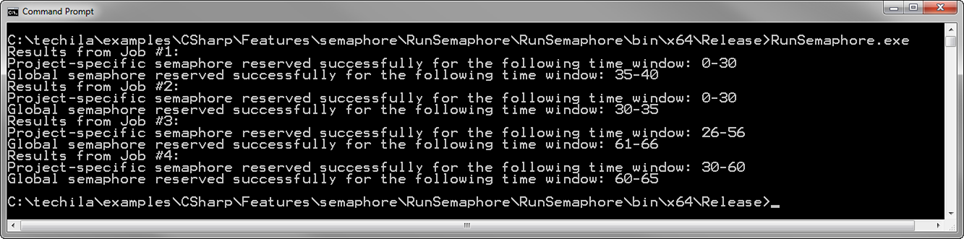
The example screenshot below illustrates the generated output when the global semaphore does not exist.
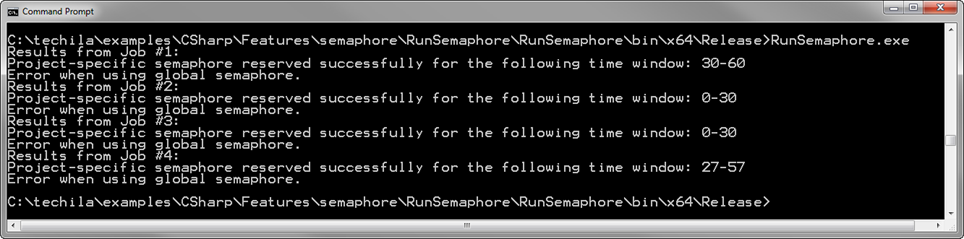
5. Interconnect Examples
The Techila interconnect feature allows solving parallel workloads in a Techila Distributed Computing Engine (TDCE) environment. This means that using the Techila interconnect feature will allow you to solve computational Projects, where Jobs need to communicate with other Jobs in the Project.
This Chapter contains walkthroughs of simple examples, which illustrate how to use the Techila interconnect functions to transfer interconnect data in different scenarios.
The example material discussed in this Chapter, including C#-source code files and data files can be found under the following folder in the Techila SDK:
-
techila\examples\CSharp\Interconnect
More general information about this feature can be found in Techila Interconnect.
Please note that when using interconnect functionality in your Jobs, all Jobs of the Project must be running at the same time. Additionally, all Techila Workers that are assigned Jobs from your Project must be able to transfer Techila interconnect data.
If all Techila Workers in your TDCE environment are not able to transfer interconnect data, it is recommended that you assign your Projects to run on Techila Worker Groups that support interconnect data transfers. If Jobs are assigned to Techila Workers that are unable to transfer interconnect data, your Project may fail due to network connection problems. Please note that before the interconnect Techila Worker Groups can be used, they will need to be configured by your local Techila Administrator.
You can specify that only Techila Workers belonging to specific Techila Worker Groups should be allowed to participate in the Project with the techila_worker_group Project parameter.
The example code snippet below illustrates how the Project could be limited to only allow Techila Workers belonging to Techila Worker Group called IC Group 1 to participate. This example assumes that administrator has configured a Techila Worker Group called IC Group 1 so it consists only of Techila Workers that are able to transfer interconnect data with other Techila Workers in the Techila Worker Group.
TechilaProject tp = new TechilaProject();
tp.GetPeach().PutProjectParam("techila_worker_group", "IC Group 1");
Please ask your local Techila Administrator for more detailed information about how to use the Techila interconnect feature in your TDCE environment.
5.1. Transferring Data between Specific Jobs
This example is intended to illustrate how to transfer data between specific Jobs in the Project.
There are no locally executable versions of the code snippets. This is because the distributed versions are essentially applications, where each iteration must be executed at the same time.
The material used in this example is located in the following folder in the Techila SDK:
-
techila\examples\CSharp\Interconnect\1_jobtojob
Please note that before you can successfully run this example, your TDCE environment needs to be configured to support Techila interconnect Projects. Please ask your local Techila Administrator for more information.
Interconnect data can be transferred between by using the methods in the TechilaConn class. This class has the following constructor:
TechilaConn(TechilaThread tt)The constructor for this class is located in the TechilaThread class, meaning the constructor can be called in the Execute method that will be executed on the Techila Worker. Calling the constructor is illustrated in the below screenshot.
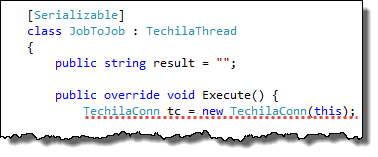
TechilaConn provides the following two generic methods for sending and receiving interconnect data transferred between two specific Jobs:
-
TechilaConn.SendDataToJob<T>(int jobid, T data) -
TechilaConn.ReceiveDataFromJob<T>(int jobid)
The type argument <T> in these generic methods is used to define the data type. The type will need to match the data type you are transferring. Any data types that can be serialized can be transferred. You can also omit the type argument in which case the compiler will infer the type.
The jobid argument in SendDataToJob defines the target Job that the data will be transferred to. Respectively, the jobid argument in ReceiveDataFromJob defines the source Job, i.e. from which Job the data will be received.
The T data in SendDataToJob defines what data will be transferred. The data type will need to match the data type of the input arguments.
Example 1: The following syntax could be used to send a string Hello to Job #2.
TechilaConn tc = new TechilaConn(this);
SendDataToJob<string>(2, "Hello");
If we assume that the above code is executed in Job #1, the data could be received by executing the following commands in Job #2.
TechilaConn tc = new TechilaConn(this);
string data = tc.ReceiveDataFromJob<string>(1);
The output variable data will contain the data that was received. In this example, data would contain the string Hello.
Note! After interconnect data has been transferred between Jobs, the tc.WaitForOthers() command can be used to enforce a synchronization point. When this command is executed in Jobs, each Job in the Project will wait until all other Jobs in the Project have also executed the command before continuing.
5.1.1. Example code walkthrough
The source code of the example discussed here can be found in the following file in the Techila SDK:
techila\examples\CSharp\Interconnect\1_jobtojob\RunJobToJob.cs
The code used in this example is shown below: creating the Project and displaying results is shown below:
using System;
using System.Collections.Generic;
using System.Linq;
using System.Text;
using Techila.Management;

namespace RunJobToJob
{
    class Program
    {
        static void Main(string[] args)
        {
            // Create a new TechilaProject object.
            TechilaProject tp = new TechilaProject();

            // Create two Jobs in the Project
            tp.Add(new JobToJob());
            tp.Add(new JobToJob());

            // Uncomment the below line to only allow Workers in Worker Group
            // 'IC Group 1' to participate.
            //tp.GetPeach().PutProjectParam("techila_worker_group", "IC Group 1");

            // Create the Project
            tp.Execute();

            // Display the results
            for (int i = 0; i < 2; i++)
            {
                JobToJob jtj = (JobToJob)tp.Get(i);
                int jobidx = jtj.GetJobId();
                Console.WriteLine("Result from Job #" + jobidx + ": " + jtj.result);
            }
        }
    }

    // Mark the class as serializable
    [Serializable]
    class JobToJob : TechilaThread // Extend the TechilaThread class
    {
        // Define 'Result' as public so it can be accessed when Job results are retrieved from 'tp'.
        public string result = "";

        // Override the 'Execute' method in the 'TechilaThread' class with code that we want to execute.
        public override void Execute()
        {
            // Create a TechilaConn object, which contains the interconnect methods.
            TechilaConn tc = new TechilaConn(this);

            // Check which Job is being processed.
            int jobidx = GetJobId();

            // Container for data that will be transferred using interconnect functions.
            string dataToSend;
            if (jobidx == 1) // This code block will be executed by Job #1.
            {
                dataToSend = "Hi from Job #1";
                // Send data from Job #1 to Job #2.
                tc.SendDataToJob<string>(2, dataToSend);
                // Receive data from Job #2.
                result = tc.ReceiveDataFromJob<string>(2);
            }
            else if (jobidx == 2) // This code block will be executed by Job #2.
            {
                dataToSend = "Hi from Job #2";

                // Receive data from Job #1.
                result = tc.ReceiveDataFromJob<string>(1);
                // Send data from Job #2 to Job #1.
                tc.SendDataToJob<string>(1, dataToSend);
            }

            // Wait until all Jobs have reached this point before continuing
            tc.WaitForOthers();
        }
    }

}
As can be seen from the above code, using the Techila interconnect feature does not require any modifications to the code used to create the Project.
In this example, the Project will contain two Jobs. During each of these Jobs, the Execute method in the JobToJob class will be executed and will be used to transfer data between the Jobs.
After the Project has been completed, the results will be displayed by using a for-loop to iterate over the list elements in the tp object. This is done by casting the result element as JobToJob, after which the GetJobid() method can be used to get information about which Job generated this specific result. This information is then printed to the console.
The Execute that will be executed in the Jobs method contains two if-statements. The first if-statement will be executed in Job #1 and the second if-statement will be executed in Job #2. These will be executed simultaneously, assuming both Jobs were started at the same time. If Jobs were not started at the same time, you might receive a timeout error if the difference in Job start times exceeded the timeout window.
Each if-statement consists of creating a simple message string, which will be transferred to the other Job. Please note that the order of the ReceiveDataFromJob and SendDataToJob is different in the if-statements.
After the Jobs exit their respective if-statements, the WaitForOthers method will be executed. This line will act as a synchronization point, meaning Jobs will continue execution only after all Jobs have reached this line.
5.1.2. Running the example
This Chapter contains a description on how to run the example program described in this Chapter.
|
Tip
|
If you need help building the example material, please follow the steps described in Building and running the example. |
After building the RunJobToJob.cs file, you can run the distributed version of the program from the Windows Command Prompt using command:
RunJobToJob.exe
The example screenshot below illustrates the program output, which will display the message strings that were transferred between Jobs.

5.2. Broadcasting Data from one Job to all other Jobs
This example is intended to illustrate how to broadcast data from one Job to all other Jobs in the Project.
The material used in this example is located in the following folder in the Techila SDK:
-
techila\examples\CSharp\Interconnect\2_broadcast
Please note that before you can successfully run this example, your TDCE environment needs to be configured to support Techila interconnect Projects. Please ask your local Techila Administrator for more information.
Data can be broadcasted from one Job to all other Jobs with the generic CloudBc method, which has the following signature:
CloudBc<T>(int jobid, T data);
The jobid argument defines the source Job, which will broadcast the defined data T data to all other Jobs in the Project. The method will return the broadcasted data after the method exits.
For example, the following syntax could be used to broadcast the string Hello from Job #2 to all other jobs in the Project. The return string resval will contain the string Hello in each Job after the method has been executed.
TechilaConn tc = new TechilaConn(this);
string resval = tc.CloudBc<string>(2, "Hello");
As with other general methods, you can omit the type definition. This means that the example code snippet below would work in similar manner as the code snippet above.
TechilaConn tc = new TechilaConn(this);
string resval = tc.CloudBc(2, "Hello");
5.2.1. Example code walkthrough
The source code of the example discussed here can be found in the following file in the Techila SDK:
-
techila\examples\CSharp\Interconnect\2_broadcast\RunBroadcast.cs
The code used in this example is shown below.
using System;
using System.Collections.Generic;
using System.Linq;
using System.Text;
using Techila.Management;

namespace RunBroadcast
{
    class Program
    {
        static void Main(string[] args)
        {
            // Create a new TechilaProject object.
            TechilaProject tp = new TechilaProject();

            // Define how many Jobs will be created.
            int jobs = 4;

            // Define which Job will broadcast the data.
            int sourcejob = 2;

             // Create four Jobs in the Project
            for (int x = 0; x < jobs; x++)
            {
                // Pass the 'sourcejob' argument to the Broadcast constructor.
                // The value of the 'sourcejob' argument will define which Job
                // will broadcast data.
                tp.Add(new Broadcast(sourcejob));
            }

            // Uncomment the below line to only allow Workers in Worker Group
            // 'IC Group 1' to participate.
            //tp.GetPeach().PutProjectParam("techila_worker_group", "IC Group 1");

            // Create the Project.
            tp.Execute();

            // Print the results
            for (int i = 0; i < jobs; i++)
            {
                Console.WriteLine(((Broadcast)tp.Get(i)).result);
            }

        }
    }

    // Mark the class as serializable
    [Serializable]
    class Broadcast : TechilaThread // Extend the TechilaThread class
    {
        // Define 'Result' as public so it can be accessed when Job results are retrieved from 'tp'.
        public string result = "";
        private int sourcejob;

        // Define constructor which takes one input argument.
        public Broadcast(int sourcejob)
        {
            this.sourcejob = sourcejob;
        }

        // Override the 'Execute' method in the 'TechilaThread' class with code that we want to execute.
        public override void Execute()
        {
            // Create a TechilaConn object, which contains the interconnect methods.
            TechilaConn tc = new TechilaConn(this);

            // Build a string that will be broadcasted.
            string bcstring = "Hello from Job #" + GetJobId();

            // Broadcast 'bcstring' from 'sourcejob' to all other Jobs in the Project.
            // With the default values in the example, Job #2 will broadcast the string 'Hello from Job #2' .
            result = "Value of 'bcstring' string in Job #" + GetJobId() + ": " + tc.CloudBc(sourcejob, bcstring);

            // Wait until all Jobs have reached this point before continuing
            tc.WaitForOthers();
        }
    }

}
As can be seen from the code above, using Techila interconnect methods does not require any additions to the code used to create the Project.
The value of sourcejob to 2. This will later be used to define that Job #2 will broadcast data to all other Jobs in the Project.
Jobs are added to the Project by using a for-loop, which contains four iterations. Each iteration will add one Job to the Project. The sourcejob argument is given to the constructor of the Broadcast class, which will in turn define which Job will broadcast the data.
Each Job in the Project will build a simple message string bcstring. The message strings for each Job are shown below:
| Job # | Value of bcstring |
|---|---|
1 |
Hello from Job #1 |
2 |
Hello from Job #2 |
3 |
Hello from Job #3 |
4 |
Hello from Job #4 |
The sourcejob argument given to the CloudBc method will define that Job #2 will broadcast the data to all other Jobs in the Project. Each Job will use the received broadcast data to build a result string, which will be returned from the Job. This result string will contain information which Job received broadcast data and what was the contents of the broadcasted data. The values of the result variable for each Job are shown below:
| Job # | Value of result |
|---|---|
1 |
Value of |
2 |
Value of |
3 |
Value of |
4 |
Value of |
After the broadcast operation has been completed, each Job in the Project will wait until all other Jobs in the Project have reached and executed the tc.WaitForOthers() command.
5.2.2. Running the example
This Chapter contains a description on how to run the example program described in this Chapter.
|
Tip
|
If you need help building the example material, please follow the steps described in Building and running the example. |
After building the RunBroadcast.cs file, you can run the distributed version of the program from the Windows Command Prompt using command:
RunBroadcast.exe

5.3. Transferring Data from all Jobs to all other Jobs
This example is intended to illustrate how to broadcast data from all Jobs to all other Jobs in the Project.
The material used in this example is located in the following folder in the Techila SDK:
-
techila\examples\CSharp\Interconnect\3_alltoall
Please note that before you can successfully run this example, your TDCE environment needs to be configured to support Techila interconnect Projects. Please ask your local Techila Administrator for more information.
Data can be transferred to all Jobs from all other Jobs by using the SendDataToJob and ReceiveDataFromJob methods combined with regular for-loops and if-statements. These for-loops and if-statements will need to be implemented so that each Job that is sending data has a matching Job that is receiving data.
5.3.1. Example code walkthrough
The source code of the example discussed here can be found in the following file in the Techila SDK:
-
techila\examples\CSharp\Interconnect\3_alltoall\RunAllToAll.cs
The code used in this example is shown below.
using System;
using System.Collections.Generic;
using System.Linq;
using System.Text;
using Techila.Management;

namespace RunJobToJob
{
    class Program
    {
        static void Main(string[] args)
        {
            // Create a new TechilaProject object.
            TechilaProject tp = new TechilaProject();

            // Define how many Jobs will be created.
            int jobs = 4;

            // Create four Jobs.
            for (int x = 0; x < jobs; x++)
            {
                tp.Add(new AllToAll());
            }

            // Uncomment the below line to only allow Workers in Worker Group
            // 'IC Group 1' to participate.
            //tp.GetPeach().PutProjectParam("techila_worker_group", "IC Group 1");

            // Create the Project.
            tp.Execute();

            // Print the results
            for (int i = 0; i < jobs; i++)
            {
                Console.WriteLine(((AllToAll)tp.Get(i)).result);
            }

        }
    }

    // Mark the class as serializable
    [Serializable]
    class AllToAll : TechilaThread // Extend the TechilaThread class
    {
        // Define 'Result' as public so it can be accessed when Job results are retrieved from 'tp'.
        public string result = "";

        // Override the 'Execute' method in the 'TechilaThread' class with code that we want to execute.
        public override void Execute()
        {
            // Create a TechilaConn object, which contains the interconnect methods.
            TechilaConn tc = new TechilaConn(this);

            // Get the Job's index number
            int jobidx = GetJobId();

            string msg;
            string recvdata;

            // Build a simple message string, which contains the Job's index number.
            msg = "Hello from Job #" + GetJobId();
            int src;
            int dst;

            // Build the result string, which will be used to store all messages received by this Job.
            result = "Messages received in Job #" + jobidx + ": ";

            // Transfer the message string from each Job to all other Jobs in the Project.
            for (src = 1; src <= tc.GetJobCount(); src++)
                {
                for (dst = 1; dst <= tc.GetJobCount(); dst++)
                    {

                    if (src == jobidx && dst != jobidx)
                        {
                            tc.SendDataToJob<string>(dst,msg);
                        }
                    else if (src != jobidx && dst == jobidx)
                        {
                            recvdata = tc.ReceiveDataFromJob<string>(src);
                            result += recvdata + ", ";
                        }
                    }
                }
            // Remove the trailing comma and whitespace from the result string
            char [] charsToTrim = {',',' '};
            result = result.TrimEnd(charsToTrim);

            // Wait until all Jobs have reached this point before continuing
            tc.WaitForOthers();

        }

    }

}
The code shown above will create a Project consisting of four Jobs. During each Job, the Execute method in the AllToAll class will be executed.
During each Job, a message string will be built containing each Job’s index number. The msg strings generated in each Job are shown below.
| Job # | String msg |
|---|---|
1 |
Hello from Job #1 |
2 |
Hello from Job #2 |
3 |
Hello from Job #3 |
4 |
Hello from Job #4 |
Each Job will send the msg string to all other Jobs by using SendDataToJob and ReceiveDataFromJob methods placed inside for-loops and if-statements. The source and target Jobs are determined by the values of the loop counters src and dst. All received strings are appended to the result variable, which will be returned from each Job.
The interconnect data transfers that take place during the Project are illustrated in the figure below. The arrows indicate that interconnect data is being transferred. The values in parentheses correspond to the values of the src and dst loop counters. For example, arrow with value (1,3) means that Job #1 is sending the msg string to Job #3. If src is equal to dst (e.g. (2,2)), no data is transferred because the source and target is the same.
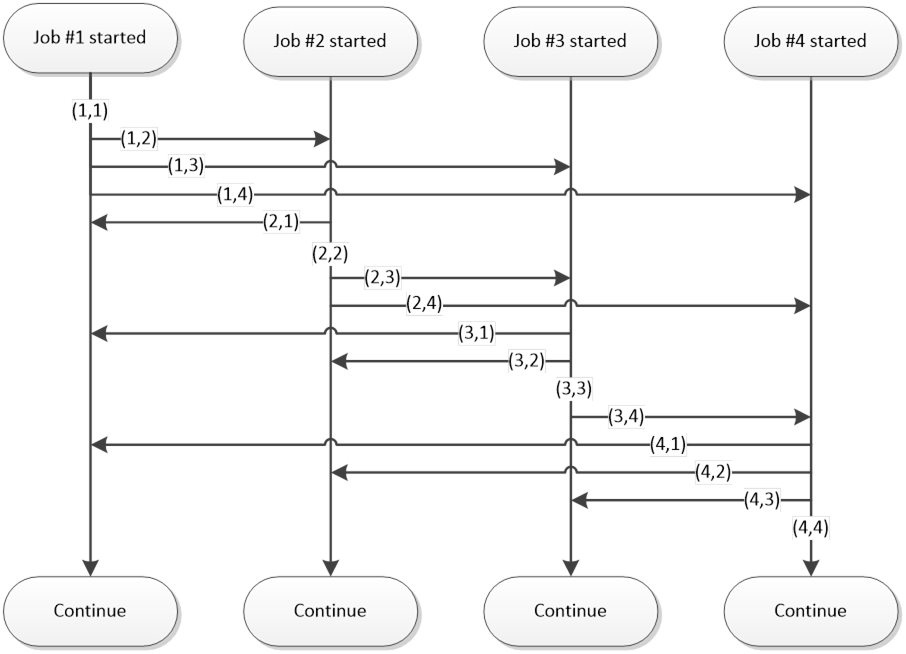
After all messages have been transferred, each Job will execute the WaitForOthers command. This means that code execution will only continue after all Jobs have reached executed this command.
5.3.2. Running the example
This Chapter contains a description on how to run the example program described in this Chapter.
|
Tip
|
If you need help building the example material, please follow the steps described in Building and running the example. |
After building the RunAllToAll.cs file, you can run the distributed version of the program from the Windows Command Prompt using command:
RunAllToAll.exe
The example screenshot below illustrates the output generated by the program.

5.4. Executing a Function by Using CloudOp
This example is intended to illustrate how to execute a function by using the CloudOp-method.
The material used in this example is located in the following folder in the Techila SDK:
-
techila\examples\CSharp\Interconnect\4_cloudop
Please note that before you can successfully run this example, your Techila environment needs to be configured to support Techila interconnect Projects. Please ask your local Techila Administrator for more information.
The CloudOp-method executes the given operation across all the Jobs. The operations in the Jobs are performed in the order defined by a binary tree structure. This means that the method executed in Jobs must meet the following requirements:
-
The method must accept two input arguments.
-
The method must return one output value.
The input and output types must be the same. This is because the outputs generated by the method are used as input arguments when the method is executed in other Jobs according to the binary tree structure.
CloudOp is a generic method, which has the following signature:
CloudOp<T>(Func<T, T, T> func, T data, int target = 0);
By default, CloudOp will return the output value in each Job. If you want to only return the result in a specific Job, this can be done by defining the desired Job’s index number with the target argument transferred to all Jobs in the Project.
The following examples illustrate two different syntaxes on how to use the CloudOp method to perform a simple multiplication operation across all Jobs and to broadcast the result value in each Job.
Example 1: This example illustrates how to define a function called doMultiply by using a lambda expression. After the function has been defined, it can be executed in all Jobs by using the CloudOp method.
[Serializable]
class CloudOp : TechilaThread
{
    public int res = 0;
    public override void Execute()
    {
        TechilaConn tc = new TechilaConn(this);
        int input = 10 * GetJobId();
        // Define function `doMultiply`, which takes two input arguments
        Func<int, int, int> doMultiply = (in1, in2) => { return in1 * in2; };
        // Execute function `doMultiply` in all Jobs with input argument `input'
        int res = tc.CloudOp<int>(doMultiply, input);
    }

}
Example 2: This example illustrates how to define a separate method called Multiply. After the method has been defined, it can be executed in all Jobs by using the CloudOp method.
[Serializable]
class CloudOp : TechilaThread
{
    public int res = 0;
    public override void Execute()
    {
        TechilaConn tc = new TechilaConn(this);
        int input = 10 * GetJobId();
        // Execute `Multiply` method in all Jobs with input argument `input'
        int res = tc.CloudOp(Multiply, input);
    }
    // Define method `Multiply`, which takes two input arguments
    public int Multiply(int a, int b)
    {
        return (a*b);
    }
}
If we assume that there is a Project with 3 Jobs, and each Job executes the code illustrated above, the process flow during the Project would match the one illustrated below.
The circles in the Initial situation container represent Jobs in the Project. The arrows connecting the circles represent interconnect network connections. The numbers in the arrows indicate the order in which data transfers and operations will take place.
During Step 1, the Multiply method is used to multiply the values of input arguments in Jobs #1 and #2. The value of the multiplication will be stored in Job #1 for use in subsequent Multiply operations.
During Step 2, the Multiply method will multiply the value of the previous multiplication operation, which is stored internally in Job #1, with the value of the input variable in Job #3.
During Steps 3 and 4, the result of the final multiplication operation will be transferred from Job #1 to Jobs #2 and #3. After data has been transferred to all Jobs, the CloudOp will return and the res variable will contain the value 6000 in each Job.
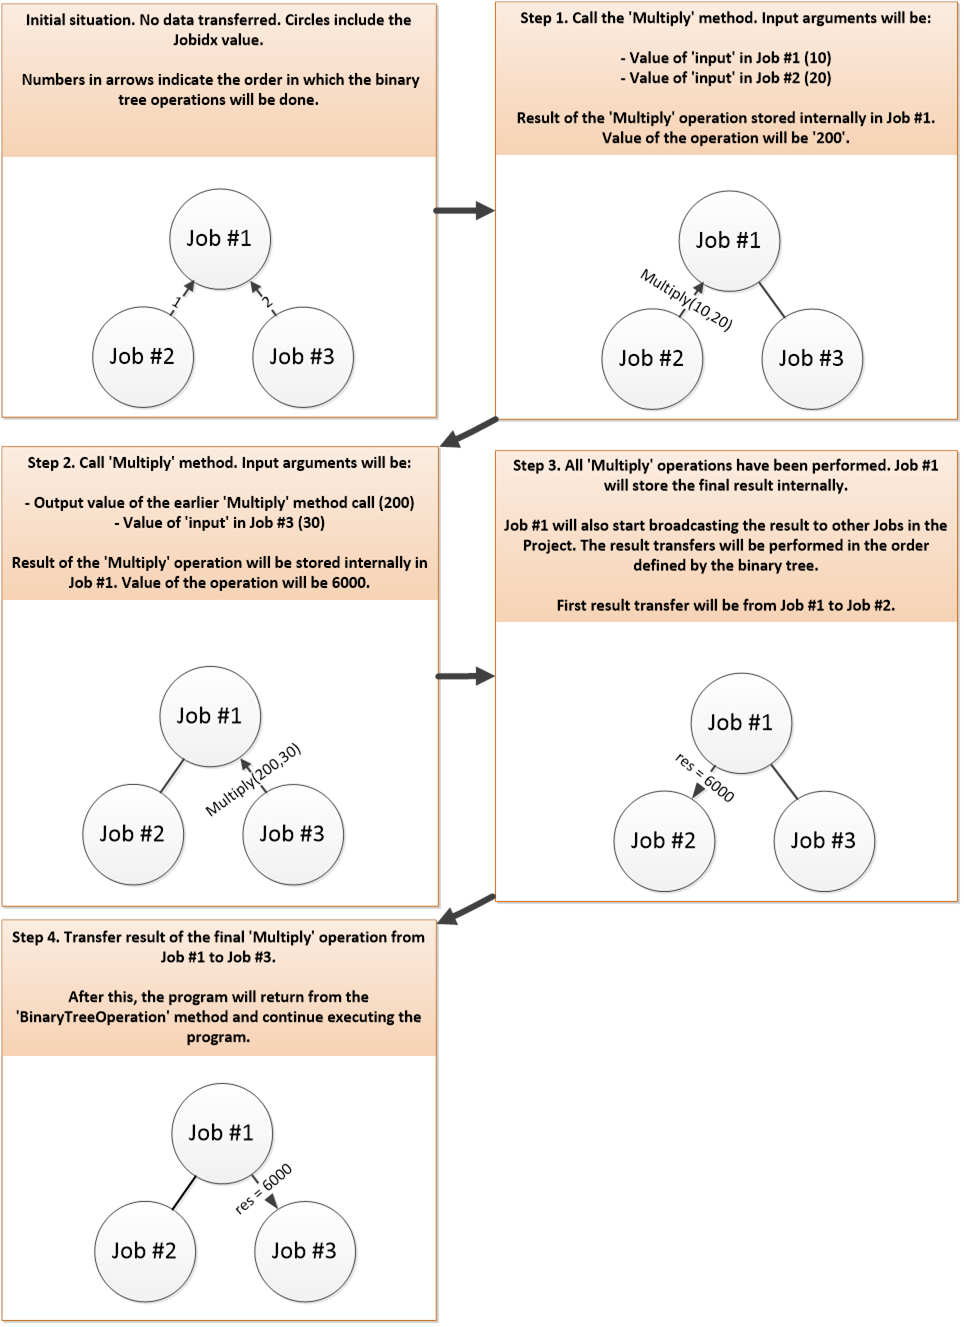
CloudOp in a Project with three Jobs.5.4.1. Example code walkthrough
The source code of the example discussed here can be found in the following file in the Techila SDK:
-
techila\examples\CSharp\Interconnect\4_cloudop\RunCloudOp.cs
techila\examples\CSharp\Interconnect\4_cloudop
The code used in this example is shown below.
using System;
using System.Collections.Generic;
using System.Linq;
using System.Text;
using Techila.Management;
using System.Linq.Expressions;

namespace RunCloudop
{
    class Program
    {
        static void Main(string[] args)
        {
            // Define how many Jobs will be created.
            int jobs = 4;

            // Create a new TechilaProject object.
            TechilaProject tp = new TechilaProject();

            // Create four Jobs.
            for (int x = 0; x < jobs; x++)
            {
                tp.Add(new CloudOp());
            }

            // Uncomment the below line to only allow Workers in Worker Group
            // 'IC Group 1' to participate.
            //tp.GetPeach().PutProjectParam("techila_worker_group", "IC Group 1");

            // Create the Project.
            tp.Execute();

            // Print the results
            for (int x = 0; x < jobs; x++)
            {
                string jobres = ((CloudOp)tp.Get(x)).result;
                Console.WriteLine(jobres);
            }
        }
    }
    // Mark the class as serializable
    [Serializable]
    class CloudOp : TechilaThread // Extend the TechilaThread class
    {
        // Define 'Result' as public so it can be accessed when Job results are retrieved from 'tp'.
        public string result = "";

        // Override the 'Execute' method in the 'TechilaThread' class with code that we want to execute.
        public override void Execute()
        {
            // Create a TechilaConn object, which contains the interconnect methods.
            TechilaConn tc = new TechilaConn(this);

            // Get the Job's index number.
            int input = GetJobId();

            // Execute the 'Multiply' method across all Jobs with the input data defined in 'input'.
            // Result of the operation will be stored in 'res' in all Jobs.
            int res = tc.CloudOp(Multiply, input);

            // Build the result string, which contains the Job's index number and the result of the
            // tc.CloudOp-call.
            result = "Value of 'res' in Job #" + GetJobId() + ": " + res;

            // Wait until all Jobs have reached this point before continuing
            tc.WaitForOthers();
        }

        // Define a simple multiplication method, which will be executed using CloudOp.
        public int Multiply(int a, int b)
        {
            return (a * b);
        }
    }

}
The above code will create a Project which will have four Jobs. In each Job, the Execute method in the CloudOp class will be executed.
After the Project has been completed, the result values returned from Jobs will be displayed.
Each Job will execute the CloudOp method, which is used multiply the Job indexes of each Job by using the Multiply method. The the final multiplication result will be returned to each Job.
The order in which Jobs execute the Multiply method is defined by the binary tree structure as explained earlier in this Chapter. During each execution, the Multiply method will receive two input arguments. The values of the multiply operations that take place in a Project with four Jobs is illustrated in the binary tree below.
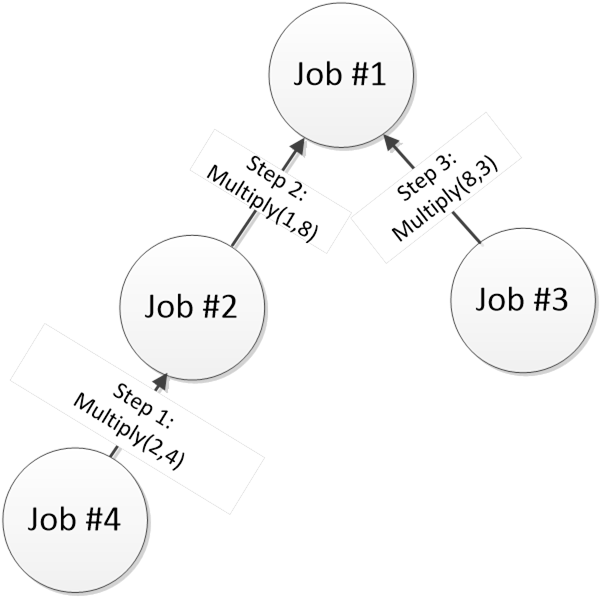
Step 1 is done first, then Step 2, then Step 3). Each arrow also displays what input arguments will be passed to the Multiply method after the data transfer has been done.The final value of the multiplication will be returned by the CloudOp method and will be stored in the res variable.
5.4.2. Running the example
This Chapter contains a description on how to run the example program described in this Chapter.
|
Tip
|
If you need help building the example material, please follow the steps described in Building and running the example. |
After building the RunCloudop.cs file, you can run the distributed version of the program from the Windows Command Prompt using command:
RunCloudop.exe
The example screenshot below illustrates the output generated by the program.
