1. Introduction
This document is designed for persons who are planning to set up a Techila distributed computing environment in Google Cloud Platform (GCP). If you are unfamiliar with the Techila terminology used in this document, please refer to Introduction to Techila Distributed Computing Engine.
Screenshots and dialogs in this document are from Microsoft Windows 7. Depending on your system, the appearance of screens might be different.
The structure of this document is as follows:
Preparation contains a list of prerequisites that must be met before proceeding with setting up a Techila Distributed Computing Engine (TDCE) environment in Google Cloud Platform.
Deploying the Techila Server in Google Cloud Platform contains instructions for deploying the Techila Server in Google Cloud Platform.
Deploying Techila Workers in Google Cloud Platform contains instructions for deploying Techila Workers in Google Cloud Platform.
Installing Bundles contains instructions for installing Bundles on the Techila Server. These Bundles are required if you are planning on using MATLAB, R, Python or Perl in your computational tasks.
Adding End-Users contains instructions for adding End-Users to the TDCE environment.
Components Created During the Deployment Process contains a description of Google Cloud Platform components that are created when deploying the Techila Server and Techila Workers in Google Cloud Platform.
Removing Components from Google Cloud Platform contains instructions on how to remove the Techila Server and Techila Workers. Instructions are also provided for removing all TDCE components from Google Cloud Platform.
2. Preparation
Before proceeding, please verify that you have the following components available:
-
Techila License package
-
Techila Deployment Tool for Google Cloud Platform (
gcpinstaller.jar)
For the remainder of this document Techila Deployment Tool for Google Cloud Platform will be referred to as Techila Deployment Tool.
If you do not have a Techila License package, please contact your Account Manager or Techila Support at support@techilatechnologies.com.
The Techila Deployment Tool is available in the Techila Extranet located at the following address:
If you do not have access to Techila Extranet, please contact your Account Manager or Techila Support at support@techilatechnologies.com to request for Techila Extranet access.
2.1. Ensuring that Java is Available
In order to launch the Techila Deployment Tool, Java needs to be installed on the computer you are using. Java Platform, Standard Edition 6 (or newer) Java Development Kit (JDK) or Java Runtime Environment (JRE) are supported.
When Java is installed and available from the command line, Java version can be verified with the following command. Please note that executing the command requires that the Java installation path is listed in the PATH environment variable.
java -version

2.2. Extracting the Techila License File
The Techila License file will be needed when deploying the Techila Server in Google Cloud Platform. Please follow the steps below to extract the Techila License file to your computer:
-
Locate the Techila License package. In the image below, a Techila License package is located in the directory
C:\TechilaLicense.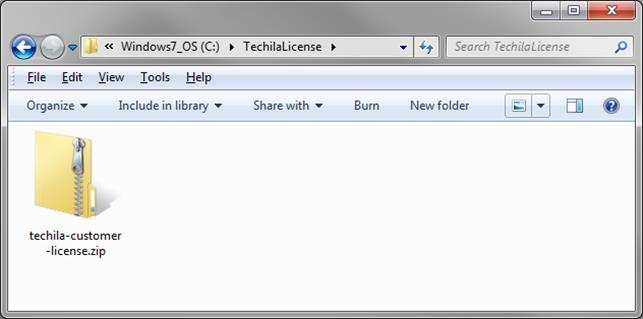 Figure 2. Techila Licenses are delivered in zip files.
 -
Extract the Techila License package. After extraction, a Techila License file will be available as illustrated below. This file will be imported to the Techila Server later during the deployment process.
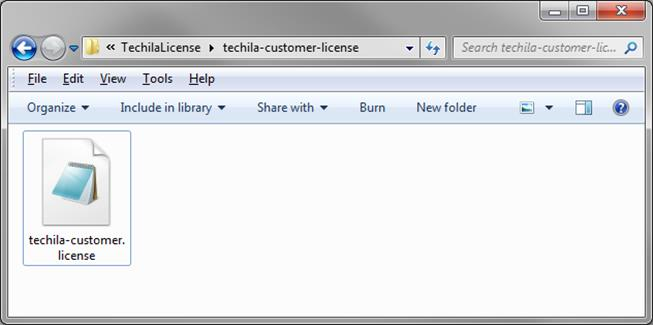 Figure 3. Techila Licenses have a
.licensesuffix.
2.3. Downloading and Extracting the Techila Deployment Tool
The Techila Deployment Tool is available in the Techila Extranet and is delivered in a zip file called gcpinstaller.zip.
Login to the Techila Extranet located at:
-
Click on the
Techila Deployment Tool for Google Cloud Platformlink in the list.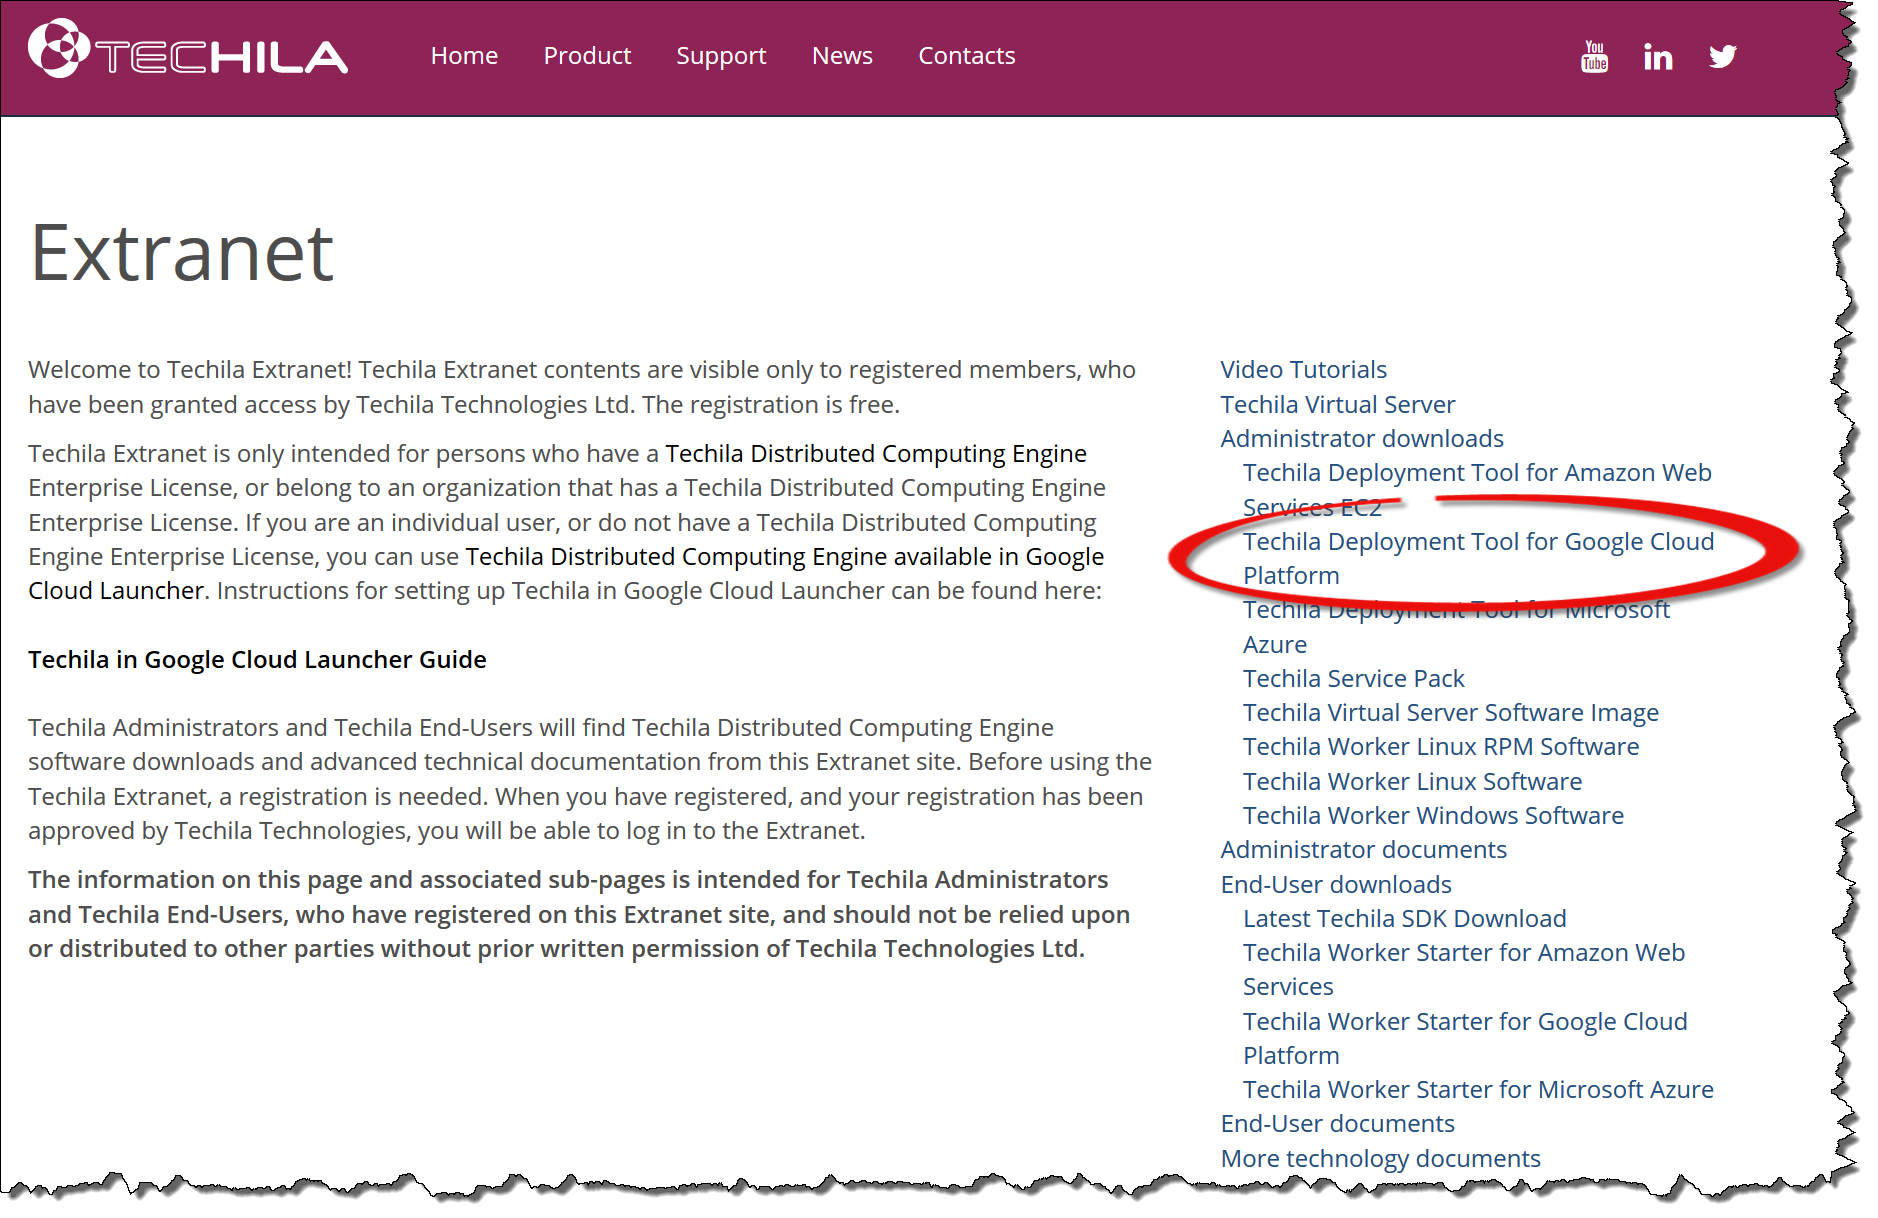 Figure 4. Opening the download page
 -
Read the EULA and click the Agree and Download button to download the gcpinstaller.zip file.
 Figure 5. Downloading the file
 -
After downloading the file, locate the zip file on your computer. In the figure below, the zip file is located in the directory
C:\Downloads.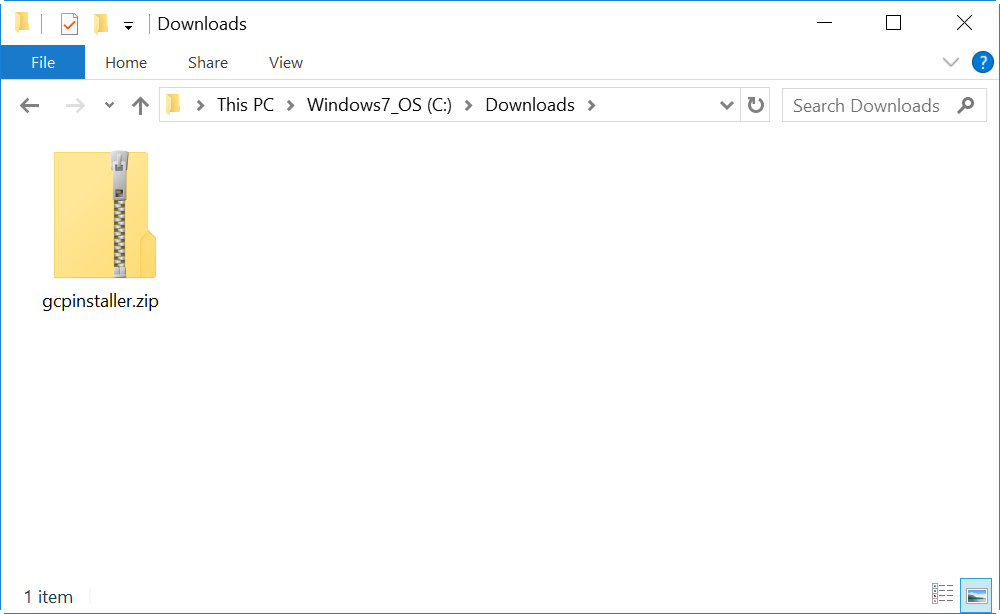 Figure 6. The Techila Deployment Tool is delivered in a zip file.
 -
Extract the
gcpinstaller.zippackage to a directory that does not require administrative privileges for creating files. This is required, because the Techila Deployment Tool will create files in the current working directory.After extraction, the Techila Deployment Tool (gcpinstaller.jar) will be available as illustrated below.
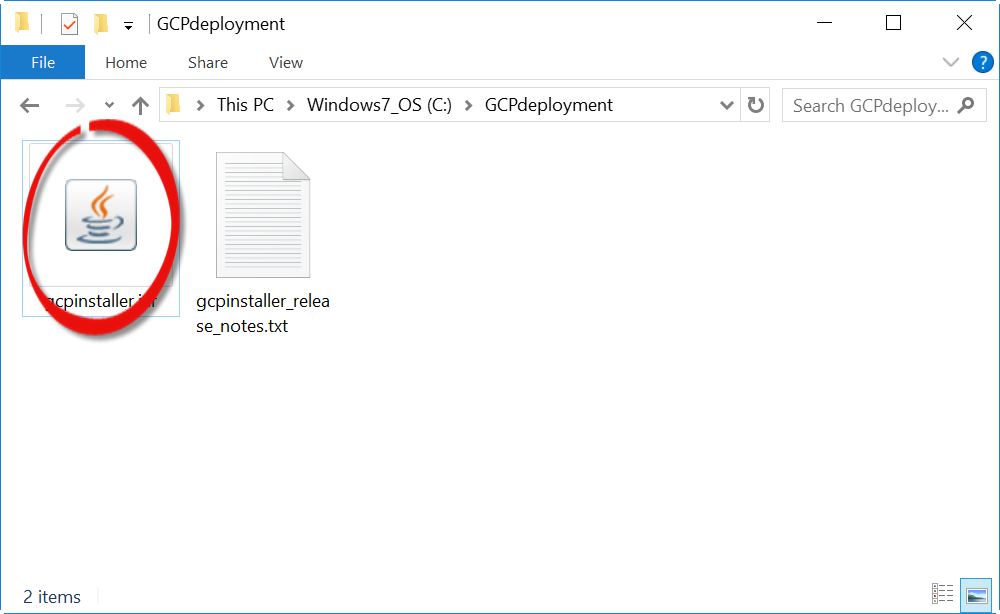 Figure 7. The Techila Deployment Tool.
3. Deploying the Techila Server in Google Cloud Platform
This Chapter contains instructions for deploying the Techila Server in Google Cloud Platform. Instructions for removing the Techila Server can be found in Removing the Techila Server.
-
Navigate to the directory that contains the Techila Deployment Tool (
gcpinstaller.jar) and launch the application.When using a file manager, the application can be launched by double clicking on the
gcpinstaller.jarfile icon. If you are unable to launch the application by double clicking, you can launch the application from the command line using command:java -jar gcpinstaller.jar.Note! If you are unable to launch the application from the command line, please verify that your PATH environment variable contains the location of your Java installation.
Note! The
gcpinstaller.jarapplication will create files in the current working directory, which means that the application must have write access to the directory. Ensure that the directory containing thegcpinstaller.jarfile does not require administrative privileges rights for creating files.
Figure 8. In this example, the filegcpinstaller.jarthat contains the Techila Deployment Tool is located in directoryC:\GCPDeployment. The application can be launched by double clicking the file icon. -
After launching the Techila Deployment Tool, the
Certificate Managementtab will be displayed.Click the
Open Google Cloud Platform Consolebutton. This will open the Google Cloud Platform Console in your web browser.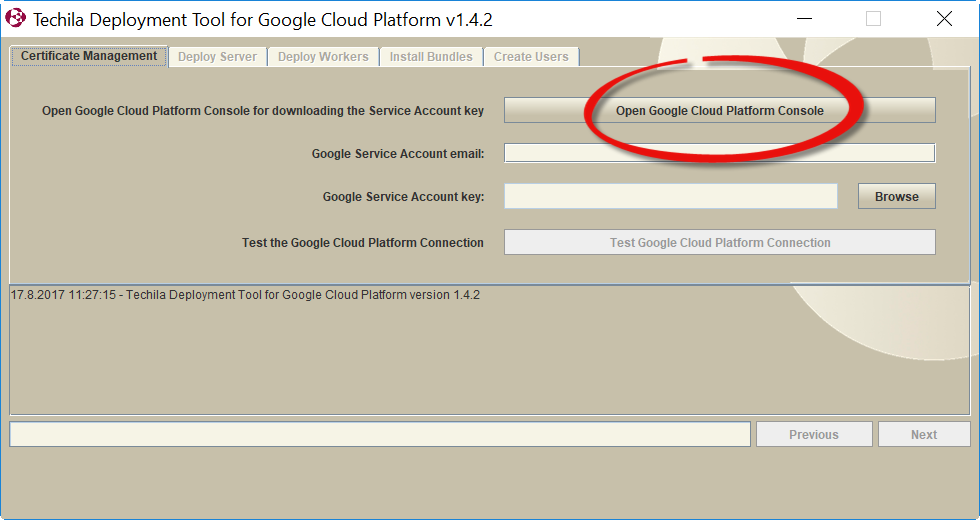 Figure 9. Click the highlighted button.
 -
If required, sign in to your Google Account.
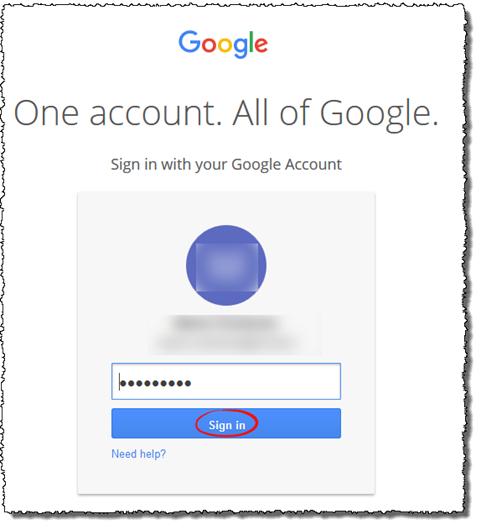 Figure 10. Sign in using your Google login credentials.
 -
After signing in, click the
Create Projectbutton to create a project.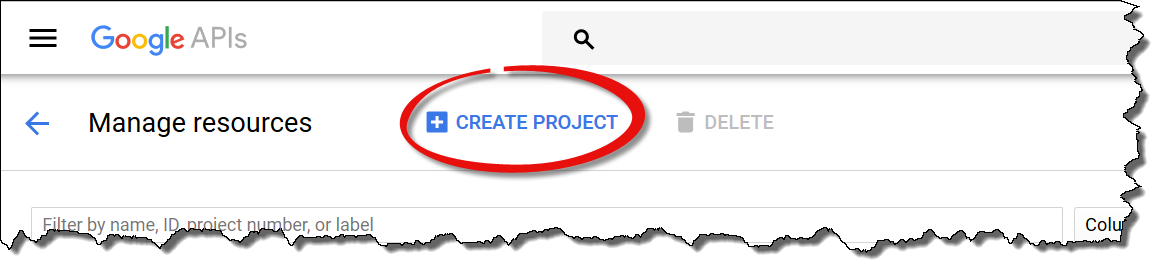 Figure 11. Create a new project.
 -
Enter a suitable name for the Project.
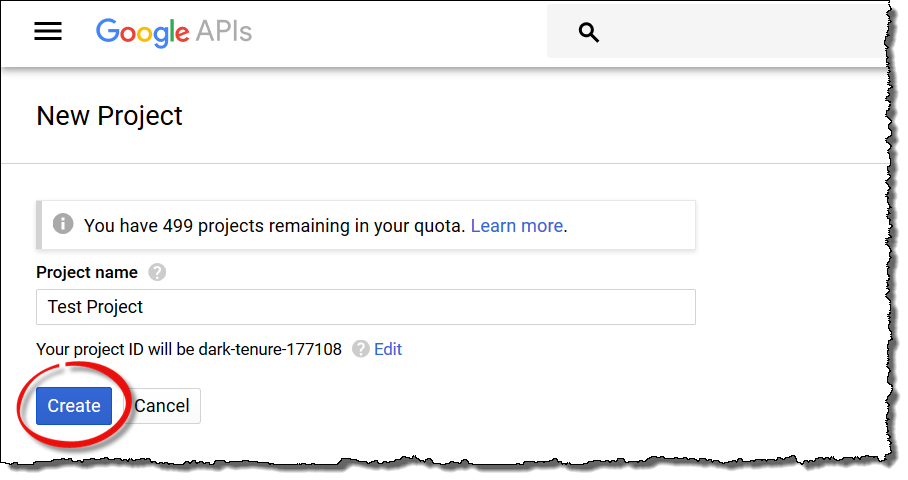 Figure 12. Naming the project.
 -
Select the project that you created by clicking on it.
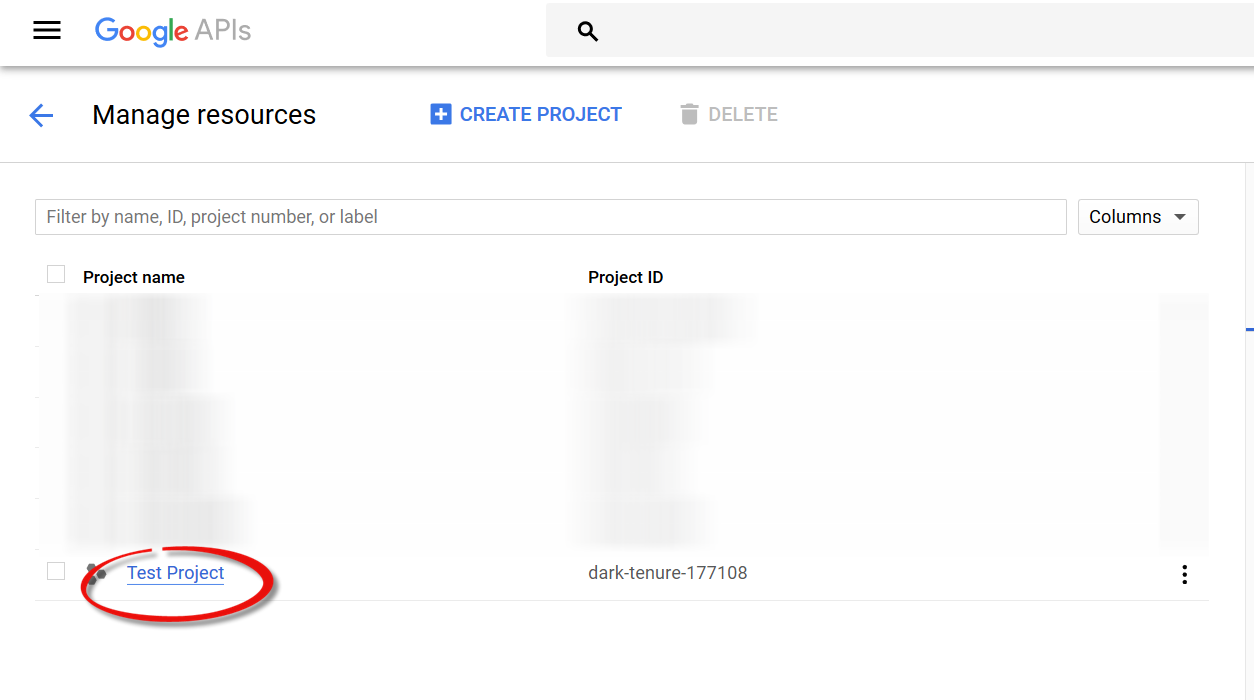 Figure 13. Selecting the project.
 -
type
APIs & sercicesin the search box and click the matching search result to open the management view.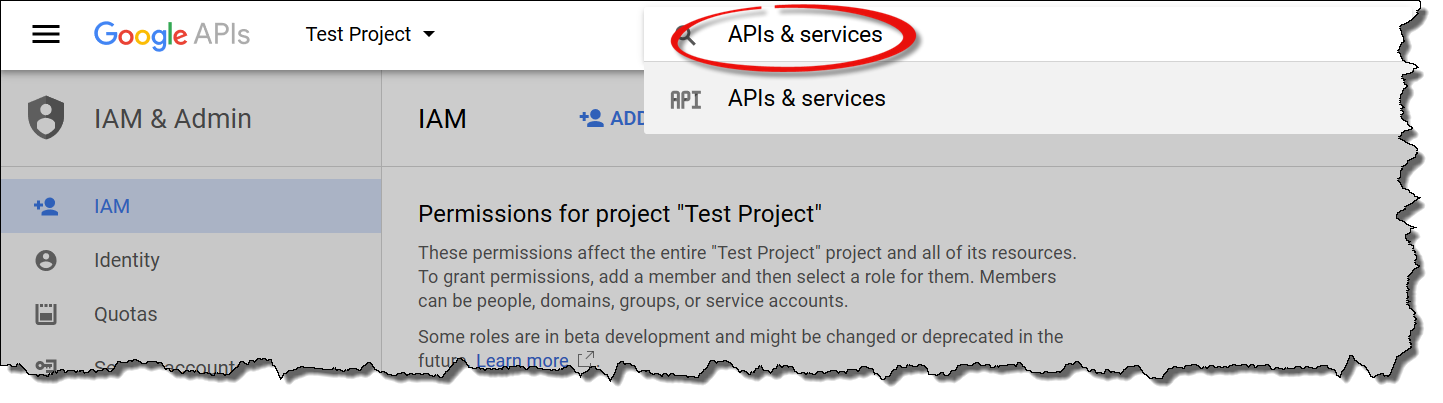 Figure 14. Opening Compute Engine API
 -
Click on
Compute Engine API.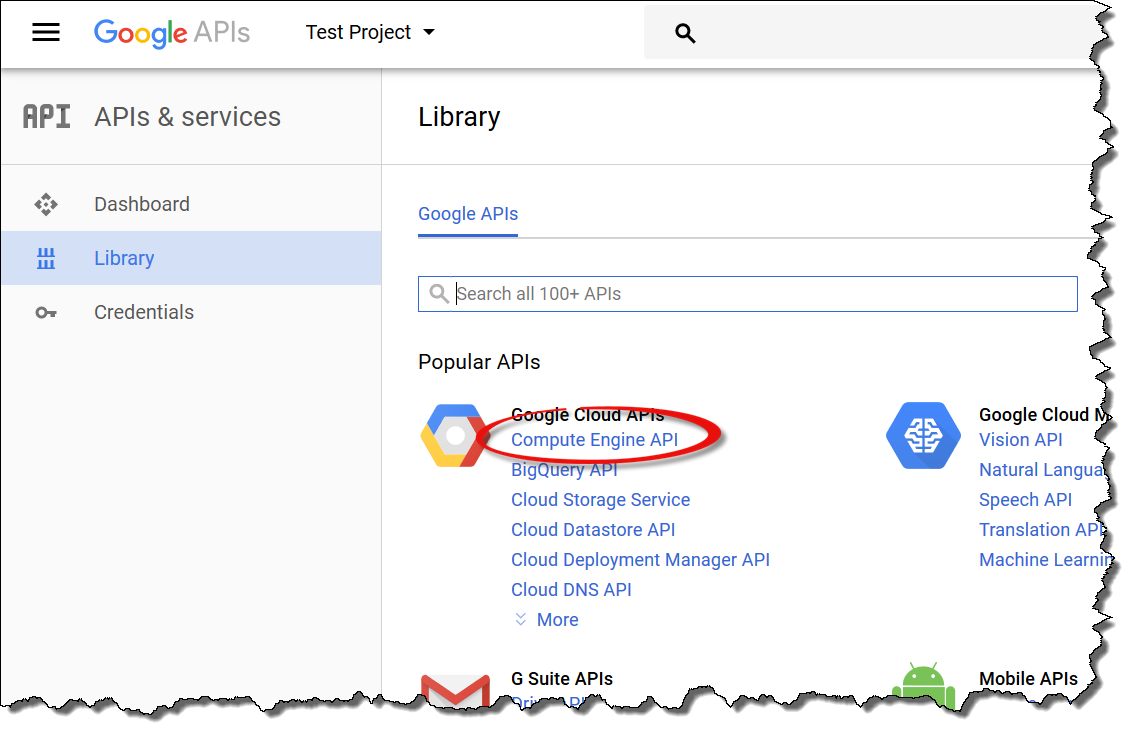 Figure 15. Click on the highlighted API.
 -
Click the
Enable APIbutton to enable the API.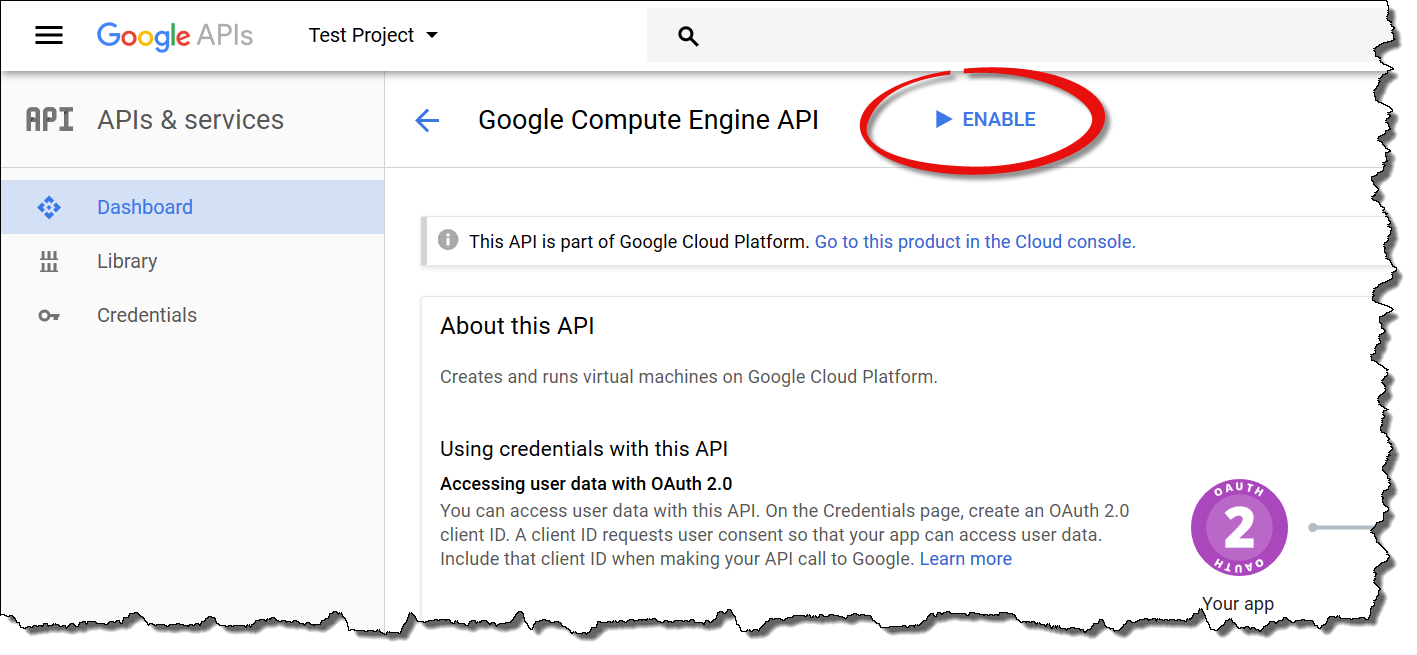 Figure 16. Enable the Google Cloud Platform API.
 -
After enabling the API, the view should resemble the one shown below.
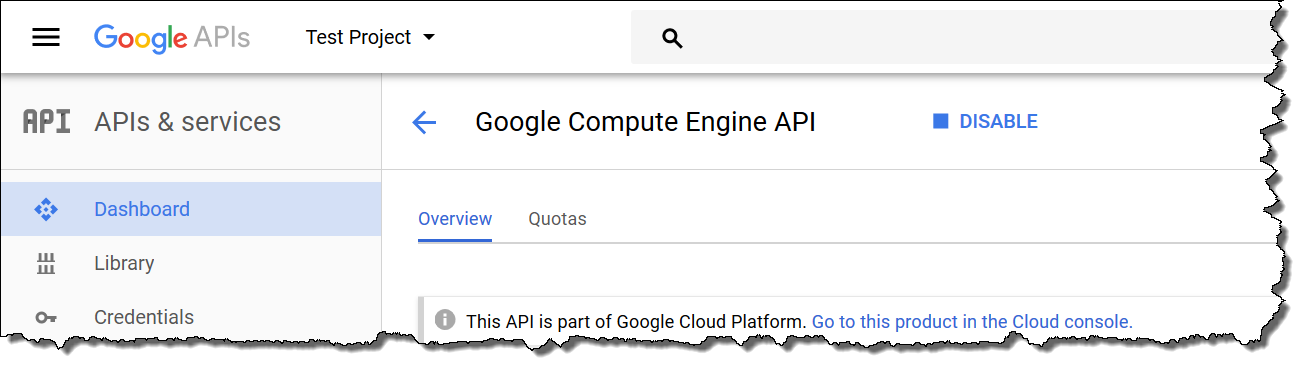 Figure 17. View after enabling the API
Note! This step requires that you have a valid billing method defined for your account. If no billing method has been defined, you will need to add a billing method before continuing.
During the following steps, a new service account will be created and the security credentials of the account will be linked with the Techila Deployment Tool. This will enable the Techila Deployment Tool to manage your GCP environment (deploy instances, create data disks, etc.).
-
Type
Service accountsin the search box and selectService accountsfrom the search results. Figure 18. Click the highlighted search result to navigate to the service accounts view.
 -
Click the
Create service accountbutton.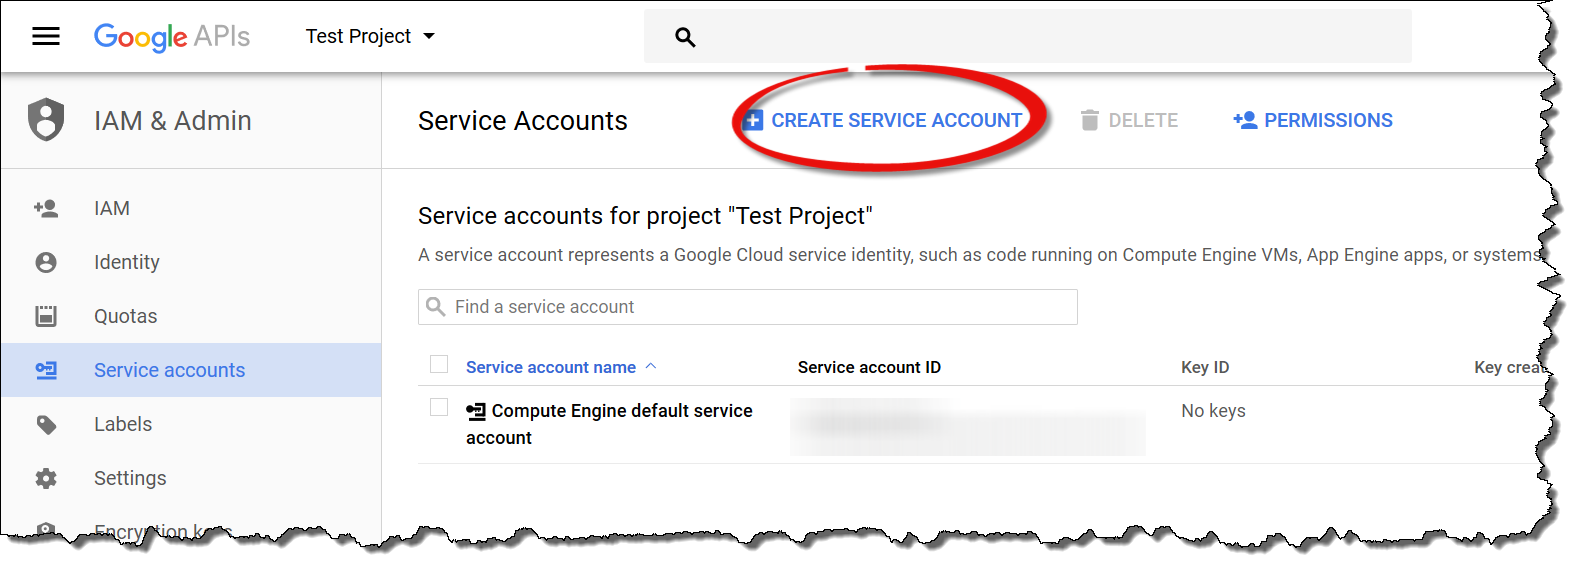 Figure 19. Click the highlighted button.
 -
Enter a Name (for example
serviceaccount) and give the necessary role permissions. After this, you will need to define a role that meets either the recommended or required minimum permissions listed below.Configuration Roles Recommended
-
Project Editor
Required Minimum
-
Compute Instance Admin (v1)
-
Compute Network Admin
-
Compute Security Admin
-
Service Account Actor
After setting the roles, tick the Furnish a new private key checkbox, choose P12 as the type.
The image below shows a configuration where Project Editor role has been selected.
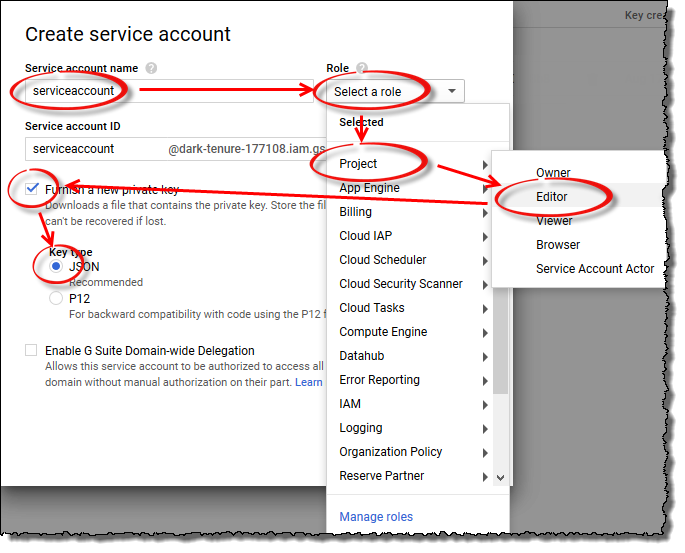 Figure 20. Configuring a new service account.
 -
-
Click
Createto create the service account.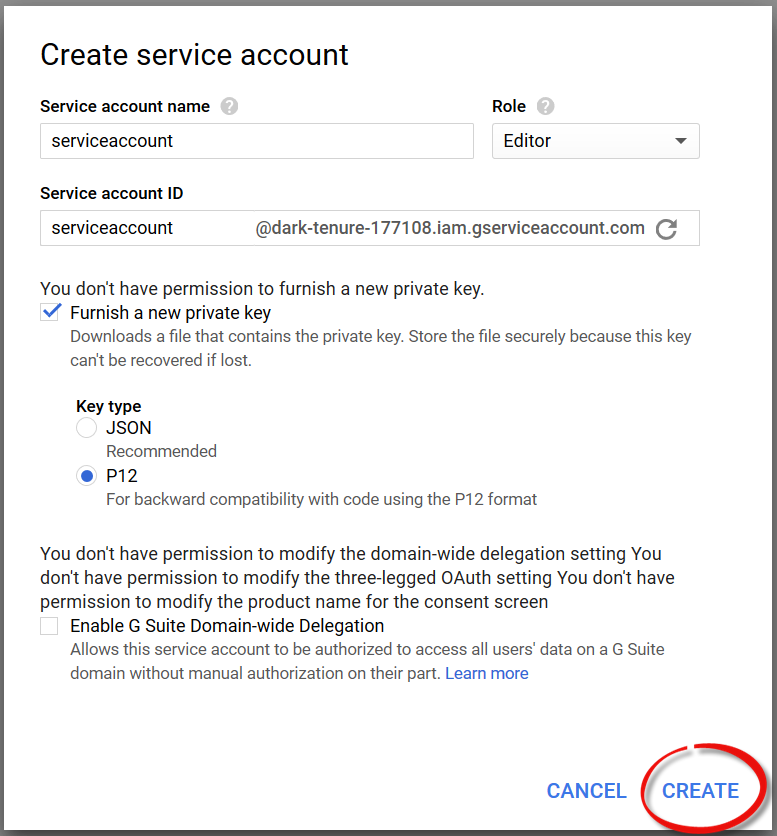 Figure 21. Creating the service account
 -
A file transfer dialog window will be displayed that can be used to download the file containing the private key to your computer.
Save the file to your computer and make a mental note where you stored the file. Note that this file should be stored in a secure location. This file will be imported to the Techila Deployment Tool during the following steps.
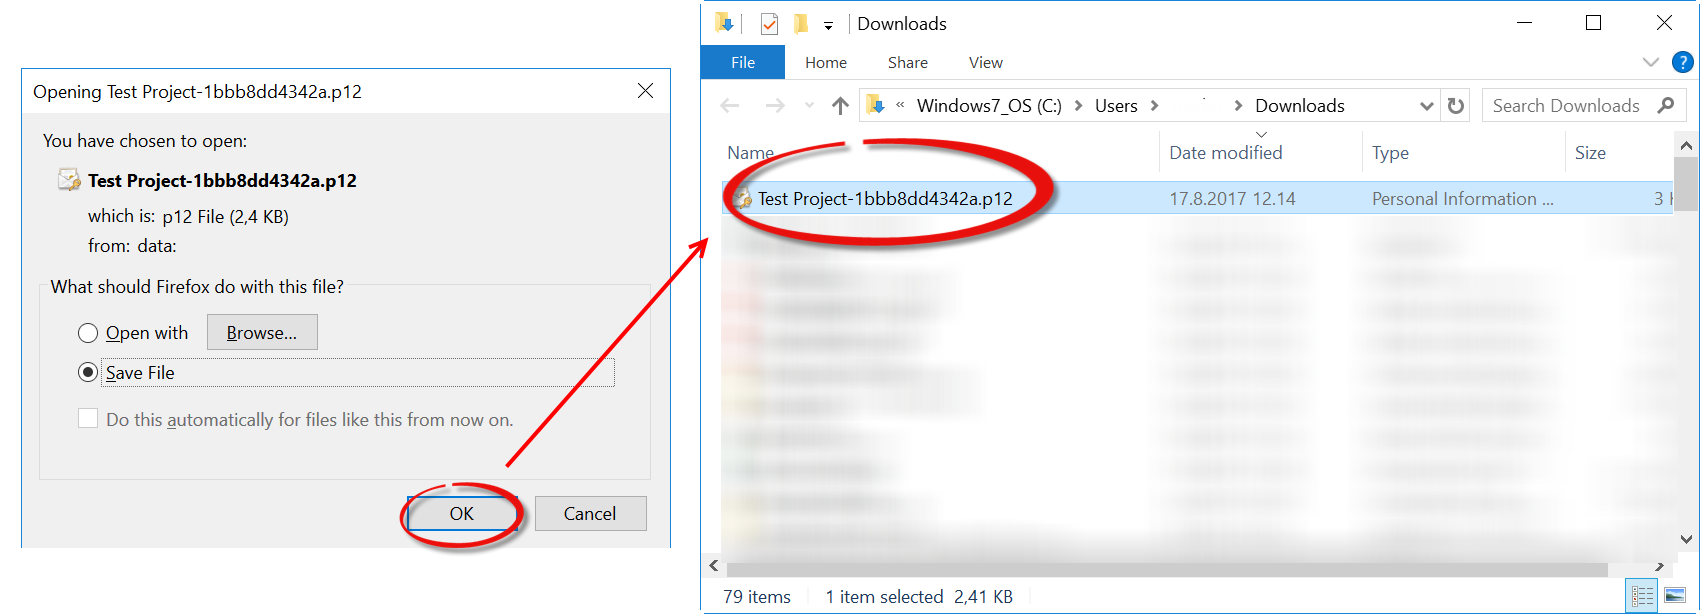 Figure 22. Save the file containing the private key to your computer. In this example, the file has been stored in
C:\Downloads. -
After saving the file on your computer, click the
Closebutton in the pop-up window to continue.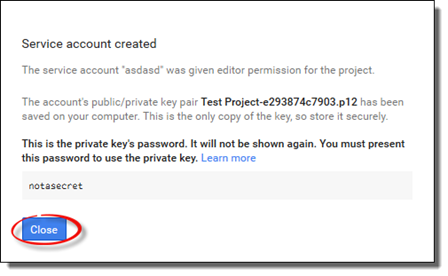 Figure 23. Close the pop-up and continue.
 -
Copy the service account email address to the Techila Deployment Tool in field
Google Service Account email.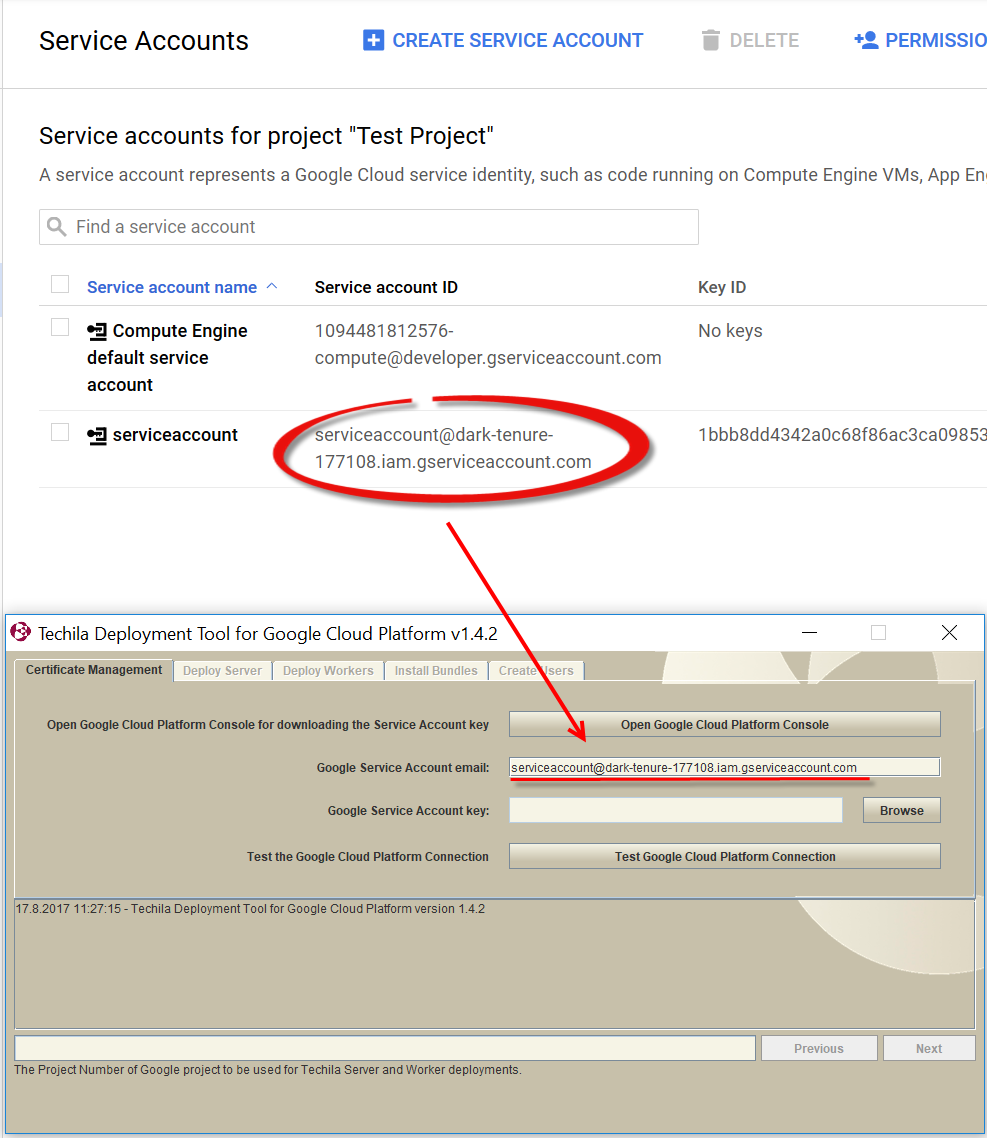 Figure 24. Copy the service account email address to the highlighted field in the Techila Deployment Tool.
 -
In the Techila Deployment Tool, click the
Browsebutton. This will open a file dialog window, which will be used to select the file containing the private key that was downloaded in the previous steps.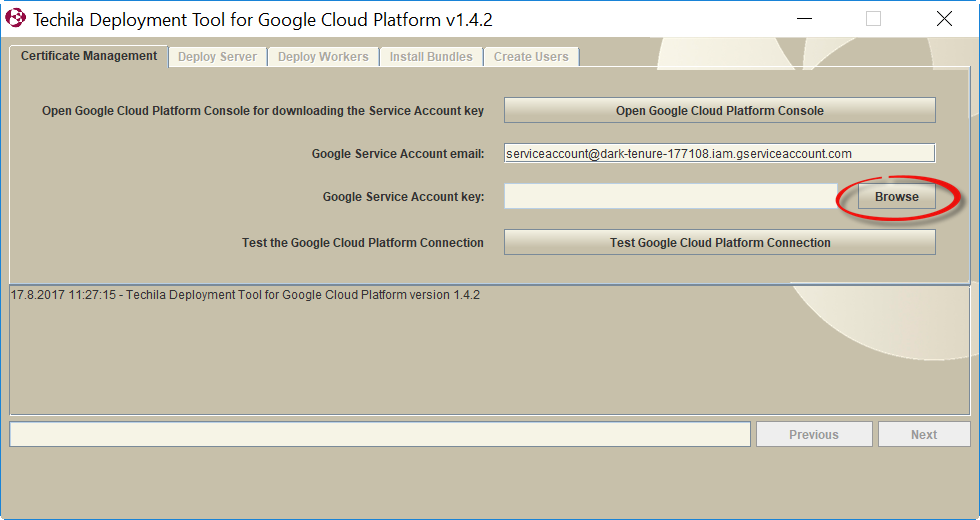 Figure 25. Click the highlighted button to select the file containing the private key.
 -
Using the file dialog window, select the file containing the private key (the file that was downloaded earlier during this process)
-
After selecting the file, click the
Openbutton to continue.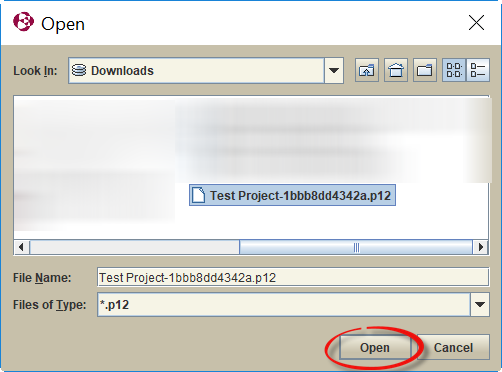 Figure 26. Select the file containing the private key.
 -
After selecting the file, the file location should be visible in the
Google Service Account keyfield.Click the
Test Google Cloud Platform Connectionbutton to perform a connection test.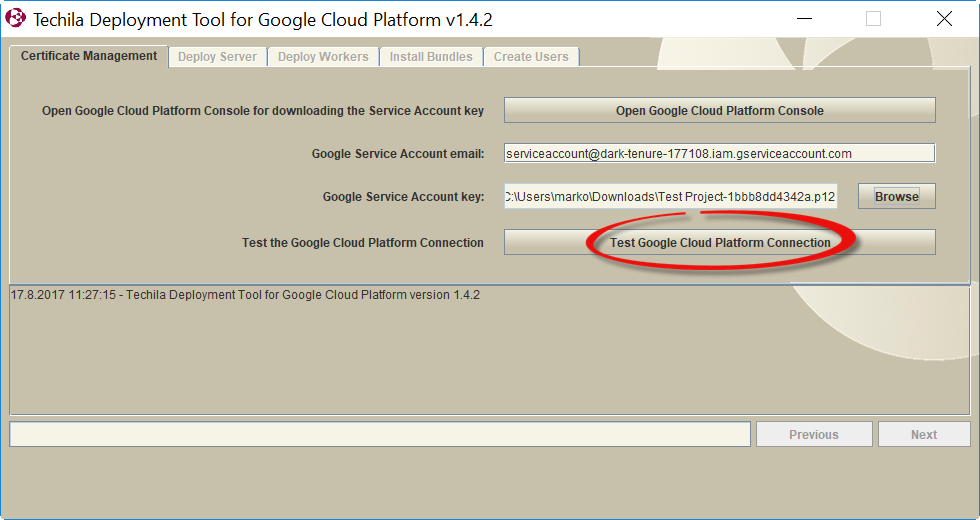 Figure 27. Click the highlighted button to perform a network connection test with the Techila Server.
 -
After a successful connection test, the message
Google Cloud Platform connection tested successfullyshould be visible in the message area. Click the Next button to continue to theDeploy Servertab.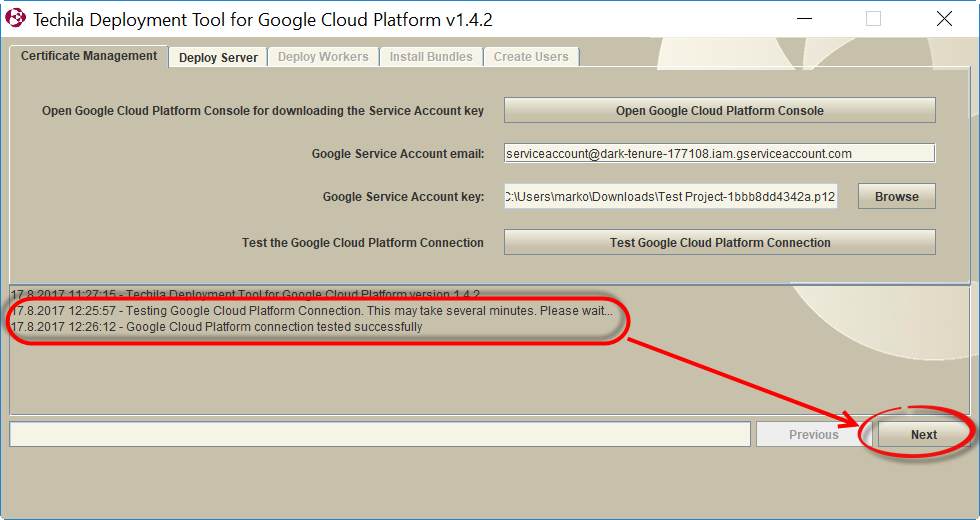 Figure 28. After a successful network connection test you can proceed to the next tab by clicking the
Nextbutton. -
On the
Deploy Servertab, click theImport Licensebutton. This will open a file dialog window, which will be used to select the Techila License file.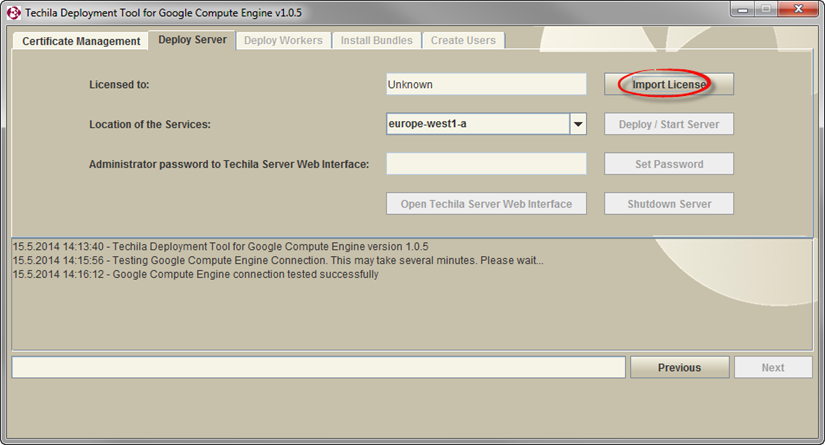 Figure 29. Importing a Techila License is required before deploying the Techila Server. Techila Licenses are provided by Techila Technologies. If you do not have a Techila License file, please contact support@techilatechnologies.com or your Account Manager.
 -
After clicking the
Import Licensebutton, use the file dialog window to select your Techila License file. The Techila License file can be recognized from the .license suffix. After selecting the file, click the Open button.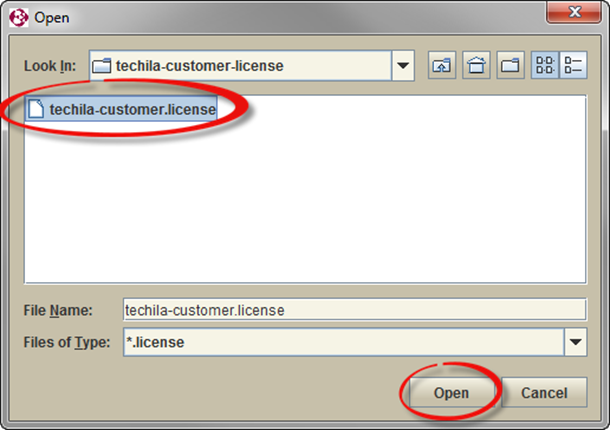 Figure 30. The file dialog window can be used to select your Techila License.
 -
After importing your Techila License, the
Licensed tofield will contain the corresponding information stored in the Techila License file.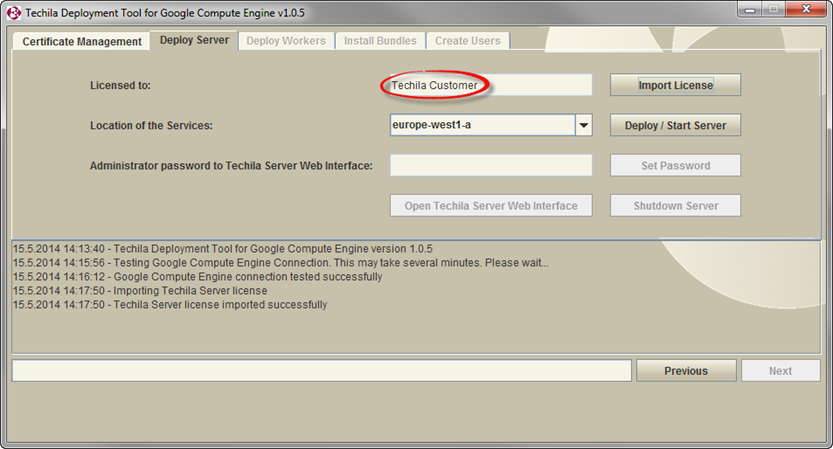 Figure 31. The Techila License information will be displayed after a successful import process.
 -
Using the dropdown menu, choose the location where the Techila Server and Techila Workers will be deployed.
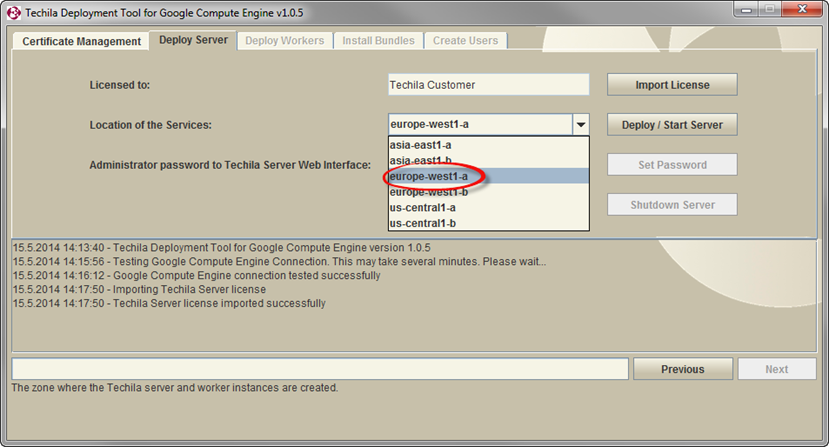 Figure 32. Choose the location for the Techila Distributed Computing Engine components. Typically it is suggested to select a location that is geographically close to you.
 -
After selecting the location for the services, click the
Deploy/Start Serverbutton to begin the Techila Server deployment process.This deployment process will create all necessary components and will also automatically deploy one instance (type
n1-standard-4), which will be used as the Techila Server.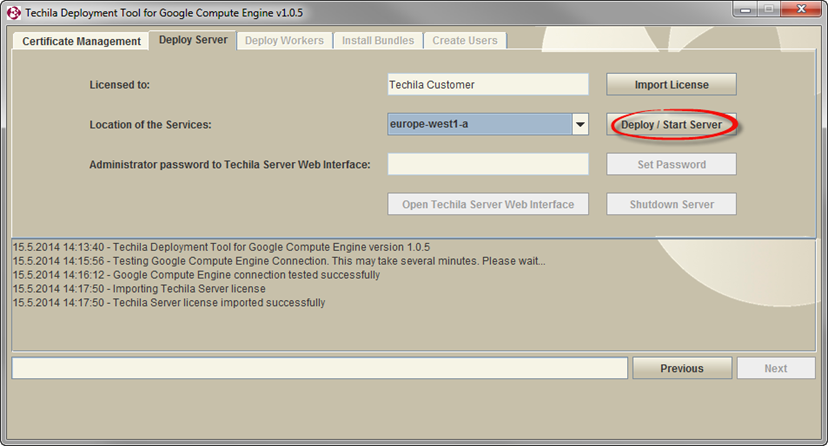 Figure 33. Click the highlighted button to start the Techila Server deployment process.
During the deployment, a computational Project will be automatically created for testing purposes. The progress of the test Project will be indicated by a status window, which will be visible for the duration of the Project. The status of the Project will also be displayed in the text field of the Techila Deployment Tool.
After the deployment process has been completed, a message stating
Techila Server Installation completedwill be displayed and theOpen Techila Server Web Interfacebutton will be enabled. The password for the Useradminwill be displayed in theAdministrator password to Techila Server Web Interfacefield.The Techila Server has now been successfully deployed and is ready for use. You can now continue with deploying Techila Workers in Google Cloud Platform as described in Deploying the Techila Server in Google Cloud Platform.
Note! If you want, you can change the Techila Web Interface password for the
adminUser. This is described in the following steps.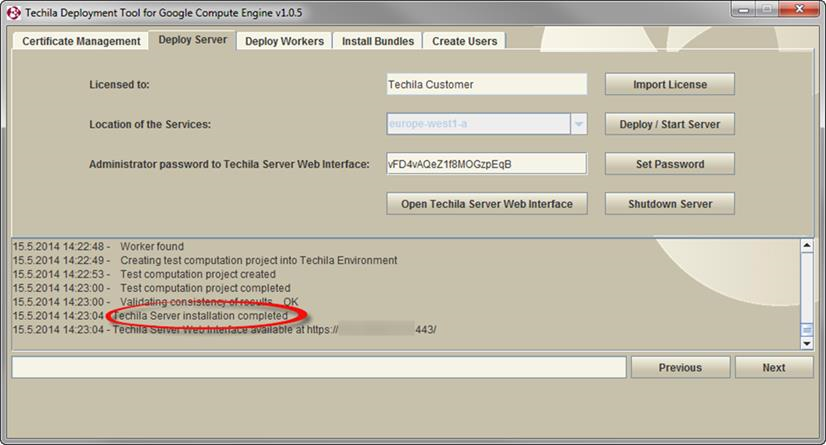 Figure 34. The view after successfully deploying the Techila Server.
 -
After the Techila Server has been deployed, you can change the Techila Web Interface password for the
adminUser by entering a new password to theAdministrator password to Techila Server Web Interface. After entering the new password, click theSet Passwordbutton.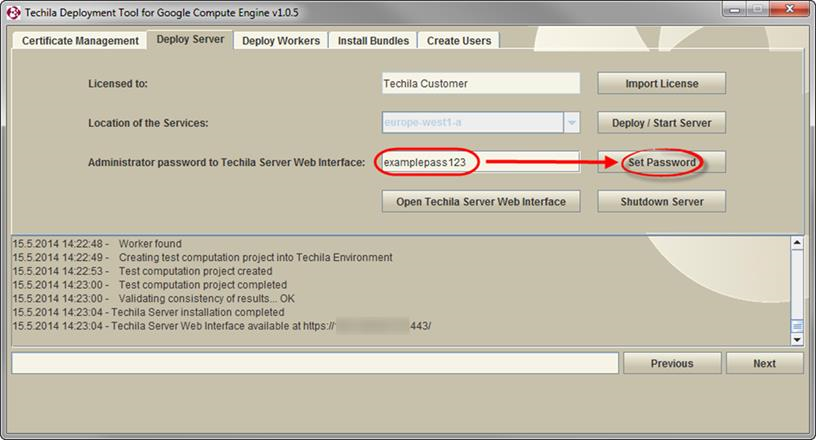 Figure 35. Changing the Techila Web Interface password for the
adminUser. -
After clicking the button, the message
Administrator password changedwill be displayed. The password has now been successfully reset.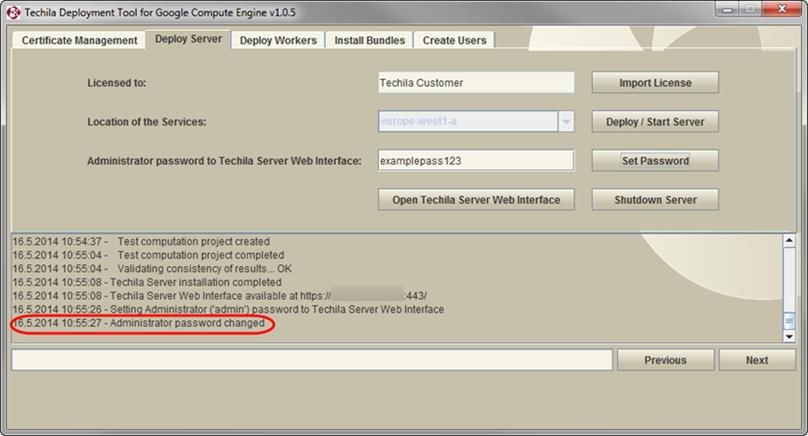 Figure 36. A successfully changed password.
4. Deploying Techila Workers in Google Cloud Platform
This Chapter contains instructions for deploying Techila Workers in Google Cloud Platform. Instructions for removing Techila Workers can be found in Removing Techila Workers.
Please note that in order to deploy (or remove) Techila Workers, a deployed Techila Server must be available. Instructions for deploying the Techila Server in Google Cloud Platform can be found in Deploying the Techila Server in Google Cloud Platform.
-
Navigate to the directory containing the Techila Deployment Tool and launch the application by double clicking on the
gcpinstaller.jarfile icon.Note! If the Techila Deployment Tool is already running and you have performed a connection test, you can continue from Step 3.
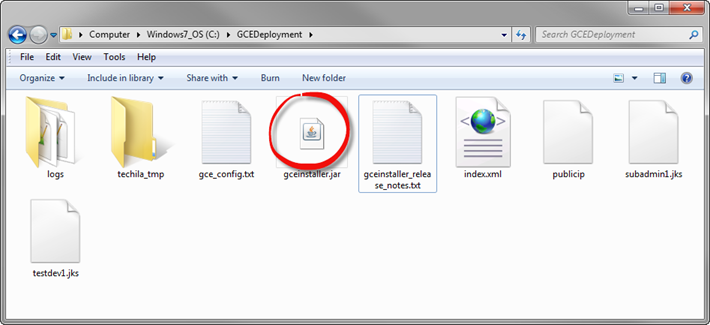 Figure 37. After a successful deployment of the Techila Server in your GCP environment, several new files have been automatically generated in to the directory containing the Techila Deployment Tool. The application can be re-launched by double clicking the
gcpinstaller.jarfile icon. -
After the Techila Deployment Tool has been launched, click the
Test Google Cloud Platform Connectionbutton.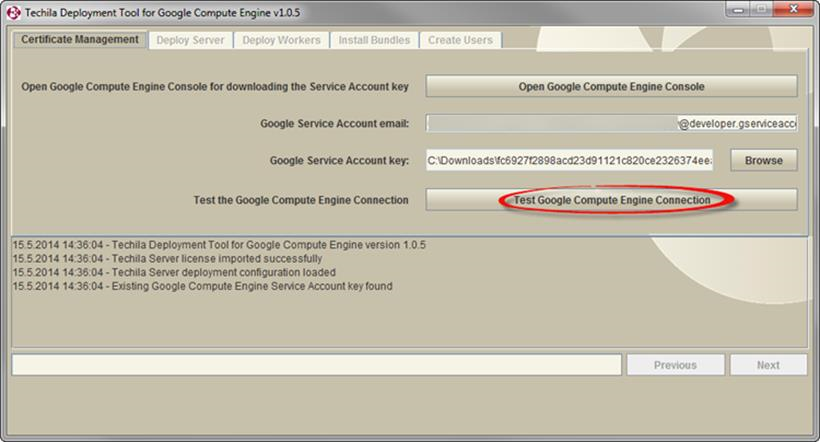 Figure 38. Click the highlighted button to enable other tabs in the Techila Deployment Tool.
 -
After the connection test has been performed, click on the
Deploy Workerstab to open the tab that will be used to deploy Techila Workers in Google Cloud Platform.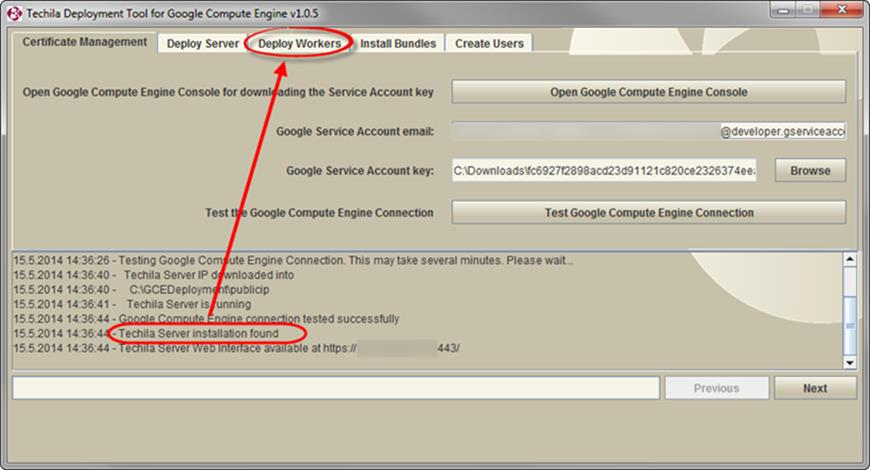 Figure 39. After a successful connection test, the
Deploy Workerstab will be available.The
Deploy Workerstab can be used to deploy Techila Workers in Google Cloud Platform instances. Before any Techila Workers have been deployed, the tab should resemble the one illustrated below.The
Totalvalue in the highlightedTotal/Maxfield contains information on how many cores are currently used by existing Techila Worker deployments and how many cores would be used if the specified number of Techila Workers (value in theSelected Worker Count) would be deployed.The
Maxvalue in the highlightedTotal/Maxfield displays the maximum number of cores that can be used for Techila Worker deployments. The maximum value will depend on the CPU quota of your Google Cloud Platform project.More information about resource quotas can be found on the following website:
 Figure 40. The
Deploy Workerstab will contain information on the currently deployed Techila Workers.When deploying Techila Workers, each Techila Worker deployment will be deployed to a separate service. For the purposes of this Chapter however, it is assumed that you will only deploy Techila Workers to the default service. More information on creating additional services and doing more diverse deployments can be found in Deploying Techila Workers on Different Machine Types.
When deploying Techila Workers, you will need to specify the following settings (follow the links to learn more about the settings):
-
Techila Worker Size. (
Selected Worker Sizedropdown menu). -
Techila Worker Deployment Count. Selected Worker Count` field)
-
Instance Shutdown Delay. (
Shutdown Idle Delay (minutes)field) -
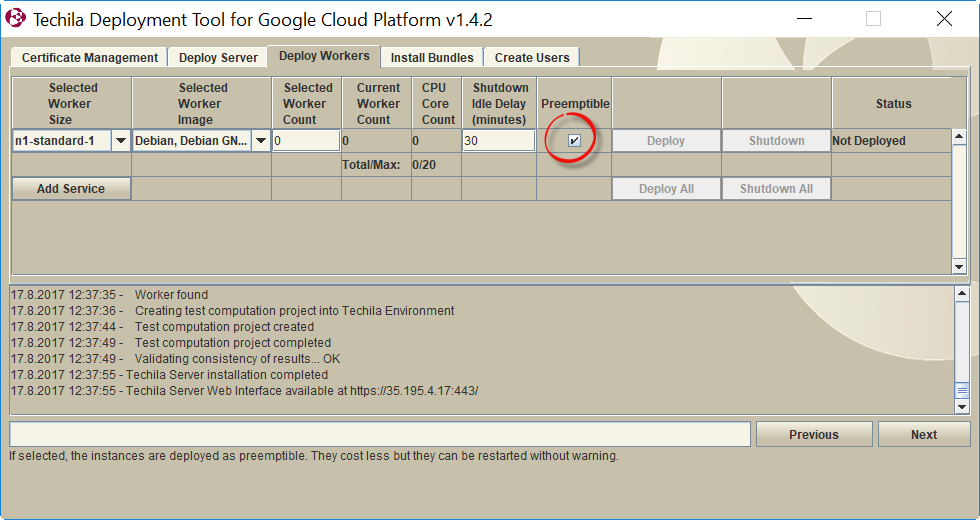
Whether or not you want to use Preemptible Instances.
After specifying these settings, click the Deploy button to begin the deployment process
In the example below, the Worker Size has been set to
n1-standard-1, the operating system toDebianand the Techila Worker count to5.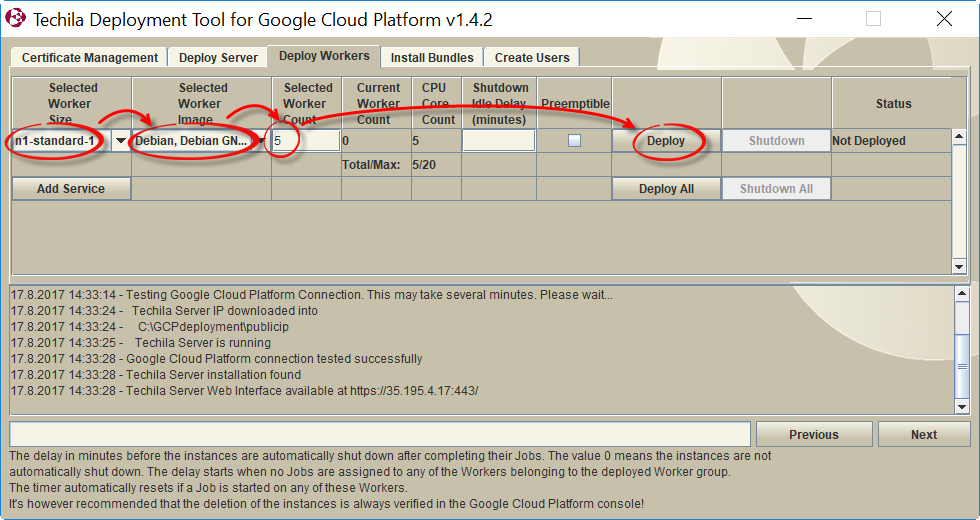 Figure 41. After selecting the desired Worker Size and the number of Techila Workers you want to deploy, click the
Deploybutton to begin the deployment process.
-
-
After the instances have been deployed, the
Current Techila Worker countfield will display the number of deployed Techila Workers and should match the value you specified in the previous step.Note! It will take several minutes before the Techila Workers can be used in computational Projects. Typically Techila Workers should be deployed within 5 minutes.
Note! The
Statuscolumn is updated based on the information from the Google Cloud Platform environment and does not include the configuration of the Techila Worker components. This means that even though theStatuscolumn would report5 of 5 deployed, it might take several minutes before the Techila Workers will be visible in the Techila Web Interface and before they can be used in computational Projects.In the example below,
5Techila Workers have been deployed onn1-standard-1instances.After deploying Techila Workers, the
Worker Instance Sizedropdown menu will be disabled and all new Techila Workers will automatically be deployed using the same machine type.After you have deployed Techila Workers, you can continue with installing Bundles on the Techila Server as described in Installing Bundles.
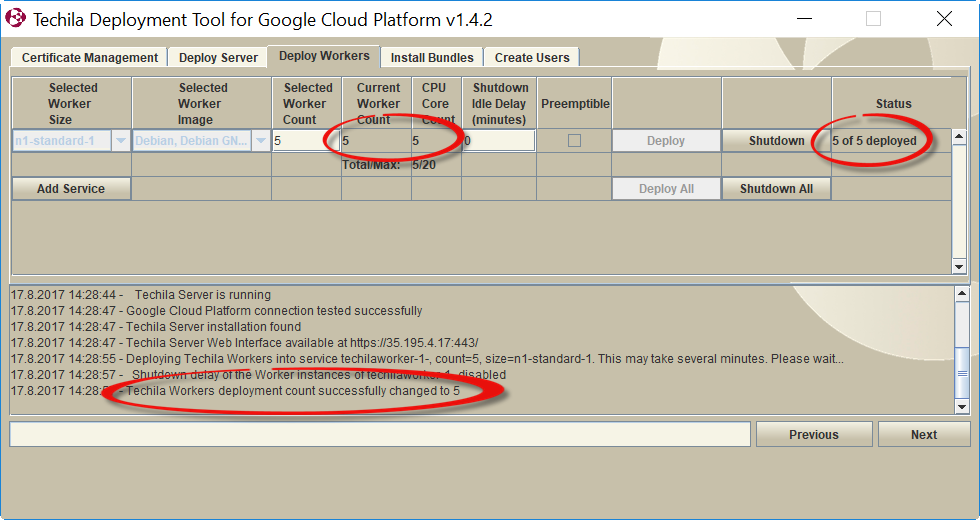 Figure 42. After the Techila Workers have been deployed, the
Current Worker CountandStatuscolumns will display information on the status of deployed Techila Workers.
4.1. Deploying Techila Workers on Different Machine Types
This Chapter contains instructions on how to deploy Techila Workers on different GCP machine types.
-
Navigate to the directory containing the Techila Deployment Tool and launch the application by double clicking on the
gcpinstaller.jarfile icon.Note! If the Techila Deployment Tool is already running and you have performed a connection test, you can continue from Step 3.
-
Click the Test Google Cloud Platform Connection button
-
Click the
Deploy Workerstab. In the example below, there are already 10 Techila Workers deployed onn1-standard-1machine types. Click the Add Service button to add a new service.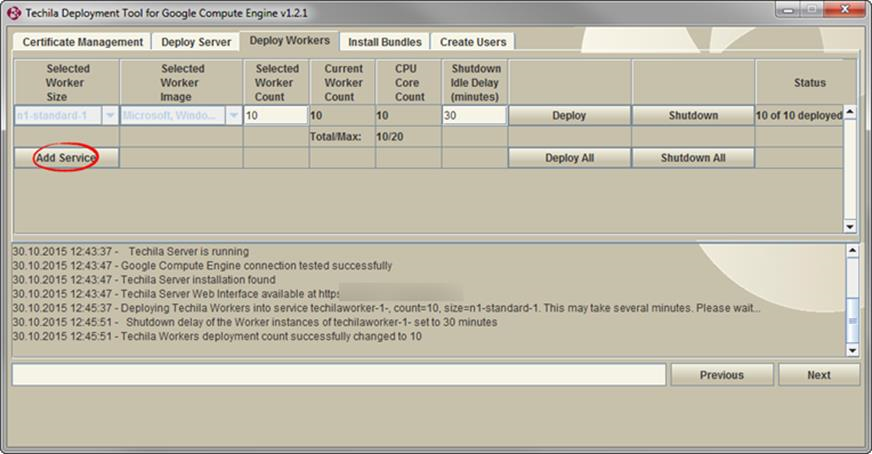 Figure 43. In this example, the default service already contains 10 deployed Techila Workers.
 -
After clicking the Add Service button, a new line will be displayed containing the information of the new service. This service can be used to deploy Techila Workers on different instance sizes (or the same size) than the default service.
Specify the following settings for the new service. Specifying these settings follows the same principle as described in Deploying Techila Workers in Google Cloud Platform:
-
Number of Techila Workers to be deployed
-
Techila Worker Size
-
Shutdown delay
-
Image
-
Preemptible instances
After defining the settings, deploy the Techila Workers by clicking the
Deploybutton for the new service.Note! If you have added multiple new services and wish to deploy Techila Workers to all of these services, click the Deploy All button.
In the example below, two (2) Techila Workers will be deployed on
n1-standard-4machine types.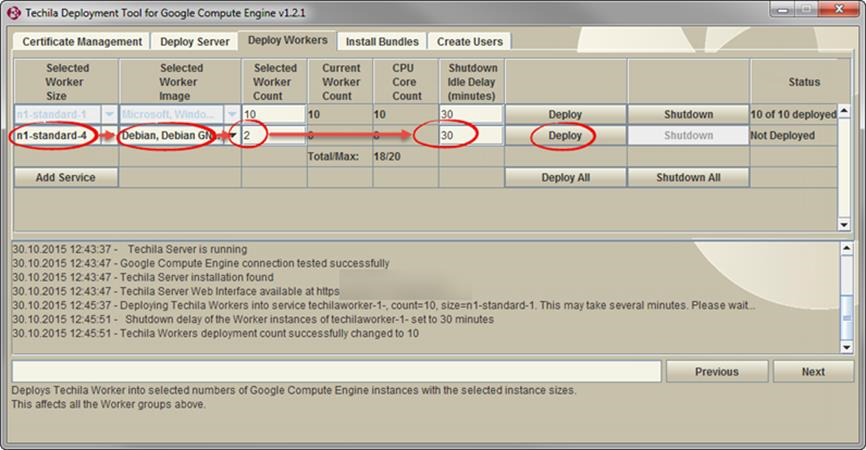 Figure 44. Deploying Techila Workers to a new service is done in a similar manner as with the default service.
After the Techila Workers have been deployed to the new service, the information will be updated in the
Current Worker CountandStatuscolumns. When theStatuscolumn states that all Techila Workers have been deployed, they can be used in computational Projects.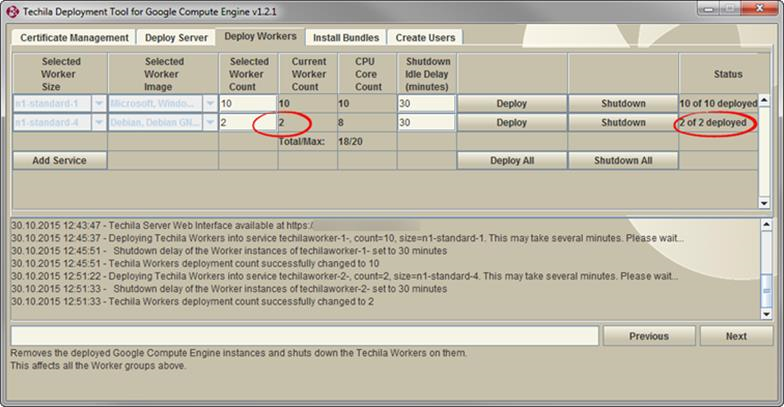 Figure 45. After the Techila Workers have been deployed, the information will be automatically updated for the service.
-
5. Installing Bundles
This Chapter contains instructions for installing Bundles on the Techila Server. Please note that in order to install Bundles, a deployed Techila Server must be available. Instructions for deploying the Techila Server in Google Cloud Platform can be found in Deploying the Techila Server in Google Cloud Platform.
Installed Bundles will be automatically transferred to Techila Workers if a computational Job that is assigned to the Techila Worker has dependencies to the Bundle. The Bundle transfer process from the Techila Server to the Techila Workers may take several minutes depending on the size of the Bundle, but will only need to be performed once per deployment.
After the Bundle has been transferred to Techila Workers, the Techila Workers will automatically re-use the Bundle in subsequent computational Projects. Please note that if the Google Cloud Platform instances hosting the Techila Workers are restarted, the Bundles will need to be transferred again from the Techila Server to the Techila Workers. This is due to the stateless nature of Techila Workers in a Google Cloud Platform environment.
There are two different methods for installing Bundles:
-
Installing Runtime Bundles. This is the default method, which is typically used when deploying a Techila environment in Google Cloud Platform.
-
Installing Custom Bundles. This method is typically used only when you create your own Runtime Bundles or when you receive Bundles from Techila Technologies.
5.1. Installing Runtime Bundles
This Chapter contains instructions for installing Runtime Bundles that are available in the Bundle list. Runtime Bundles contain runtime components that are required when performing computations using the following programming languages.
-
R
-
Python
-
Perl
The example process below describes how to install one Runtime Bundle.
-
Navigate to the directory containing the Techila Deployment Tool and launch the application by double clicking on the
gcpinstaller.jarfile icon.Note! If the Techila Deployment Tool is already running and you have performed a connection test, you can continue from Step 3.
-
Click the
Test Google Cloud Platform Connectionbutton -
Click the
Install BundlestabThe
Install Bundlestab contains a list of Bundles that can be installed on the Techila Server. Bundles can be marked for installation by ticking the checkboxes of the Bundles you wish to install. The naming convention of the Bundles is typically of the following format:<Programming Language> <Version> <Processor Architecture>
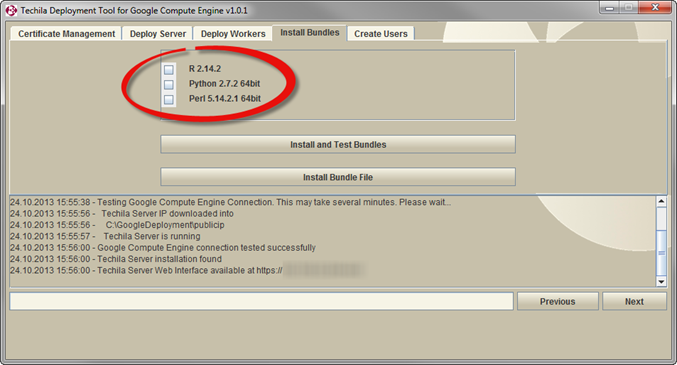 Figure 46. The appearance of this tab will vary, depending on which Bundles are currently available. In this example, Bundles containing the runtime components for R, Python and Perl can be selected and installed.
When installing Bundles containing the runtime components, following principles apply:
-
Bundles are programming language specific
-
Bundles are version specific
These two principles are shortly explained below
Programming language specific Bundles
Bundles containing the runtime components are programming language specific, meaning you will need to install the Bundles for the programming languages you plan on using. For example, if you wish to perform computations using the R programming language, you will need to select and install the Bundle containing the R runtime components.
In the example below, the Bundle containing the runtime components for R version 2.14.2 has been selected.
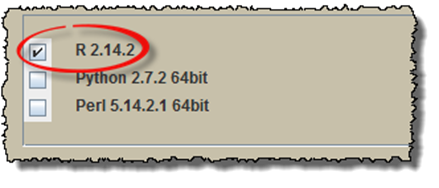 Figure 47. Support for programming languages can be added by installing applicable Bundles.
Version specific Bundles
Bundles containing the runtime components are version specific. It is therefore recommended that you install Bundles that contain the same version of the runtime components as used by the End-User. The versions of the runtime components stored in the Bundles are visible in the list displayed in the
Install Bundlestab.In the example below, the version of the runtime components in the R Bundle has been highlighted. The runtime components correspond to the R version 2.14.2.
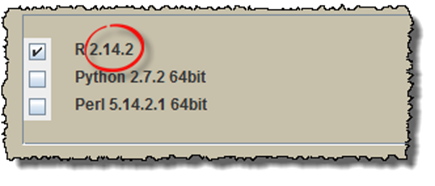 Figure 48. The version of runtime components in Bundles should match the development environment versions used by the End-Users.
If you plan on performing MATLAB computations in the Techila Distributed Computing Engine (TDCE) environment, you will need to install a MATLAB Bundle with the same version and processor architecture as the MATLAB you are using for creating the computational Projects. This is due to MATLAB compilations being processor architecture specific, meaning that e.g. 64-bit compilations will require 64-bit runtime components for the same MATLAB version.
Select the Bundles you wish to install by ticking the checkboxes and click the Install and Test Bundles button to install the Bundles. In the example below, the Bundle containing the runtime components for Python version 2.6.2 will be installed.
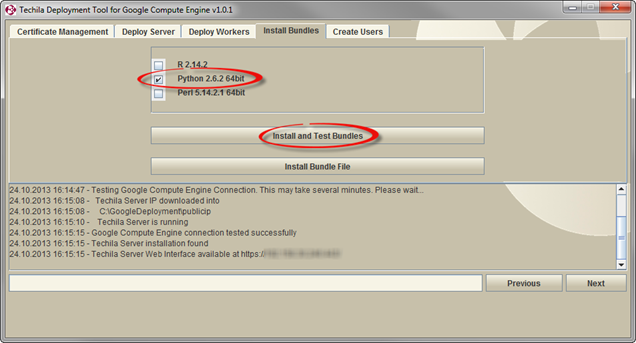 Figure 49. Bundles are installed by ticking the checkboxes of the Bundles you wish to install and clicking the
Install and Test Bundlesbutton. Multiple Bundles can be installed by ticking several checkboxes.After clicking the
Install and Test Bundlesbutton, the installation process will be started. This may take several minutes. After the Bundles you selected have been installed, a message stating that the installation process was successful will be printed and the selections you made will be grayed out.The Bundles that were installed will now be automatically used in computational Projects created by End-users. You can now continue with adding End-Users to the TDCE environment as described in Adding End-Users.
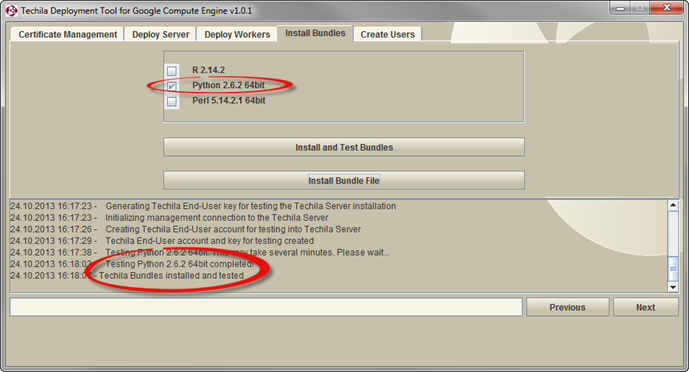 Figure 50. After successfully installing a Bundle, the selection will be grayed out. The runtime components in the Bundle will now be automatically used in computational Projects that have dependencies to the Bundle. In this example, the support for Python version 2.6.2 was added.
-
5.2. Installing Custom Bundles
This Chapter contains instructions for uploading Bundles from your computer to the Techila Server in Google Cloud Platform. The procedure described here can be used to e.g. upload Runtime Bundles that are not included in the Bundle list. Typical usage scenarios include uploading Bundles received from Techila Technologies and uploading Bundles that you have created using the Techila Bundle Creator Tool.
-
Navigate to the directory containing the Techila Deployment Tool and launch the application by double clicking on the
gcpinstaller.jarfile icon.Note! If the Techila Deployment Tool is already running and you have performed a connection test, you can continue from Step 3.
-
Click the
Test Google Cloud Platform Connectionbutton -
Click the
Install Bundlestab -
Click the
Install Bundle Filebutton. This will open a file dialog window which can be used to select the Bundle you wish to upload to the Techila Server.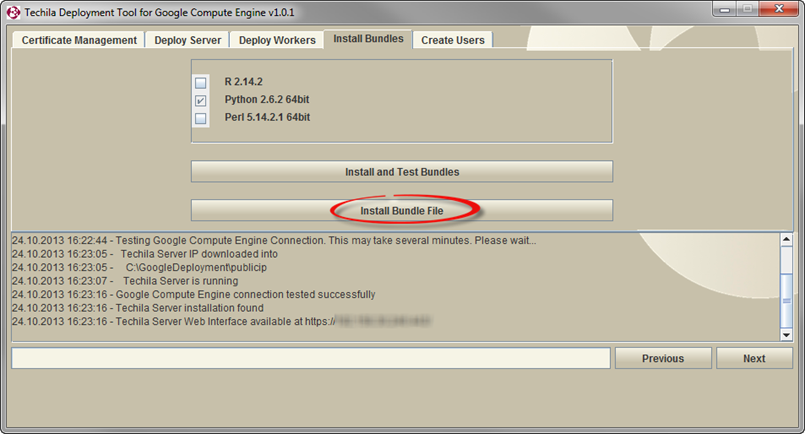 Figure 51. Clicking the highlighted button will open a file dialog window.
 -
Using the file dialog window, select the Bundle you wish to upload to the Techila Server. Click the Open button to upload the Bundle to the Techila Server.
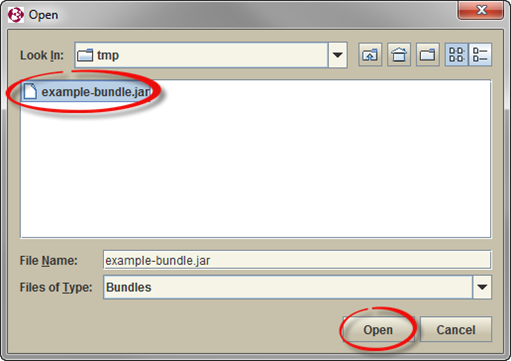 Figure 52. Select the Bundle you wish to upload. In this example a file called
example-bundle.jarhas been selected. -
After starting the upload process, a Status Window will displayed containing information on the upload process.
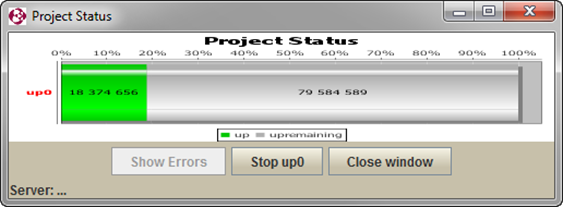 Figure 53. Duration of the upload process will depend on the size of the Bundle and available network bandwidth.
 -
After the Bundle has been uploaded, the corresponding message will be displayed in the message area. The Bundle can now be used in computational Projects.
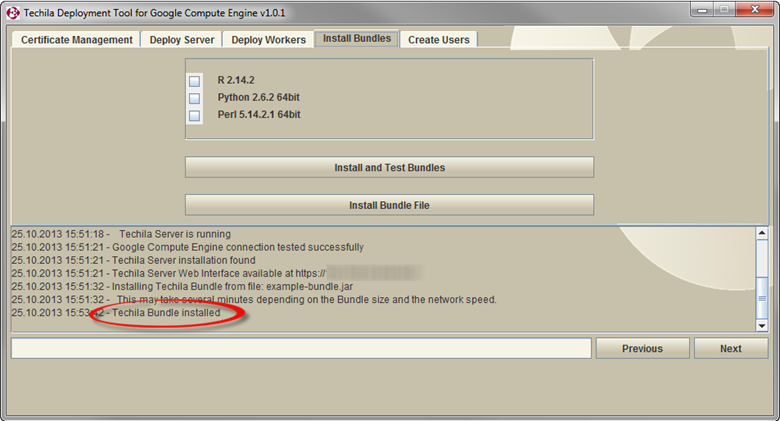 Figure 54. A successfully uploaded Bundle.
6. Adding End-Users
This Chapter contains instructions for adding End-Users to the Techila Distributed Computing Engine (TDCE) environment. All End-Users in the TDCE environment will require a personal keystore containing their End-User Key. This End-User Key will be used for signing Bundles when a computational Project is created.
In addition to the actual keystore file, the End-User will also need the password of the keystore. This password will be defined during the keystore file creation process described in this Chapter.
In addition to the keystore and keystore password, the End-User will also need the hostname/IP address of the Techila Server when configuring the techila_settings.ini file as described in Getting Started.
The IP address of the Techila Server will be displayed in the Techila Deployment Tool after clicking the Test Google Cloud Platform Connection button in the Certificate Management tab.
Please note that the protocol (https://) and trailing port and forward slash will need to be removed as illustrated in the example below.
Parameter |
Example Value |
Techila Server Web Interface |
https://146.148.16.203:443/ |
IP address |
146.148.16.203 |
After you have successfully added End-Users to the TDCE environment, please refer Getting Started for instructions on how to configure your Techila SDK to connect to the Techila Server. Programming language specific preparation steps are described in the document series Techila Distributed Computing Engine with. These documents are available here.
-
Navigate to the directory containing the Techila Deployment Tool and launch the application by double clicking on the
gcpinstaller.jarfile icon.Note! If the Techila Deployment Tool is already running and you have performed a connection test, you can continue from Step 3.
-
Click the
Test Google Cloud Platform Connectionbutton. -
Click the
Create Userstab.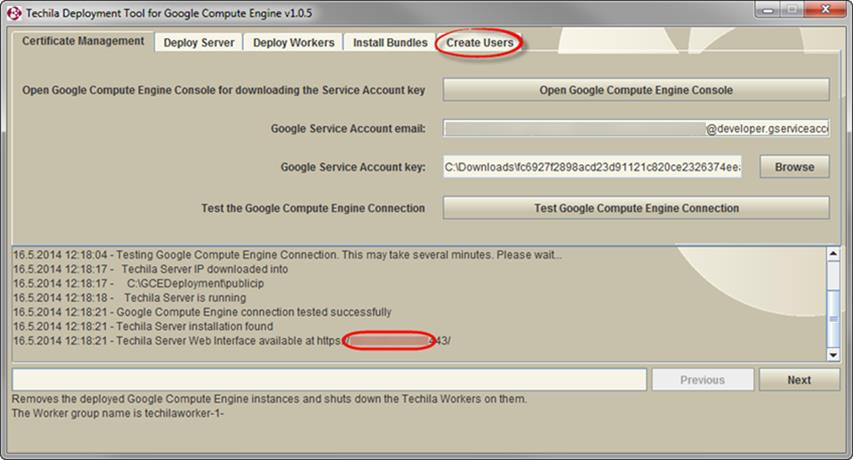 Figure 55. The IP address of the Techila Server will be displayed in the message area after a connection test. If you have performed multiple operations since you launched the Techila Deployment Tool, you might need to scroll back in order to see the highlighted message.
 -
This tab can be used to launch the Techila Keytool, which can be used to create keystore files containing End-User Keys. Click the
Open Techila Keytoolbutton to launch the Techila Keytool. Figure 56. Keystore files containing End-User Keys are generated with Techila Keytool.
 -
After launching the Techila Keytool, the main window will be displayed. Click the Create a new end-user key and sign it button.
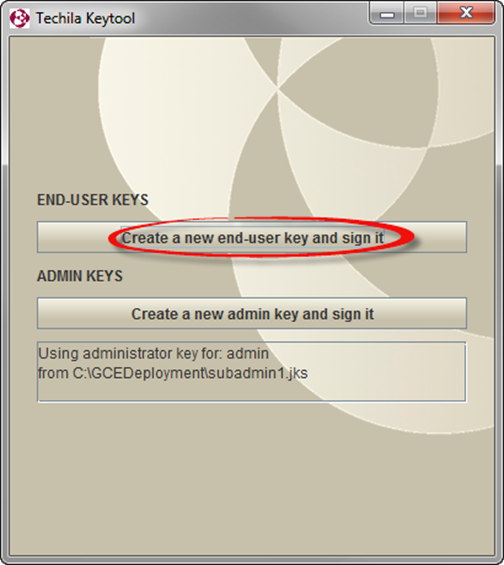 Figure 57. The Techila Keytool can be used to create End-User Keys (used for signing Bundles) and Administrator Keys (used for creating End-User Keys).
 -
After clicking the button, a new window will be displayed. Specify the full name of the End-User by filling in the
First NameandLast Namefields. TheAliasfield will be automatically updated to match the values entered to theFirst NameandLast Namefields.Note! The End-User can use the value shown in the
Aliasfield to log in to the Techila Web Interface.The
Validity periodfield displays how long the End-User Key will be valid. By default, all End-User Keys will be valid for 365 days. A different validity period can be defined by entering the desired time period in the field.Using the
Keystore PasswordandVerify Passwordfields, specify the keystore password that will be used to protect the keystore file.Note! This is the password that the End-User will need to enter when creating computational Projects in the TDCE environment.
After you have filled all necessary fields, click the
Generate Keybutton to continue.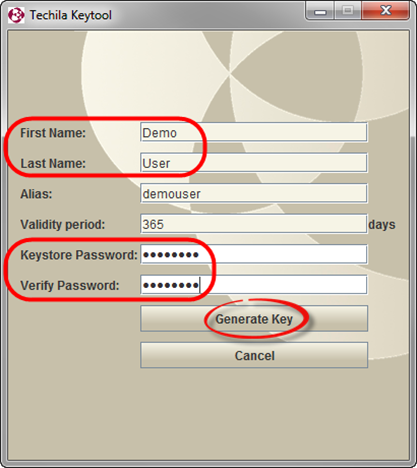 Figure 58. After specifying the End-User`s name, the Generate Key button will be enabled. In this example, an End-User with the name
Demo Userwould be added to the Techila Distributed Computing Engine environment. -
After clicking the Generate Key button, a new window will be displayed. This window will be used to specify the name of the keystore file and the destination directory where the keystore file will be stored
Click the
Savebutton to create the keystore file.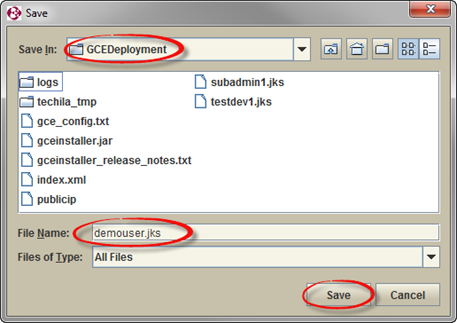 Figure 59. This window is be used to specify a name for the file and the location where it will be stored. In this example, the keystore file will be named
demouser.jksand stored inC:\GCPDeployment. -
A new window will be displayed that contains information on where the keystore was stored on your computer. The key will also be automatically sent to the Techila Server at this stage. The network transfer status message will be displayed in the message area. If the transfer was successfully completed, the following message should be displayed:
Key has been sent to the server successfully.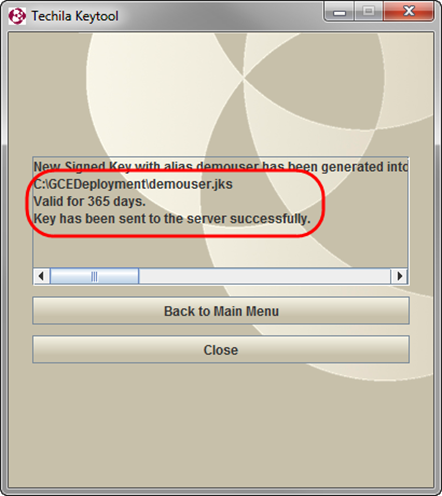 Figure 60. The location of the keystore file and the transfer status message will be displayed.
The End-User has now been successfully added to the TDCE environment. The End-User Key that was created can now be used for signing Bundles, which will be required when creating computational Projects. In order for the End-User to access the TDCE environment they will need the following file:
-
The keystore file that was created (
demouser.jksin the example)And the following information:
-
The keystore password
-
The hostname/IP address of the Techila Server. The IP address of the Techila Server will be displayed in the message area of the Techila Deployment Tool each time the
Test Google Cloud Platform Connectionbutton is clicked.
-
-
Click the
Closebutton to close the Techila Keytool or the Back to Main Menu button if you wish to add more End-Users to the TDCE environment.
7. Components Created During the Deployment Process
This Chapter contains a description of Techila Distributed Computing Engine (TDCE) components that are created in Google Cloud Platform when deploying the Techila Server and Techila Workers.
These components are:
These components are shortly explained in the following Chapters.
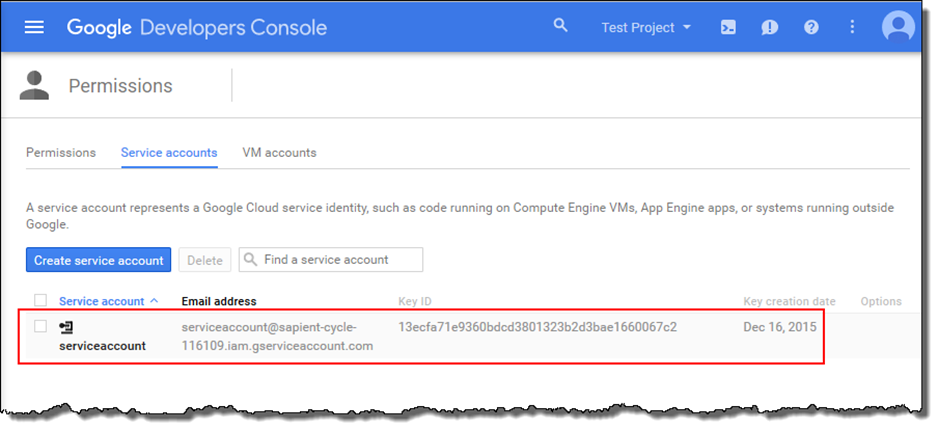
7.1. Service Account
The service account is created manually before deploying the Techila Server. The security credentials of the service account will be linked to the Techila Deployment Tool and used for authentication when using the Techila Deployment Tool.
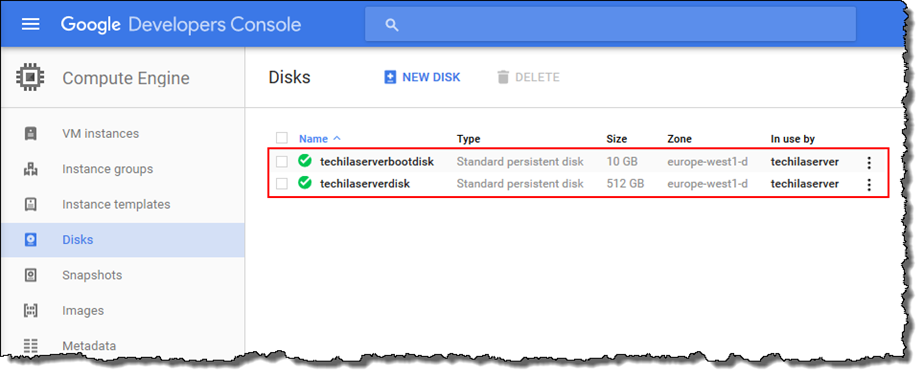
7.2. Disks
Disks are used to store information about the TDCE environment in persistent block storage. These persistent disks are automatically mounted when deploying the Techila Server and will maintain the state of the Techila Server beyond the life cycle of the VM instance.
Data on persistent disks is retained even if your virtual machine instance suffers a failure or is taken offline.
7.3. Network
Network configurations are used to manage network access to the virtual machines hosting the Techila Server and Techila Workers. These configurations include firewall rules for network communication within the TDCE environment and rules for inbound network connections to the Techila Server.
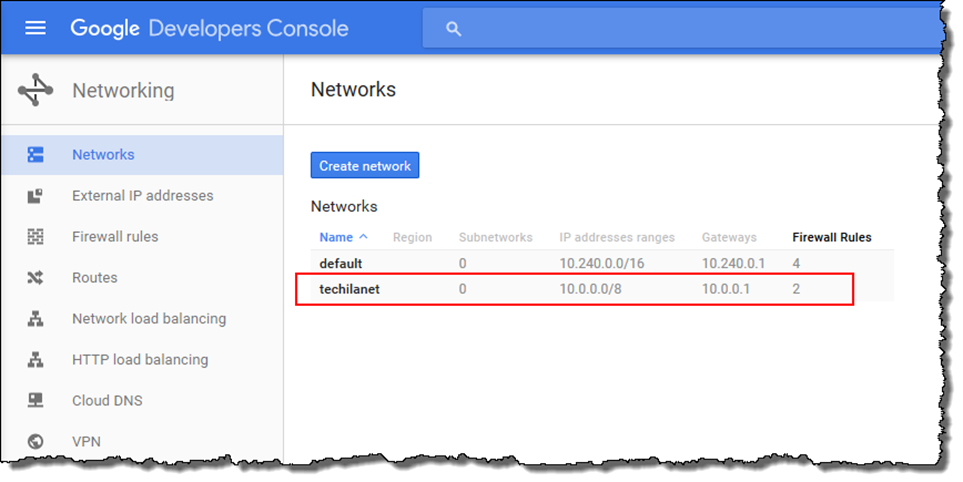
techilanet.8. Removing Components from Google Cloud Platform
8.1. Removing Techila Workers
This Chapter contains instructions on how to delete Google Cloud Platform instances that are hosting Techila Workers. Terminating all instances will stop hourly costs from being incurred by instances that are hosting the Techila Workers.
Note! After removing Techila Workers, verify that the Google Cloud Platform instances were successfully deleted. The status of Google Cloud Platform instances can be viewed using the Google Cloud Platform Console.
Navigate to the directory containing the Techila Deployment Tool and launch the application by double clicking on the gcpinstaller.jar file icon.
Note! If the Techila Deployment Tool is already running and you have performed a connection test, you can continue from Step 3.
-
Click the Test Google Cloud Platform Connection button
-
Click the
Deploy Workerstab -
When removing Techila Workers, the following approaches can be typically applied:
Please follow the steps applicable to your situation.
8.1.1. Removing ALL deployed Techila Workers in ALL services
To remove ALL currently deployed Techila Workers, click the Shutdown All button.
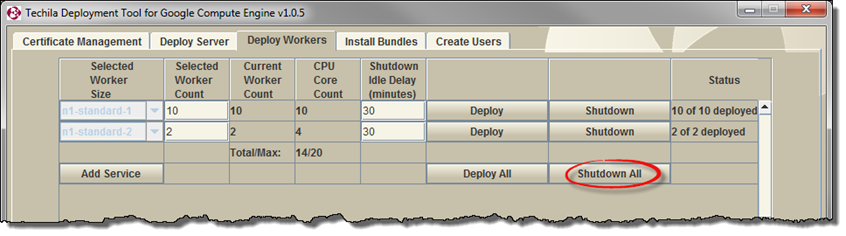
After the operation has been completed, the changes will be visible in the Deploy Workers tab as illustrated below.
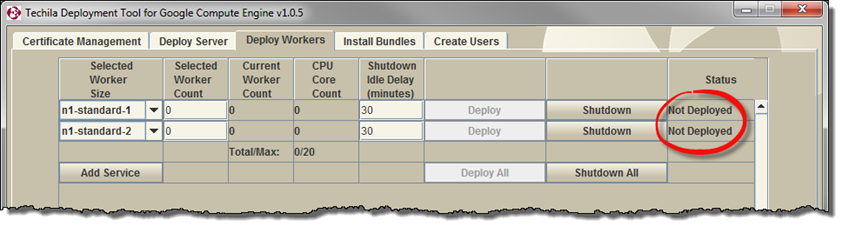
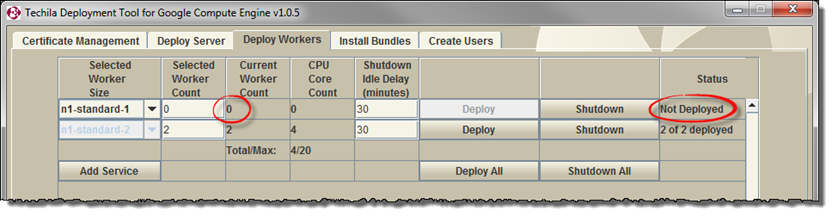
Not Deployed8.1.2. Removing ALL deployed Techila Workers in one service
To remove ALL currently deployed Techila Workers in one service, click the Shutdown button for the specified service.
In the example below, clicking the highlighted button would remove all Techila Workers deployed to the default service. Techila Workers deployed to the second service would remain unaffected.
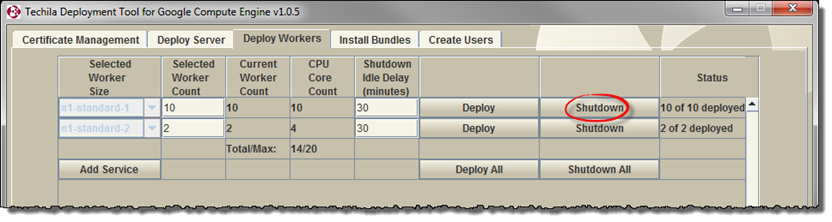
After the operation has been completed, the changes will be visible in the Deploy Workers tab. In the example below, the Status column displays Not Deployed, indicating that Techila Workers in the service have been removed.
8.1.3. Reducing the number of deployed Techila Workers in a service
To reduce the number of deployed Techila Workers in a service, specify the new Techila Worker count in the Selected Worker Count Field. The value entered to the field will determine how many Techila Workers will remain deployed after the operation. After you have entered the value, click the Deploy button for the service.
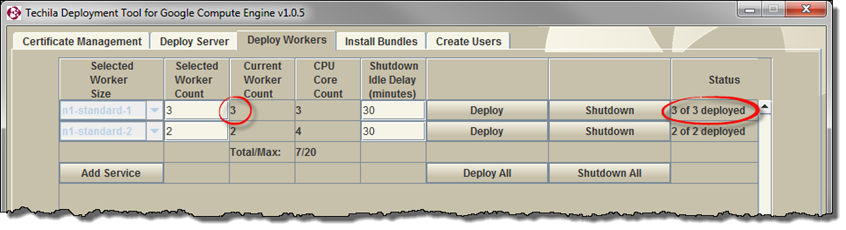
In the example below, there are currently ten (10) Techila Workers deployed in the first service and the Selected Worker Count field contains the value three (3). These settings could be used to remove seven (7) of the Techila Workers that are currently deployed in the service.
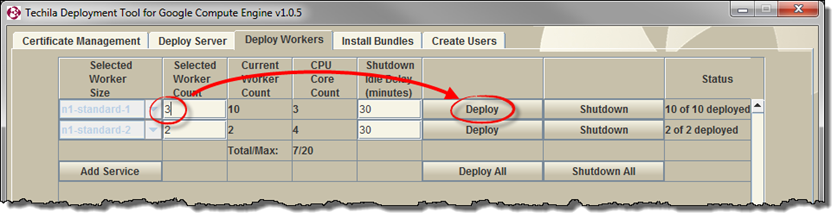
Techila Worker Count field. This operation only affects the specified service, meaning the Techila Worker count in other services remains unchanged.After the operation has been completed, the changes will be visible in the Deploy Workers tab. In the example below, the Status column displays 3 of 3 deployed, indicating that seven (7) Techila Workers have been removed.
Status column will display the new information.8.2. Removing the Techila Server
This Chapter contains instructions on how to terminate the Google Cloud Platform instance that is hosting the Techila Server. Terminating the instance will stop hourly costs from being incurred from the instance hosting the Techila Server.
Note! Removing the Techila Server will also remove all Techila Workers that are currently deployed.
Note! If you remove the Techila Server, the Techila Server`s IP address will be released. This means that if you restart the Techila Server at some later point, there is no guarantee that the IP address will remain the same. If the IP address changes, you will need to update the new IP address to the techila_setting.ini file`s hostname parameter.
Note! After removing the Techila Server, verify that the Google Cloud Platform instances were successfully deleted. The status of Google Cloud Platform instances can be viewed using the Google Cloud Platform Console.
Navigate to the directory containing the Techila Deployment Tool and launch the application by double clicking on the gcpinstaller.jar file icon.
Note! If the Techila Deployment Tool is already running and you have performed a connection test, you can continue from Step 3.
-
Click the
Test Google Cloud Platform Connectionbutton -
Click the
Deploy Servertab -
Click the
Shutdown Serverbutton to remove the Techila Server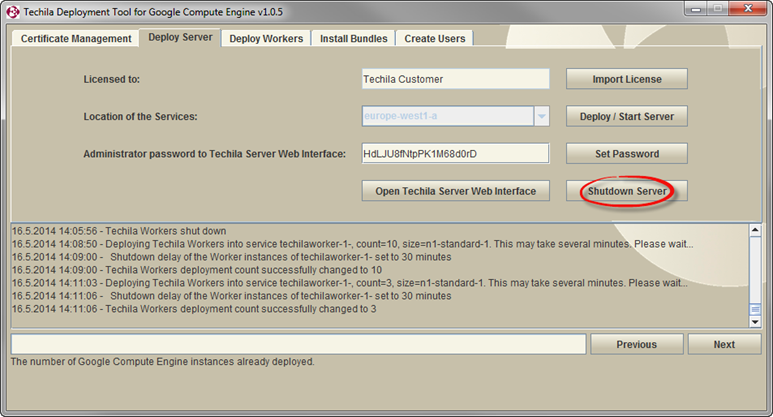 Figure 70. The Shutdown Server button can be used to delete the Google Cloud Platform instance hosting the Techila Server
 -
After the Techila Server has been removed, a Shutdown Verification window will be displayed. Click the
OKbutton to open the Google Cloud Platform Management Portal.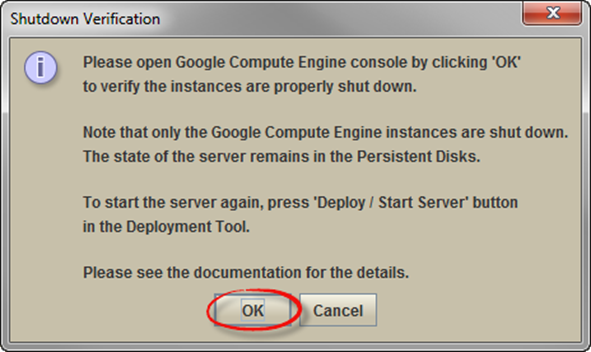 Figure 71. Clicking the
OKbutton will open the Google Cloud Platform Management Portal. -
If you are redirected to the Google APIs console, use the menu icon and click the Google Cloud Platform icon to navigate to the Google Cloud Console.
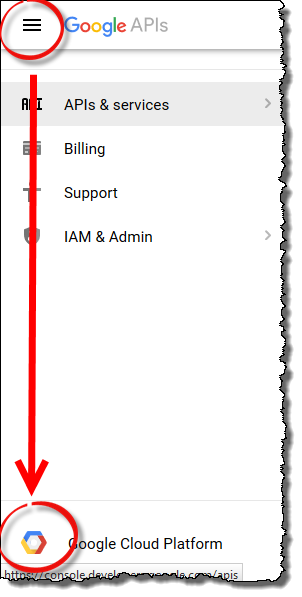 Figure 72. Opening the Google Cloud Console from the Google APIs view.
 -
In the Google Cloud Platform Console, navigate to
Compute Engine→VM instances. Verify that all instances were successfully terminated. The image below illustrates a situation where no instances are deployed.Note! If the instances were not deleted, delete the instances by using the Google Cloud Platform Console. If you see any Techila Workers running, please note that you will need to delete the Instance group that is used to run the instances. If you only delete the Techila Worker VM instances (and not the instance group), the instance group will automatically re-launch the VM instances.
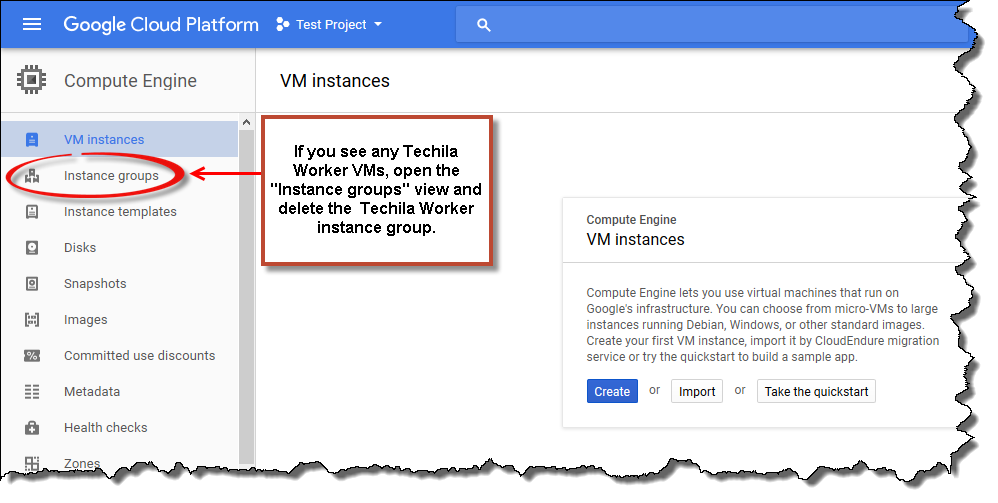 Figure 73. This screenshot illustrates a situation where no instances are deployed.
8.3. Removing All Components Created During Deployment
This Chapter contains instructions on how to remove all Techila Distributed Computing Engine (TDCE) components from the Google Cloud Platform Console.
NOTE! Performing the procedure described in this Chapter will remove Techila components, meaning all data from the Techila Server will be removed. This means that the state of the Techila Server will be lost, including all Project data and End-Users. The steps described in this Chapter are typically only required if you wish to discontinue the use of your current Techila Server or to re-deploy a Techila Server to a clean Google Cloud Platform environment.
-
Remove the Techila Server as described in Removing the Techila Server
-
Open the Google Cloud Platform Console in your web browser
-
Type
Service accountin the search box and click the highlighted search result.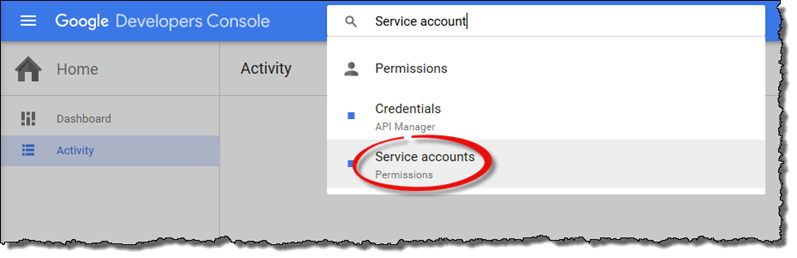 Figure 74. Click the highlighted search result.
 -
Tick the checkbox of the service account you created when setting up the TDCE environment and click the
Deletebutton.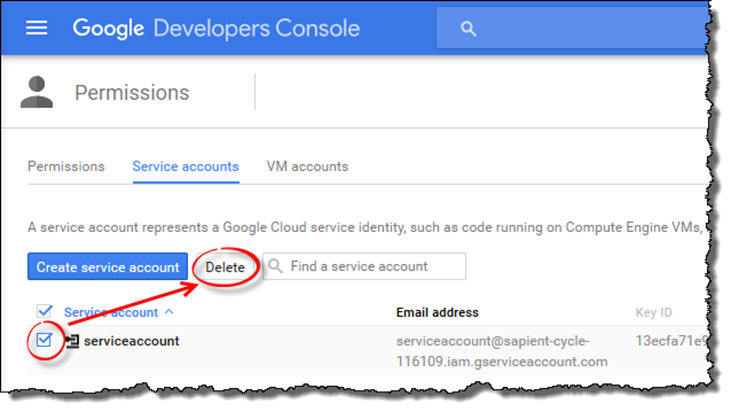 Figure 75. Delete the service account.
 -
If prompted, click
Deleteto confirm the action.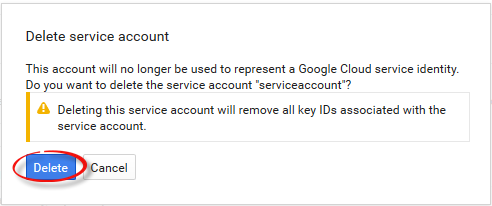 Figure 76. Confirm the action.
 -
During the next steps, all data disks linked to the TDCE environment will be deleted.
Type
Disksin the search box and click the matching search result.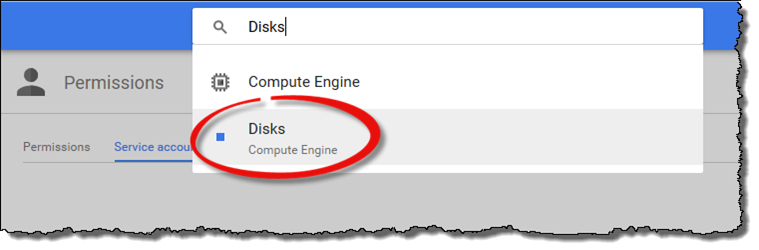 Figure 77. Navigate to the disks view.
 -
Select all TDCE related disks. (TDCE disks will have a
techilaprefix) and click Delete.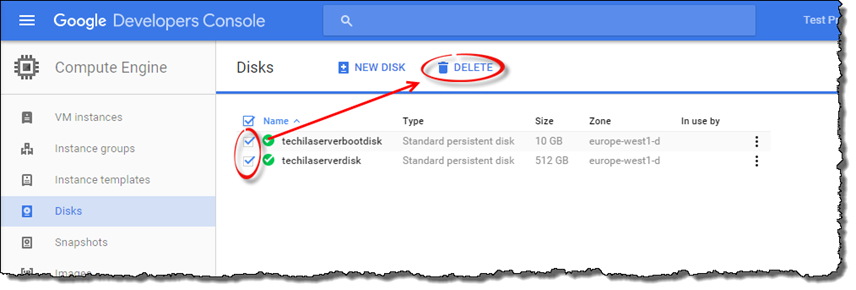 Figure 78. Selecting and deleting all Techila Distributed Computing Engine related disks.
 -
If required, confirm the delete action.
-
After all disks have been deleted, the
Disksview should resemble the one shown below.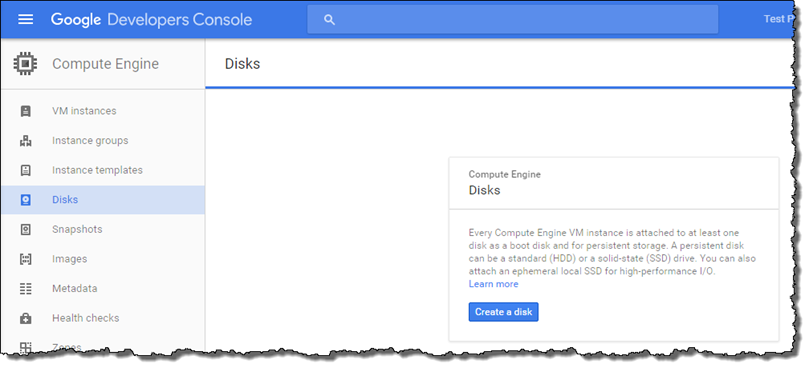 Figure 79. View after all disks have been deleted.
 -
Type
Networksin the search box and click the matching search result.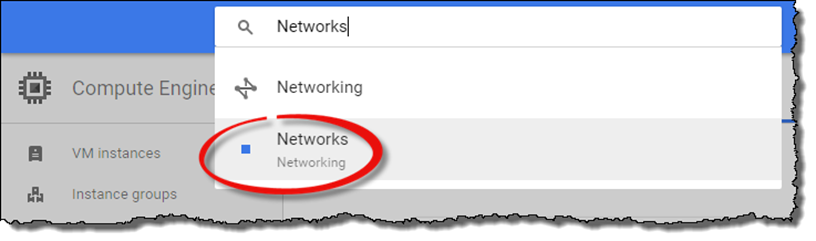 Figure 80. Click the highlighted search result.
 -
Select the network named
techilanet.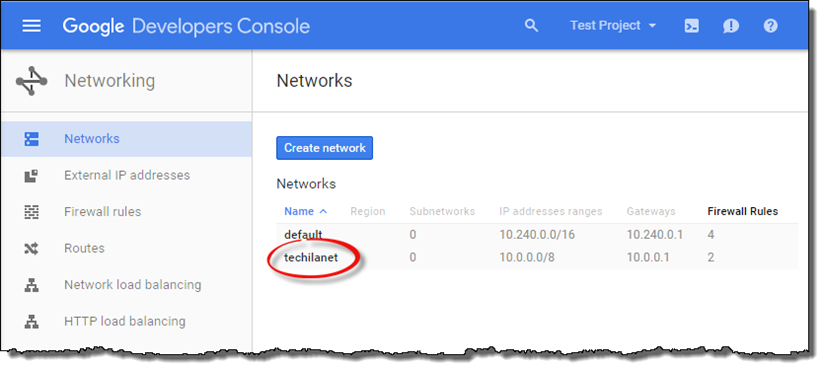 Figure 81. Select
techilanetby clicking on the name. -
Click the
Delete networkbutton to delete the network.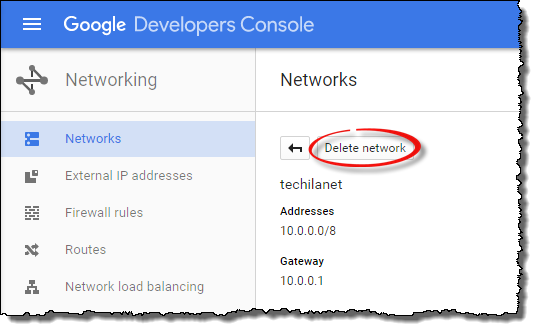 Figure 82. Delete the network.
 -
If prompted, confirm the action.
-
All TDCE components have now been removed from your Google Cloud Platform environment.
9. Appendix
9.1. Appendix 1: Techila Web Interface Login Credentials
After deploying the Techila Server in Google Cloud Platform, the Techila Web Interface can be accessed with the login credentials shown below:
Techila Web Interface |
|
Login |
admin |
Password |
Displayed in the Techila Deployment Tool |
9.2. Appendix 2: Updating the Techila Deployment Tool
When a new version of the Techila Deployment Tool is released, please follow the steps below to update your Techila Deployment Tool:
-
Download the new version of the Techila Deployment Tool from the Techila Extranet
-
If the Techila Deployment Tool is currently running, close the tool.
-
Extract the new
gcpinstaller.jarfile over your existinggcpinstaller.jarfile.The new version is now ready for use. Previously generated files and configuration settings will be automatically used by the new version of the Techila Deployment Tool.
9.3. Appendix 3: Techila Worker Deployment Details
9.3.1. Techila Worker Size
The Selected Worker Size dropdown menu can be used to select the Google Cloud Platform machine type that will be used when deploying Techila Workers. Selections made in the dropdown menu will also determine the maximum number of Techila Workers that can be deployed. This is because different machine types will require a different number of cores per instance. The maximum number of Techila Workers you can deploy will be determined by the CPU quota of your Google Cloud Platform Project and the selected Techila Worker Size.
When selecting the Techila Worker Size, it is recommended that you choose the machine type that best suits the distributed application(s) you plan on computing on the Techila Workers. Most important properties include the amount of memory, amount of available disk space and the instance price per hour. Information on the properties of different machine types can be found from the following website:
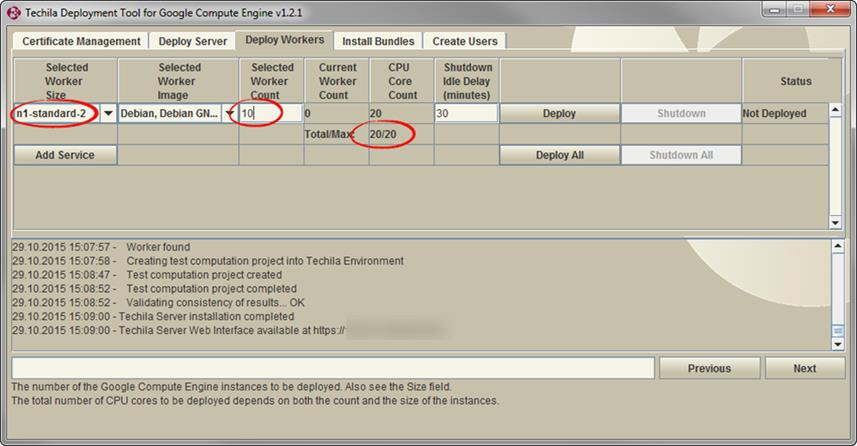
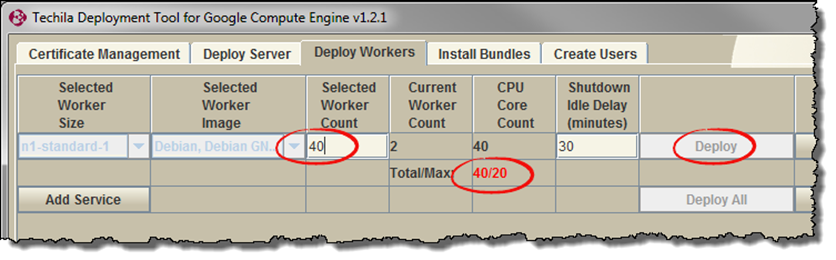
The example screenshot below illustrates a situation where the GCP project CPU quota has 20 cores available. This means that a maximum of 10 n1-standard-2 instances (two cores per instance) could be deployed.
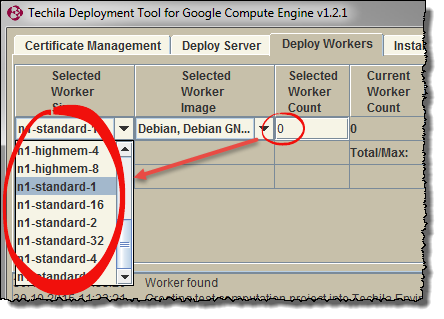
Note! The Selected Worker Size dropdown menu will only be available if there are no currently deployed Techila Workers for the selected service.
Selected Worker Size dropdown menu can be used to set the machine type. Only available when no instances have been deployed to the service.After you have deployed Techila Workers to the service, all additional Techila Workers deployed to this service will be automatically deployed on the same machine type. If you wish to deploy Techila Workers on different machine types at the same, please see instructions in Deploying Techila Workers on Different Machine Types.
9.3.2. Techila Worker Deployment Count
The Selected Worker Count field can be used to specify the number of deployed Techila Workers. In the example below, the deployment count is set to two (2) and the Worker Size has been set to n1-standard-1. These settings could be used to deploy two (2) Techila Workers on n1-standard-1 Google Cloud Platform machine types.

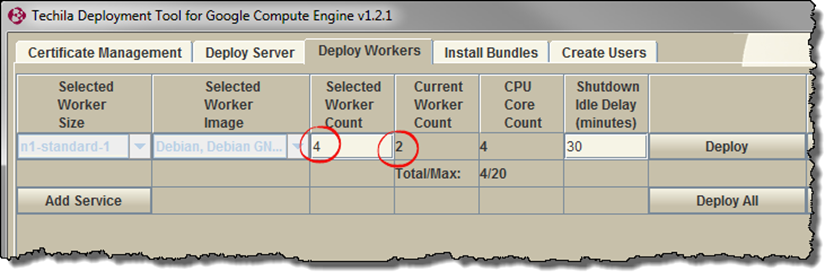
Selected Worker Count field is used to control the number of Google Cloud Platform instances that should be deployed as Techila Workers.If you have already deployed Techila Workers, specifying a larger value will enable you to increase the number of deployed Techila Workers. In the example below, the current Techila Worker deployment count is two (2) and the Selected Worker Count field contains the value four (4). These settings could be used to deploy 2 additional Techila Workers, bringing the total number of deployed Techila Workers to 4. Changes to the deployment count will be applied when the Deploy button is clicked.
Respectively, defining a smaller value can be used to reduce the number of currently deployed Techila Workers.
If you try to deploy more CPU cores than allowed by your GCP project CPU quota, the Total/Max field will be highlighted in red and the Deploy button will be disabled as illustrated below.
Deploy button will be disabled.Instructions for reducing the number of deployed Techila Workers can be found in Removing Techila Workers.
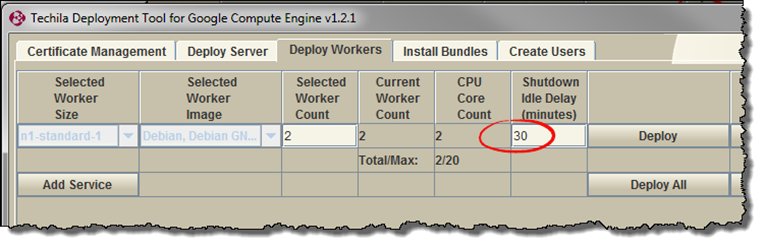
9.3.3. Instance Shutdown Delay
The Shutdown Idle Delay (minutes) field can be used to specify a shutdown delay for the Techila Workers that are deployed in the service. Specifying a shutdown delay will automatically shutdown the instances hosting the Techila Workers if they remain idle for the specified time. It is however strongly recommended that the deletion of the instances is always verified using the Google Cloud Platform Console.
The shutdown timer will be activated when computational Jobs are detected on the Techila Workers belonging to the specified service. Computational activity is polled at five second intervals, meaning extremely short test Projects might not trigger the shutdown counter. Please note that this also means that if the Techila Workers have only been deployed, but no Projects have been created, the instances will not be automatically shutdown.
The counter will be automatically reset when a computational Job is detected on any of the Techila Workers belonging to the specified service. It is also possible to modify the shutdown delay of existing Techila Worker deployments by entering a new value to the field and clicking the Deploy Workers button.
In the example below, the shutdown delay has been set to 30 minutes and the Techila Worker deployment count to 10. This means that all Techila Workers will be automatically terminated if they remain idle for 30 minutes after a Job has been detected on the Techila Workers.
Automatic shutdown can be disabled by entering the value 0 field as illustrated below.

9.3.4. Operating System of the Techila Workers
The Image dropdown menu can be used to select the operating system of the Techila Workers that will be deployed.
The dropdown menu is illustrated in the screenshot below.
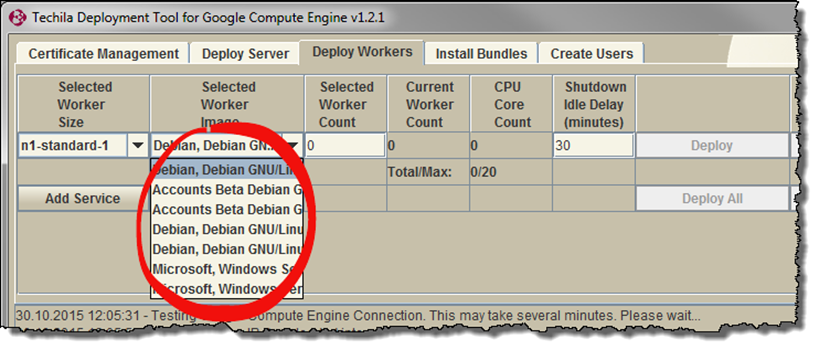
More detailed information about the operating systems can be seen from the tooltips, which will be displayed when the mouse cursor is hovered over a menu item.
The selected OS will affect the time required to deploy the Techila Workers. Techila Workers with a Windows operating system typically take approximately 10-15 minutes to deploy. Techila Workers with a Linux operating system are typically deployed in 2-4 minutes. Please note that deployment times for your environment might differ from the ones mentioned here.
9.3.5. Preemptible Instances
Using preemptible instances can reduce your cloud computing costs significantly, but are not as reliable as the standard instances. More information about the benefits and limitations can be viewed on the following website.
To use preemptible instances, tick the preemptible checkbox when starting Techila Workers. Please note that preembtible instances can only be enabled if there are no Techila Workers running in the specified service. This means that if you already have Techila Workers running and you want to switch to preemptible instances, you will need to: Shut down the Techila Workers → tick the premptible checkbox → Start Techila Workers.