1. Introduction
This document describes how you can install the Techila Worker software on a computer with a Linux operating system. After installing the Techila Worker software as described in this document, the Techila Worker will connect to Techila Server and will participate in computational Projects processed in the Techila Distributed Computing Engine (TDCE) environment.
The following procedures are described in this document:
2. Prerequisites & Security
This section details prerequisites for Techila Worker installation and important security considerations. Read this section carefully before installing the Techila Worker.
For more information on the security features, see Techila Distributed Computing Engine Security Statement.
2.1. General Prerequisites
Before starting the operation, please make sure that the following prerequisites have been met:
-
A new dedicated user account must be available for Techila Worker.
-
The installation destination should be located on the local hard drive of the workstation. Note that all data is always written in this installation directory and its subdirectories. The installation directory and the directory where the installation files are unpacked must be different.
-
Perform the installation as root or as using the dedicated user account.
-
Verify the system date and time to make sure the Techila Worker Keys are generated correctly.
Any other software which utilizes the idle CPU time (for example SETI@Home) should not be installed on the workstation. Otherwise they may interfere with the efficiency of the computations.
2.2. Required Files
The following files are need for the installation:
| Filename | Description |
|---|---|
setup.sh |
The main installation program. |
setup.inf |
The setup configuration. |
setup.tar |
The installation data. |
These files are stored in the Techila Worker installation package, which is available for download in the "Administrator Downloads" section in the Techila Extranet.
2.3. Security
Deny the booting of the workstation from any external media (CD, DVD, floppy disk, USB memory stick, etc.) to prevent any unauthorized access to the hard drives.
There is no need to open ports on the Techila Worker as all communications are from the Techila Worker to the Techila Server.
3. Installation
This Chapter contains instructions for the following procedures:
3.1. Installing the Techila Worker
This Chapter describes how to install the Techila Worker.
Procedure
-
Unpack the Techila Worker package using command:
tar xzf techila.worker.installer.linux.<arch>.<version>.tar.gz
This creates the
techila.worker.installerdirectory, where all the required files will be unpacked. Note that the directory where the package is unpacked and the installation directory must be different. -
Change to the directory that was created using command:
cd techila.worker.installer
-
Configure the installation by editing the
setup.inffile with a text editor. An examplesetup.inffile is shown below:### Techila Worker - Setup Configuration ## Target directory Dir=/opt/techila/worker ## Techila Worker User Account Account=techila ## Techila Server Address ServerHost=techila.example.com ServerPort=20001 ## Techila Worker Id WorkerId=$HOSTNAME StartService=TRUEThe following parameters are supported in the
setup.inffile:Parameter Description Dir
The destination directory for the installation.
Account
The user account running the Techila Worker.
ServerHost
The hostname (or IP address) of the Techila Server.
ServerPort
The port of the Techila Server.
WorkerId
An optional parameter that can be used to specify the name of the Techila Worker Key and the Alias of the Techila Worker shown in the Techila Web Interface.
StartService
When set to TRUE, starts the Techila Worker automatically.
-
Create a new user account on the workstation. Note, the commands shown below assume that the account techila has been configured in the
setup.inffile, if you have specified another account, modify the commands accordingly. Execute the commands as root:groupadd techila adduser --system --group techila
If the adduser command does not exist, please use the following commands:
groupadd techila
useradd --system –g techila –m techila
-
Run the installation script
setup.shas root or as the new user:./setup.sh
If the
setup.infis not located in the same directory withsetup.sh, the location can be defined by usingsetup.infit as a parameter. For example: -
If prompted, answer the questions asked by the installation program. Note that questions will only be asked, if the values are not configured in the
setup.inffile:Question Description Please specify the user account for Techila Worker
The user account created earlier. This question is asked only if the installation script is executed as root, otherwise the active account is used automatically.
Please specify the server host.
The hostname or IP address of the Techila Server.
Please specify the server port.
The port of the Techila Server. The default value is 20001.
Please specify the target directory.
The destination directory for the installation.
The Techila Worker software will start after the installation is complete.
3.2. Verification
To verify that the installation was successful, check that the following processes are running. Processes can be viewed with command: ps -fu <Account>:
-
wrapper
-
run.sh
-
java
The processes will automatically become visible after installation has been completed successfully. No reboot will be required.
Also verify that the Techila Worker is connected to the Techila Server by opening the Techila Web Interface and verifying that the new Techila Worker Key is visible in the Admin → Keys → Worker Keys page.
After you have verified that the installation was successful, please proceed and finalize the installation process as described in Finalizing the Installation.
3.3. Finalizing the Installation
Before the Techila Worker is able to receive computational Jobs, the status of the Techila Worker Key must be set to trusted by using the Techila Web Interface. To set the status of the Techila Worker Key to trusted, please follow the instructions in the Techila Distributed Computing Engine Administration Guide.
Note! The latest Techila Virtual Server has been configured to automatically trust Techila Worker Keys, which means that you will not need to manually trust the Techila Worker Keys. The Techila Worker Keys will also be automatically trusted if you have configured your Techila Server to automatically trust Techila Worker Keys.
Please note that after you have installed the Techila Worker software and set the status of the Techila Worker Key to trusted, no other manual configuration of the Techila Worker is required. All required components will be transferred in Bundles to the Techila Workers from the Techila Server.
3.4. Further information
The Techila Worker can be configured to start automatically. For more information, see Configuring the Techila Worker to Run Automatically.
4. Configuring the Techila Worker to Run Automatically
This Chapter describes how you can configure the Techila Worker to run automatically after restarting the operating system.
Prerequisites
-
Techila Worker has been successfully installed
-
The scripts must have the required rights to be run
The Techila Worker software can be configured to run automatically using the following approaches:
The procedures for these approaches are described below:
4.1. Configuring Automatic Startup on Newer Systems Using systemd
-
Copy the unit configuration file techila-worker.service from the Techila Worker installation directory to the
/etc/systemd/systemdirectory as root:cp techila-worker.service /etc/systemd/system/
-
Execute the following commands as root:
systemctl enable techila-worker
systemctl start techila-worker
The screenshot below illustrates the output of the commands when executed on a Linux computer where the Techila Worker software has been installed to directory
/opt/techila/worker.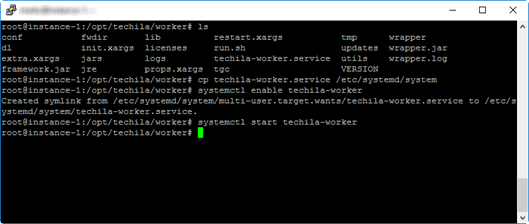
4.2. Configuring Automatic Startup on Older Systems Without systemd
-
Copy the tgc.init script from the Techila Worker installation directory to the
/etc/init.d/directory as root:cp utils/tgc.init /etc/init.d/techila
-
Depending on what Linux distribution you are using, use the following commands to configure the Techila Worker processes to be automatically started and stopped during boot and shutdown.
On Debian based Linux distributions, use command:
update-rc.d techila defaults
On Redhat based Linux distributions, use command:
chkconfig --add techila
5. Uninstallation
This Chapter describes how you can uninstall the Techila Worker.
Prerequisites
-
You need to have access to the Techila Worker directory.
Note
-
The commands must be executed as root
Uninstalling the Techila Worker will not remove the Worker Key from the Techila Server. The Worker Key can be removed by using the Techila Web Interface as described in Chapter Removing Worker Keys in the Techila Administration Guide. The Worker Key should be removed after the Techila Worker has been uninstalled.
Procedure
-
Change your current working directory to the Techila Worker installation directory.
-
Stop the Techila Worker processes by executing the applicable command as root:
/etc/init.d/techila stop
OR
systemctl stop techila-worker
-
Disable the automatic startup of the Techila Worker with the applicable command, depending on how the Techila Worker automatic startup has been configured:
If
update-rc.dwas used, execute:update-rc.d -f techila removeOR
If
chkconfigwas used, execute:chkconfig --del techilaOR
If
systemdwas used, execute:systemctl disable techila-worker -
If required, remove the techila script executed during startup from the
/etc/init.d/directory.rm /etc/init.d/techila
-
Remove the Techila Worker installation directory using the
rmcommand. For example, if the Techila Worker installation directory is/opt/techila/workerthe directory can be removed with command.rm -Rf /opt/techila/worker