1. Introduction
This guide is intended for administrators planning to set up a Techila Virtual Server in their Techila Distributed Computing Engine (TDCE) environment. If you are unfamiliar with the terminology or theory on how the TDCE system functions refer to Introduction to Techila Distributed Computing Engine for details. Please note that paths and screen captures presented in this document may differ from your system.
The structure of this document is as follows:
Preparation contains a list of prerequisites that must be met before proceeding with the Techila Virtual Server installation.
Preparing the Installation Packages contains steps for preparing the installation packages containing the Techila Virtual Server installation files and the Techila License file. These files will be required later in the installation process. After performing the steps described in this Chapter, you should have access to all required files used in the installation.
Deploying the Techila Virtual Server contains all the necessary steps for configuring the Techila Virtual Server. The configuration involves deploying the virtual machine to VMware ESXi by using the vSphere Client. Instructions are also provided for installing the Open VM Tools package and for adjusting the time zone of the Techila Virtual Server. After performing the steps described in this Chapter, you should be able to log in to the Techila Web Interface.
Updating the Techila License contains instructions for uploading the Techila License file to the Techila Virtual Server. A valid Techila License is required to perform computations in the TDCE environment. After performing the steps described in this Chapter you can continue by adding Techila Workers and End-Users to the TDCE system.
Adding Techila Workers shortly introduces how to add Techila Workers to the TDCE system. More thorough instructions are provided in the document Techila Distributed Computing Engine Administration Guide and in the operating system specific Techila Worker installation guides.
Adding End-Users contains step-by-step instructions on how you can add your first End-User to the Techila system.
Creating a Test Project contains instructions on how you can create a test Project using the End-User Key created during the process described in Adding End-Users.
Creating Runtime Bundles introduces the concept of Runtime Bundles, which are used if you plan on using MATLAB, R or Python in your TDCE environment.
Appendix contains a collection of useful information such as login credentials to the Techila Web Interface, the location and password Master Administrator Keystore and the login credentials of the techila-admin user for the Techila Virtual Server.
2. Preparation
Before proceeding, please verify that you have:
-
Techila Virtual Server installation file
-
Techila License package
If you do not have the Techila Virtual Server installation file or the Techila License package, please contact Techila Technologies.
You will also need to have the following virtualization software product installed on the server you plan on using as the host for the Techila Virtual Server.
-
VMware ESXi
The procedures described in this document have been tested with VMware ESXi 5.0 Other versions of the VMware ESXi software may also be compatible, but full functionality is not guaranteed.
In addition, you will also need the following software for deploying and configuring the Techila Virtual Server.
-
VMware vSphere Client
2.1. Master Administrator Key Practices
Please refer to Techila Distributed Computing Engine Administration Guide for details about Master Administrator Key and related recommended practices.
3. Preparing the Installation Packages
This Chapter contains instructions on preparing the Techila Virtual Server installation file and Techila License package.
3.1. Preparing the Techila Virtual Server Installation Package
Locate the Techila Virtual Server installation file. In the figure below, a Techila Virtual Server installation file is located in C:\techilavm. This file will need to be stored in a location that can be accessed when using the vSphere Client to deploy the Techila Virtual Server to the ESXi environment.

3.2. Extracting the Techila License Package
-
Locate the Techila License package. In the figure below, a Techila License package is located in
C:\Techilalicense.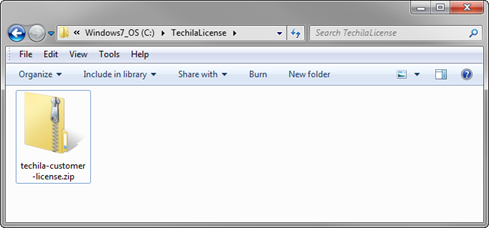 Figure 2. The Techila License is delivered as a ZIP file.
 -
Extract the Techila License package to a location that can be accessed when uploading the Techila License. After extraction, a Techila License file will be available as illustrated below. This file will be uploaded to the Techila Virtual Server later in the installation process.
 Figure 3. A Techila License file can be recognized from the .license suffix.
4. Deploying the Techila Virtual Server
-
Launch the VMware vSphere Client. The login window will be displayed prompting for the host IP address and login credentials.
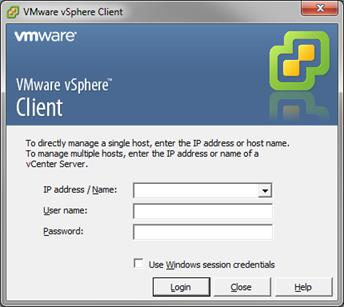 Figure 4. The VMware vSphere Client login screen.
 -
Enter your ESXi host address and your login credentials. Click the
Loginbutton to login.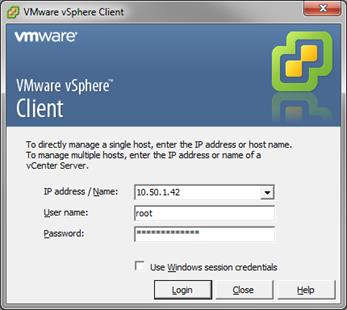 Figure 5. Entering ESXi host network address and login credentials. In this example, the connection would be established to IP address 10.50.1.42 as the user
root. -
After logging in, click
Fileand click on theDeploy OVF Template…menu item. Figure 6. Choosing the Deploy OVF Template menu item.
 -
After clicking on the menu item, the Deploy OVF Template window will be displayed. Click the
Browsebutton.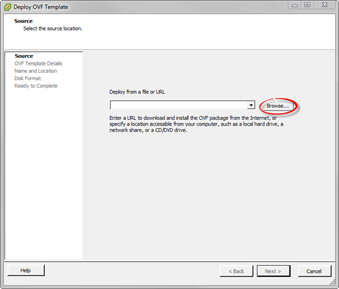 Figure 7. The initial view before any OVF templates have been selected.
 -
After clicking the
Browsebutton a file dialog window will be displayed. Navigate to the directory where you extracted the files in the Techila Virtual Server package. Select the file Techila Virtual Server installation file (.ovasuffix) and click theOpenbutton.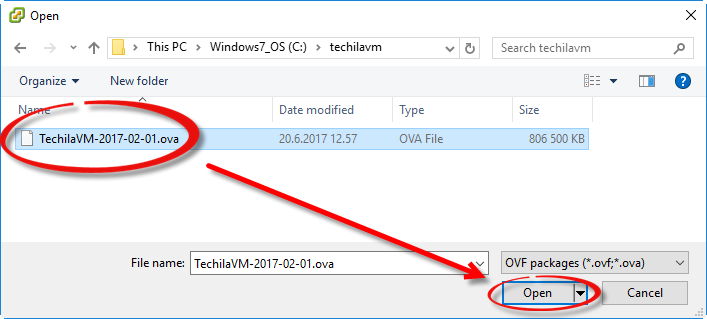 Figure 8. Selecting the TechilaVM.ova file.
 -
The view will switch back to the Deploy OVF Template window and the location of the
.ovafile you chose should now be visible in the text field as shown below. Click theNextbutton to continue.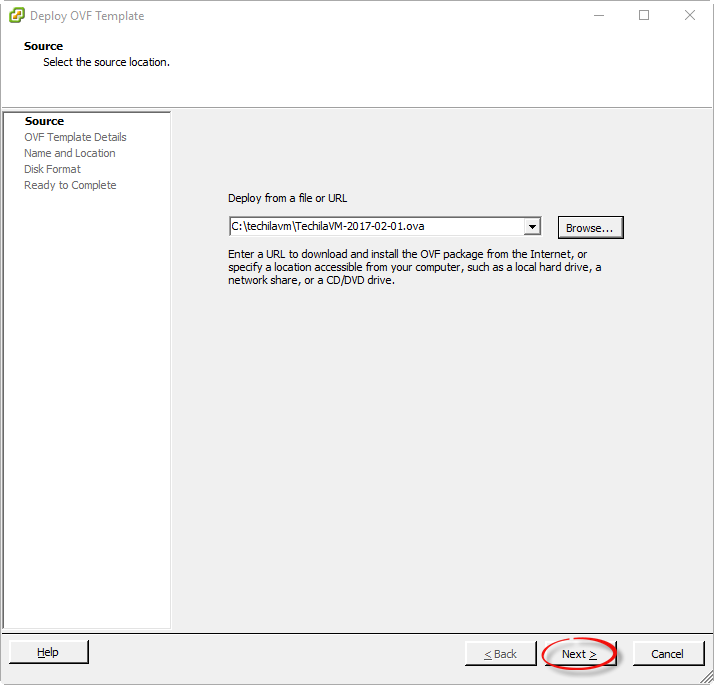 Figure 9. The path of the
ovafile should be visible -
A window containing OVF template details will be displayed. Click Next to continue.
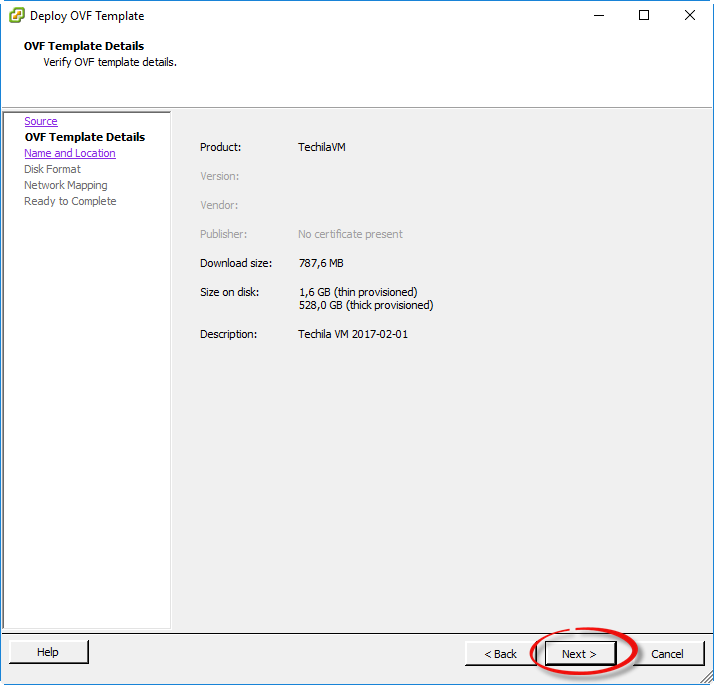 Figure 10. The OVF Template Details window.
 -
A window prompting for the name of the virtual machine will be displayed. If you wish to modify the name of the virtual machine, replace the default name with a name of your choosing. Click
Nextto continue.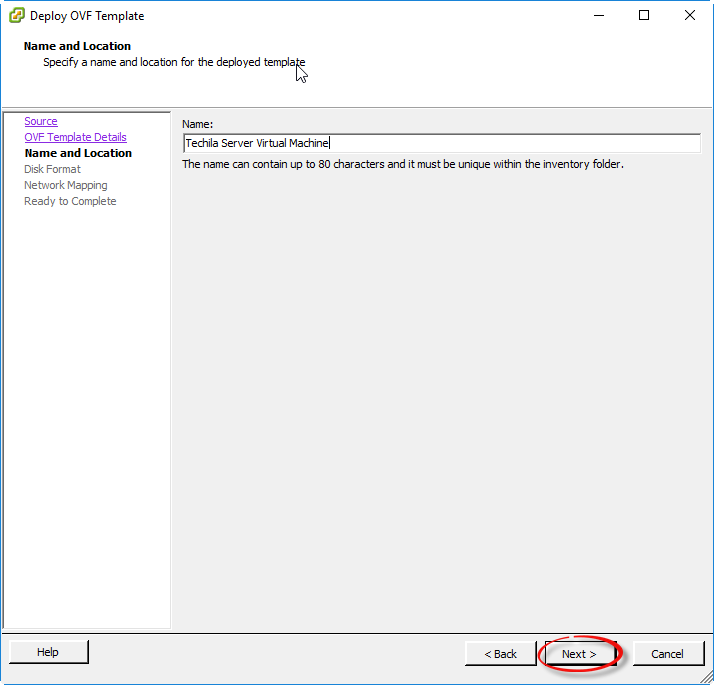 Figure 11. Specifying the name of the Techila Virtual Server.
 -
A window prompting for format of the virtual disks will be displayed, depending on your host system specifications either choose thin or thick provisioning. After you have selected the format, click
Nextto continue.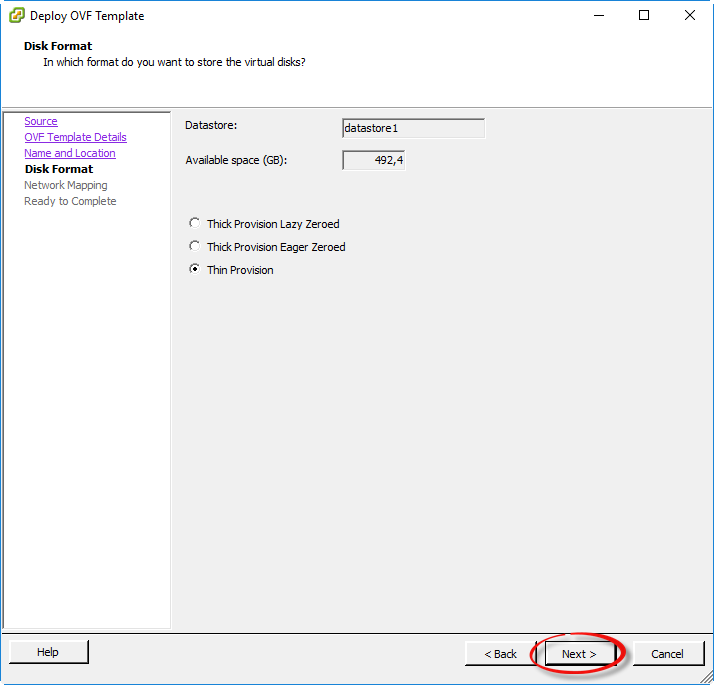 Figure 12. Choosing the disk format type.
 -
A windows prompting for network mapping will be displayed. Choose which network you want to use and click
Nextto continue.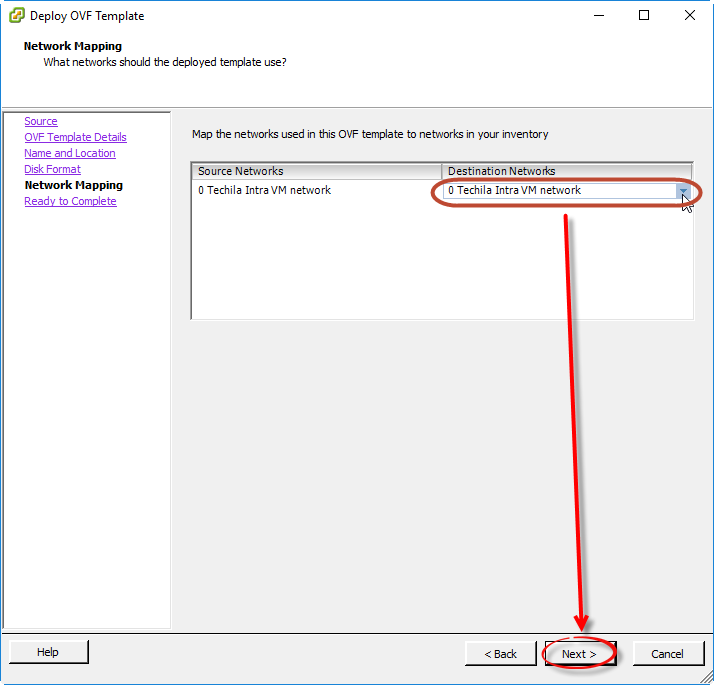 Figure 13. Choosing the network.
 -
A window containing the deployment settings will be displayed. Click
Finishto deploy the Techila Virtual Server.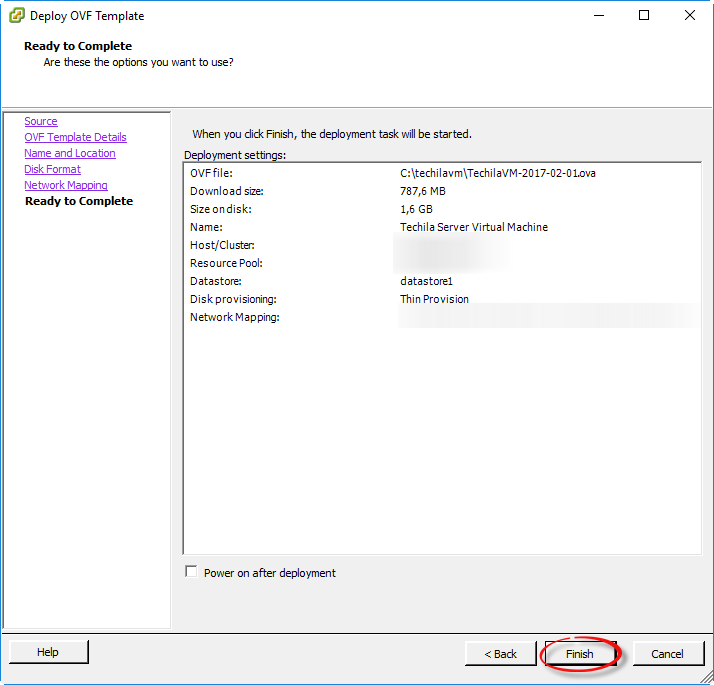 Figure 14. The Techila Virtual Server deployment settings.
 -
A deployment progress indicator will be displayed. Depending on the network bandwidth in your environment, the deployment process can take several minutes.
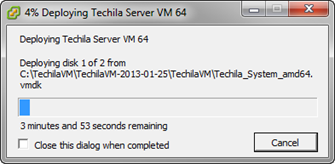 Figure 15. Deployment progress indicator.
 -
After the deployment process has been completed, a message will be displayed indicating a successful deployment. Click
Close.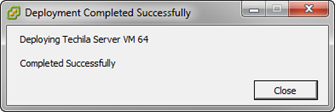 Figure 16. Notification of a successful Techila Virtual Server deployment
 -
Return to the VMware vSphere Client. Click the
Edit Settingsicon to check the settings of the Techila Virtual Server and modify values according to your requirements.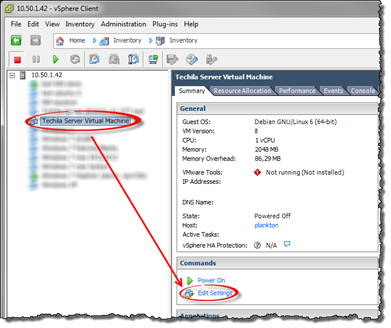 Figure 17. Edit the settings of the virtual machine.
Typical settings that might need modifications are:
-
Number of CPU cores
-
Amount of RAM
-
Size of the data hard disk (hard disk 2)
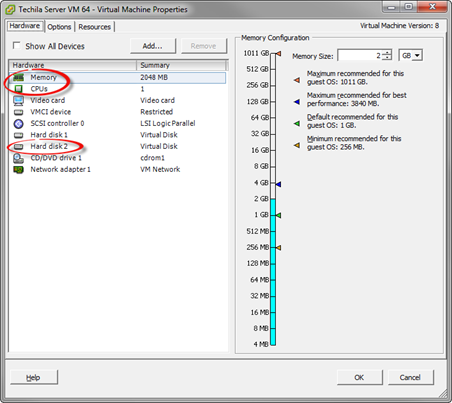 Figure 18. Modify the virtual machine properties according to your specifications.
Note! Modifying the size of the data hard disk (Hard disk 2) must be done before you power on the Techila Virtual Server for the first time. System hard disk (Hard disk 1) size cannot be changed. See Modifying the Size of the Data Hard Disk for information on how to modify the data hard disk size before powering on the Techila Virtual Server
The number of CPU cores and amount of RAM can also be modified after starting the Techila Virtual Server.
After modifying the settings, click the
OKbutton and close the configuration window.
-
-
After configuring the virtual machine properties, you can power on the Techila Virtual Server. Select the virtual machine and click the
Power onbutton located in the Summary tab to start it.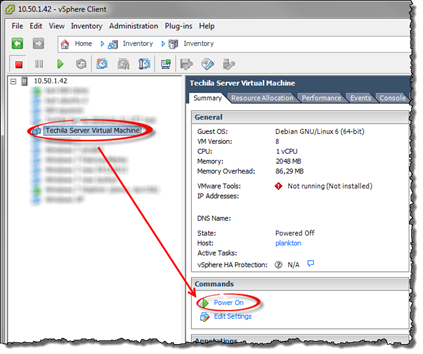 Figure 19. Powering on the Techila Virtual Server.
 -
After powering on the virtual machine, open the right-click menu for the Techila Virtual Server and select Open Console from the menu.
 Figure 20. The Open Console menu item can be used to display the console of the Techila Virtual Server.
 -
The console for the Techila Virtual Server will be displayed, which will contain information on the startup process. The startup process will take several minutes.
After the startup process has completed, the Techila Virtual Server will be operational. A login prompt will also be displayed, which can be used to login to the Techila Virtual Server.
-
Log in by using the login credentials shown below:
Login: techila-admin
Password: eizolee0Note! By default, SSH connections will be allowed from all IP addresses unless the Techila Server has been isolated to a separate network.
Note! Software
fail2banis installed on the Techila Server. This software will ban IP address after six failed attempts. Ban is 600 seconds.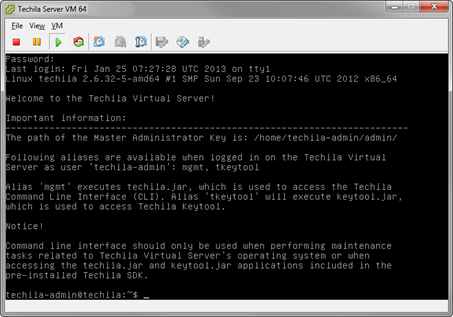 Figure 21. After logging in, important information on the Techila Virtual Server will be displayed.
Note! It is strongly recommended that you change the password used to login to the Techila Virtual Server before proceeding. The password can be changed with the
passwdcommand.The vSphere Client should display the IP-address of the Techila Virtual Server under the General category. Note! The displayed IP-address will be needed later when adding Techila Workers to the Techila Distributed Computing Engine (TDCE) environment and when configuring the techila_settings.ini file to connect to the Techila Server.
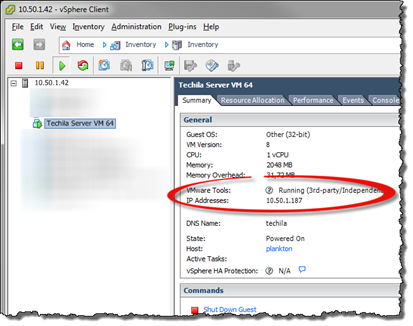 Figure 22. The IP address of the Techila Server will be visible in the Summary tab. In this example the IP Address of the Techila Server is 10.50.1.187.
The Techila Virtual Server is now operational.
-
Optional If you wish to adjust the Techila Server time, please use the command shown below to select an appropriate time-zone.
sudo dpkg-reconfigure tzdata
-
Optional If you wish to change the configured Debian mirror site used for operating system updates, please follow instructions described on the following web site:
-
Optional If you wish to change the Techila Server firewall configuration to only allow connections from a specific IP address range, please follow instructions in Configuring the Techila Server Firewall Note! It is recommended that the firewall is configured to only allow SSH connections from IP addresses used by Techila Administrators
-
Log out from the Techila Virtual Server by using the command shown below:
exit
Please continue by Updating the Techila License.
5. Updating the Techila License
This Chapter contains instructions on how to update the license of your Techila Virtual Server. If you do not have access to a Techila License, please contact Techila Technologies. Information on updating the Techila License can also be found in Techila Distributed Computing Engine Administration Guide.
Note! Certain Techila License types require access to Internet based Techila License Server TCP port 80 (HTTP). The license server address will be delivered together with the license file. If no connection can be established, the Techila Server will stop assigning new Jobs to Techila Workers after a certain time period (24 hours). Techila License files that require a connection have the following XML element:
<statsurl>...</statsurl>
-
Launch your web browser and connect to the Techila Web Interface by entering the network address of the Techila Server in the address bar of the web browser as shown below. The notation <TechilaServerNetworkAddress> should be replaced with the IP address/hostname of the Techila Server that is visible in the summary tab of the vSphere Client.
https://<TechilaServerNetworkAddress>
-
Depending on your web browser settings, you may receive a security warning. You can ignore this security warning and continue connecting to the Techila Web Interface
-
The Techila Web Interface will prompt you for user credentials. Enter the following login credentials to access the Techila Web Interface with administrative access:
Login: admin
Password: adminpass -
Click the
LOGINbutton to log in.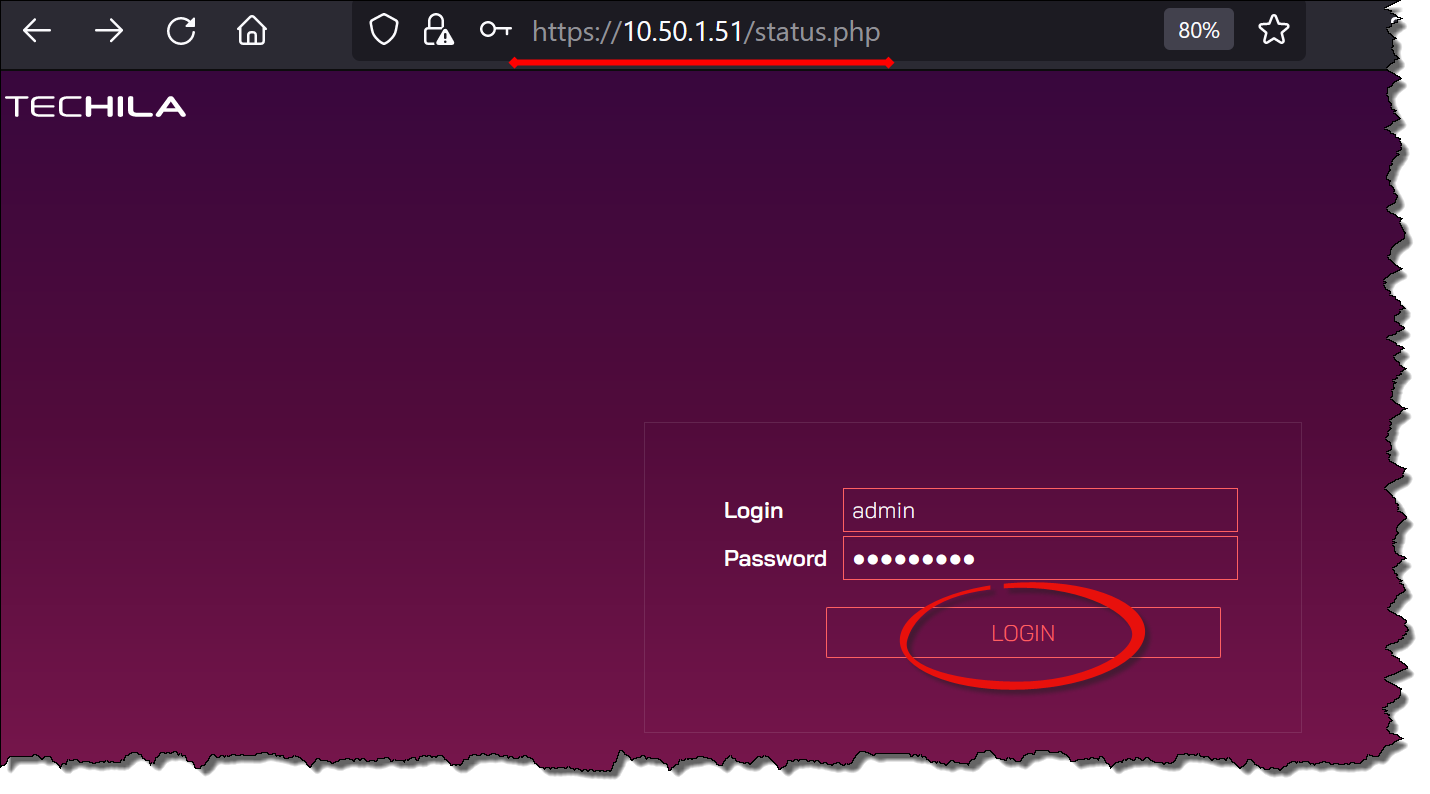 Figure 23. The Techila Web Interface Login page.
 -
After logging in, your browser will be redirected to the Status Page as illustrated below.
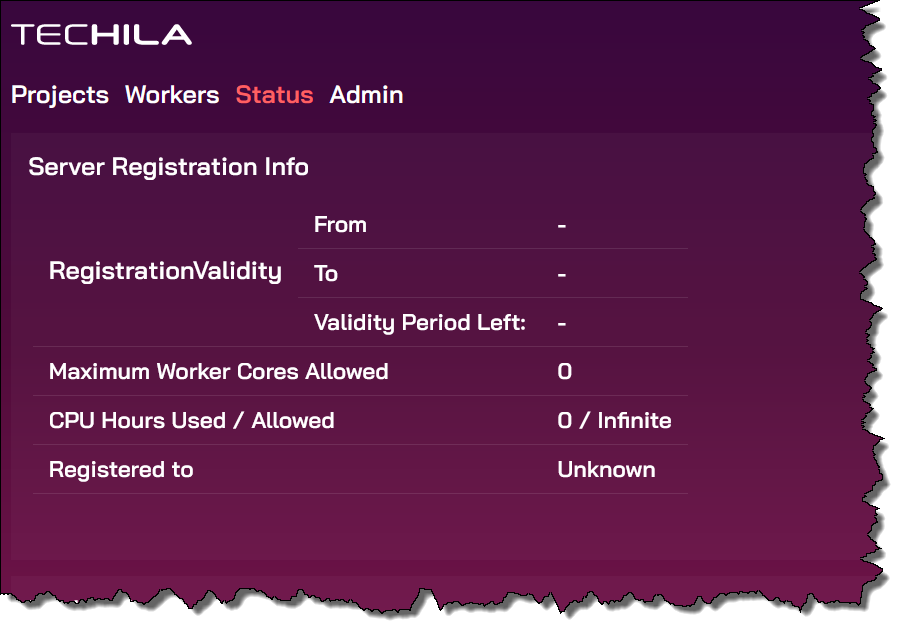 Figure 24. View when no Techila Licenses have been uploaded.
 -
Navigate to the "Uploads" page by clicking
Admin→Uploads→ click theBrowse..button to open a file dialog and select your Techila License file. After selecting the file, clickUploadto upload the license.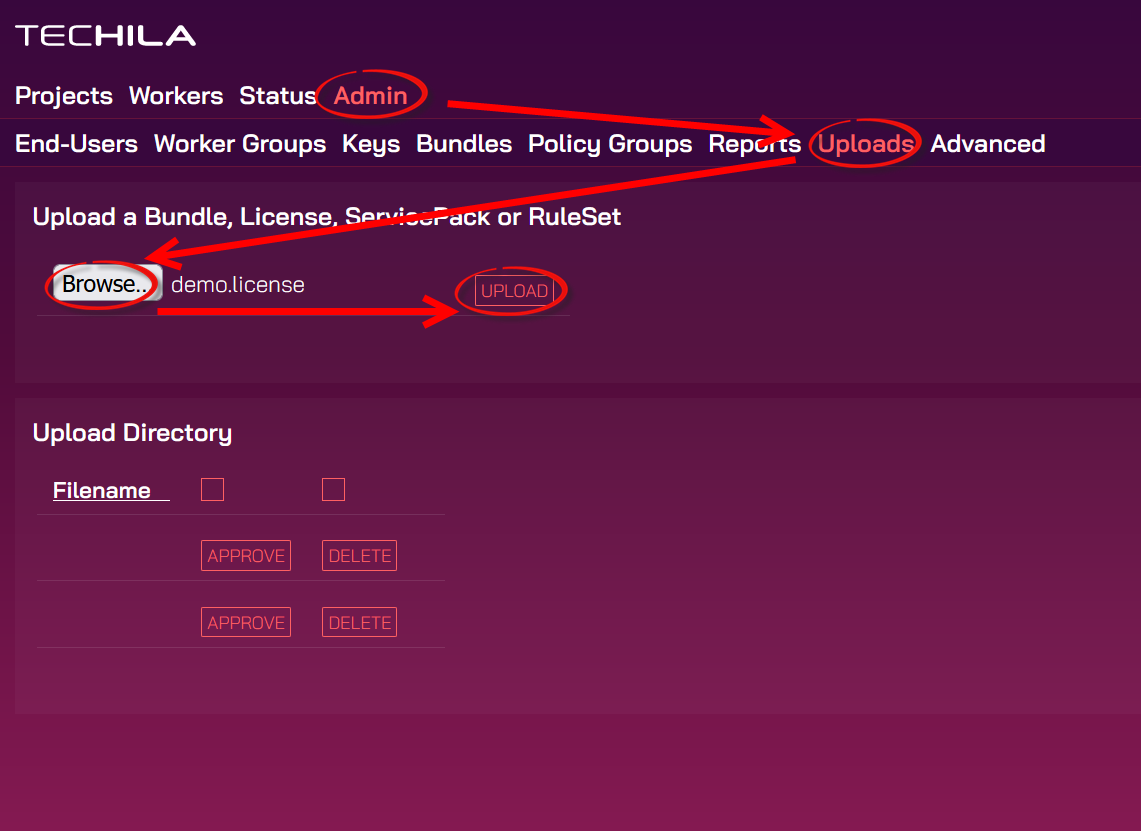
-
After the upload process is completed, the Techila License will be listed in the Upload Directory table. Tick the checkbox (under the
APPROVEbutton) and click theAPPROVEbutton to approve the License.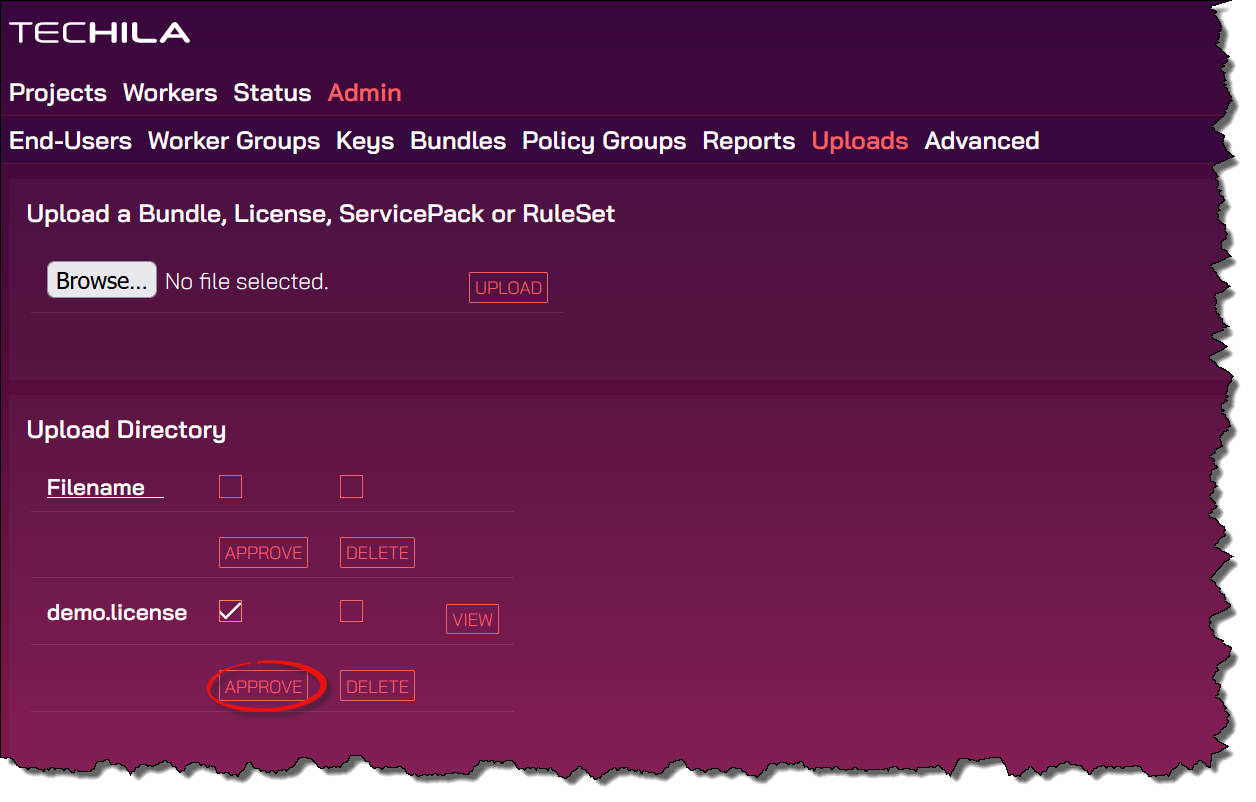 Figure 25. Tick the checkbox and approve the Techila License by clicking the
APPROVEbutton. -
Click the Status page. The Status page will display the Techila License information in the Server Registration Info table as shown below.
 Figure 26. After uploading the Techila License, the new license information will be visible in the Server Registration Info table on the Status page
Congratulations, your Techila Virtual Server is now ready for use! Please continue by Adding Techila Workers.
6. Adding Techila Workers
Before End-Users can run computational Projects in the Techila Distributed Computing Engine (TDCE) environment, Techila Workers will need to be added to the TDCE environment, and their status needs to be set to "trusted".
Installation instructions for installing the Techila Worker software on different operating systems can be found in the following documents:
After installing Techila Workers, please continue by Adding End-Users.
7. Adding End-Users
The following procedure describes how you can add your first End-User to the Techila Distributed Computing Engine (TDCE) environment and run a test computational Project.
Note! The Techila Server IP used in the examples in this chapter is most likely different than the one you are using. Replace this IP address with the IP address of your Techila Server when following the steps.
-
Using your web browser, log in to the Techila web interface.
-
Under
Admin→Advanced, check that theSDK Gen: Server public IP or Hostnamefield has been populated correctly. The value in this field will be inserted in thetechila_settings.inifile in the Techila SDK and will be used to determine which network addres the Techila SDK will connect to.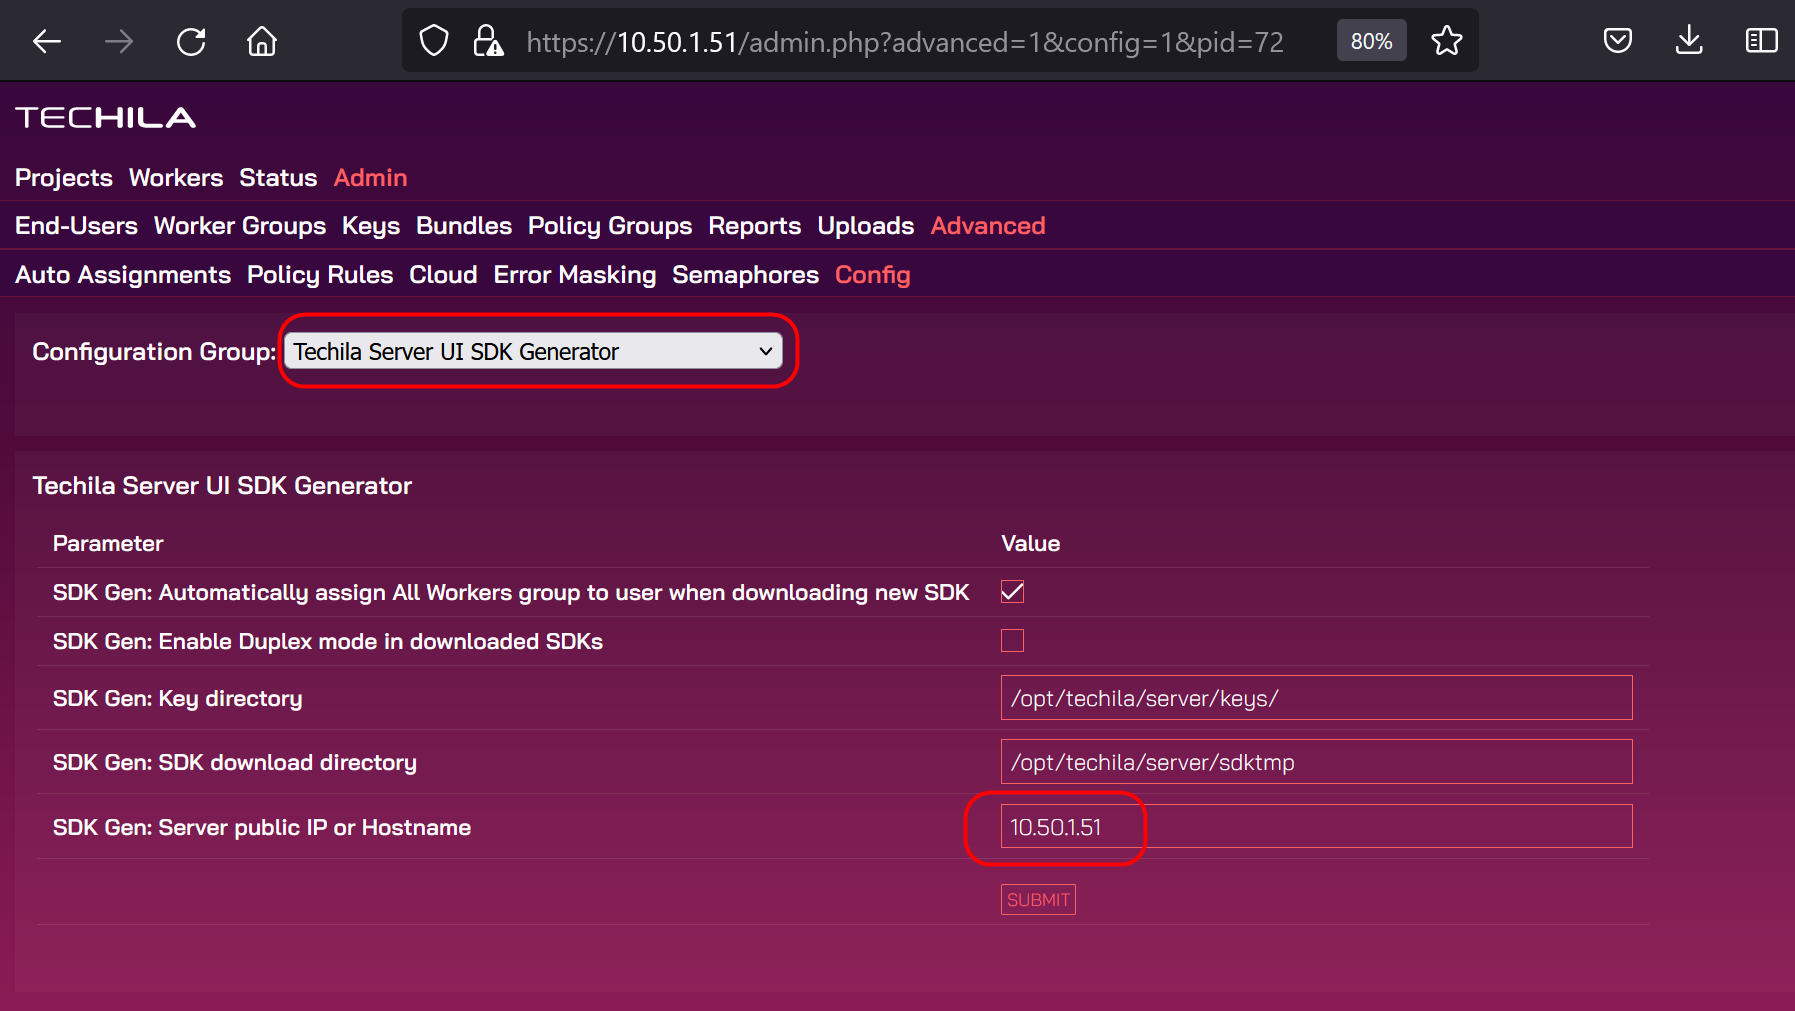
-
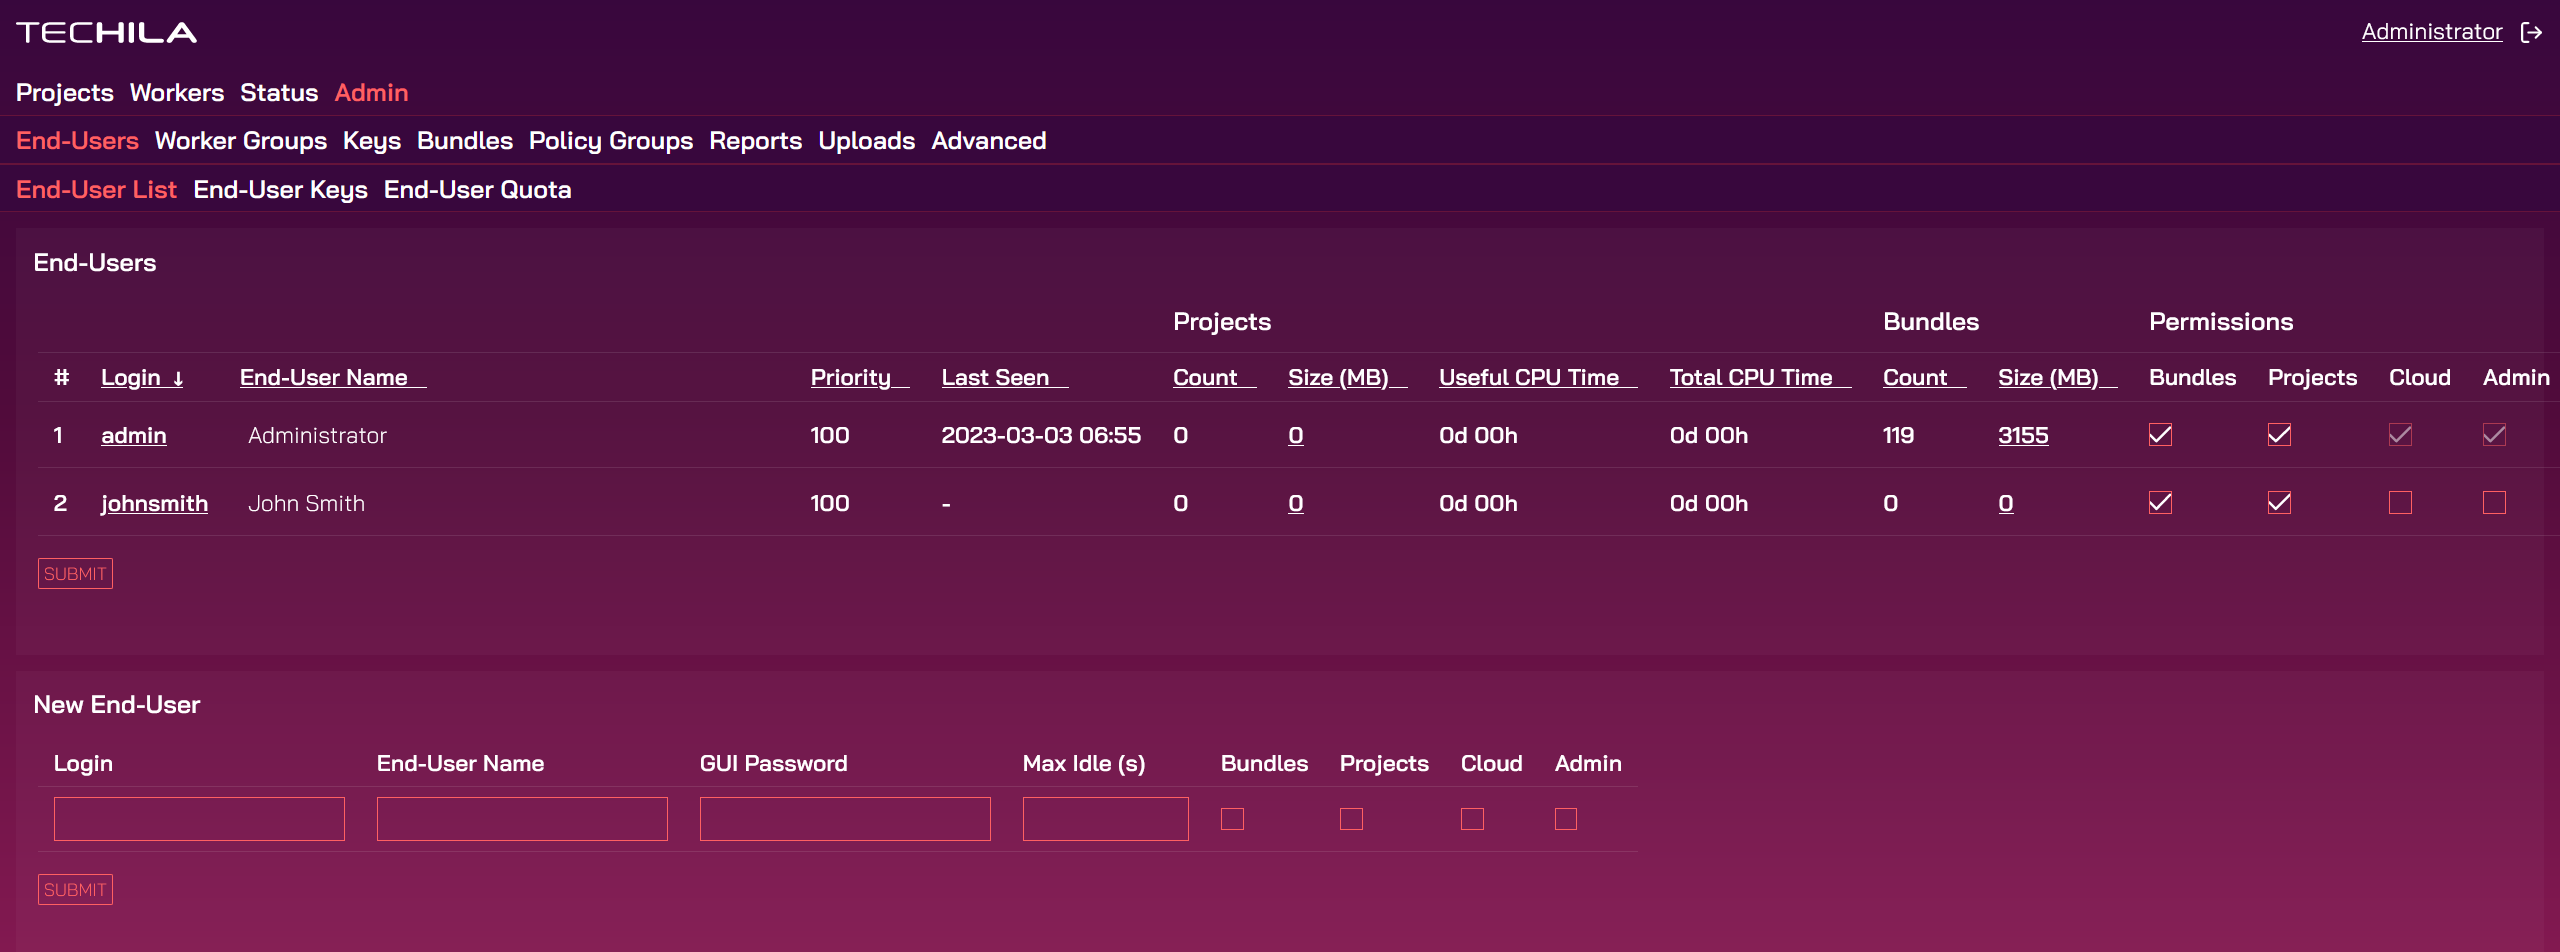
Next you can create the new user. Navigate to
Admin→End-Users→End-User List. Fill in the details and tick theBundlesandProjectscheckboxes. Click theSubmitbutton to add the user.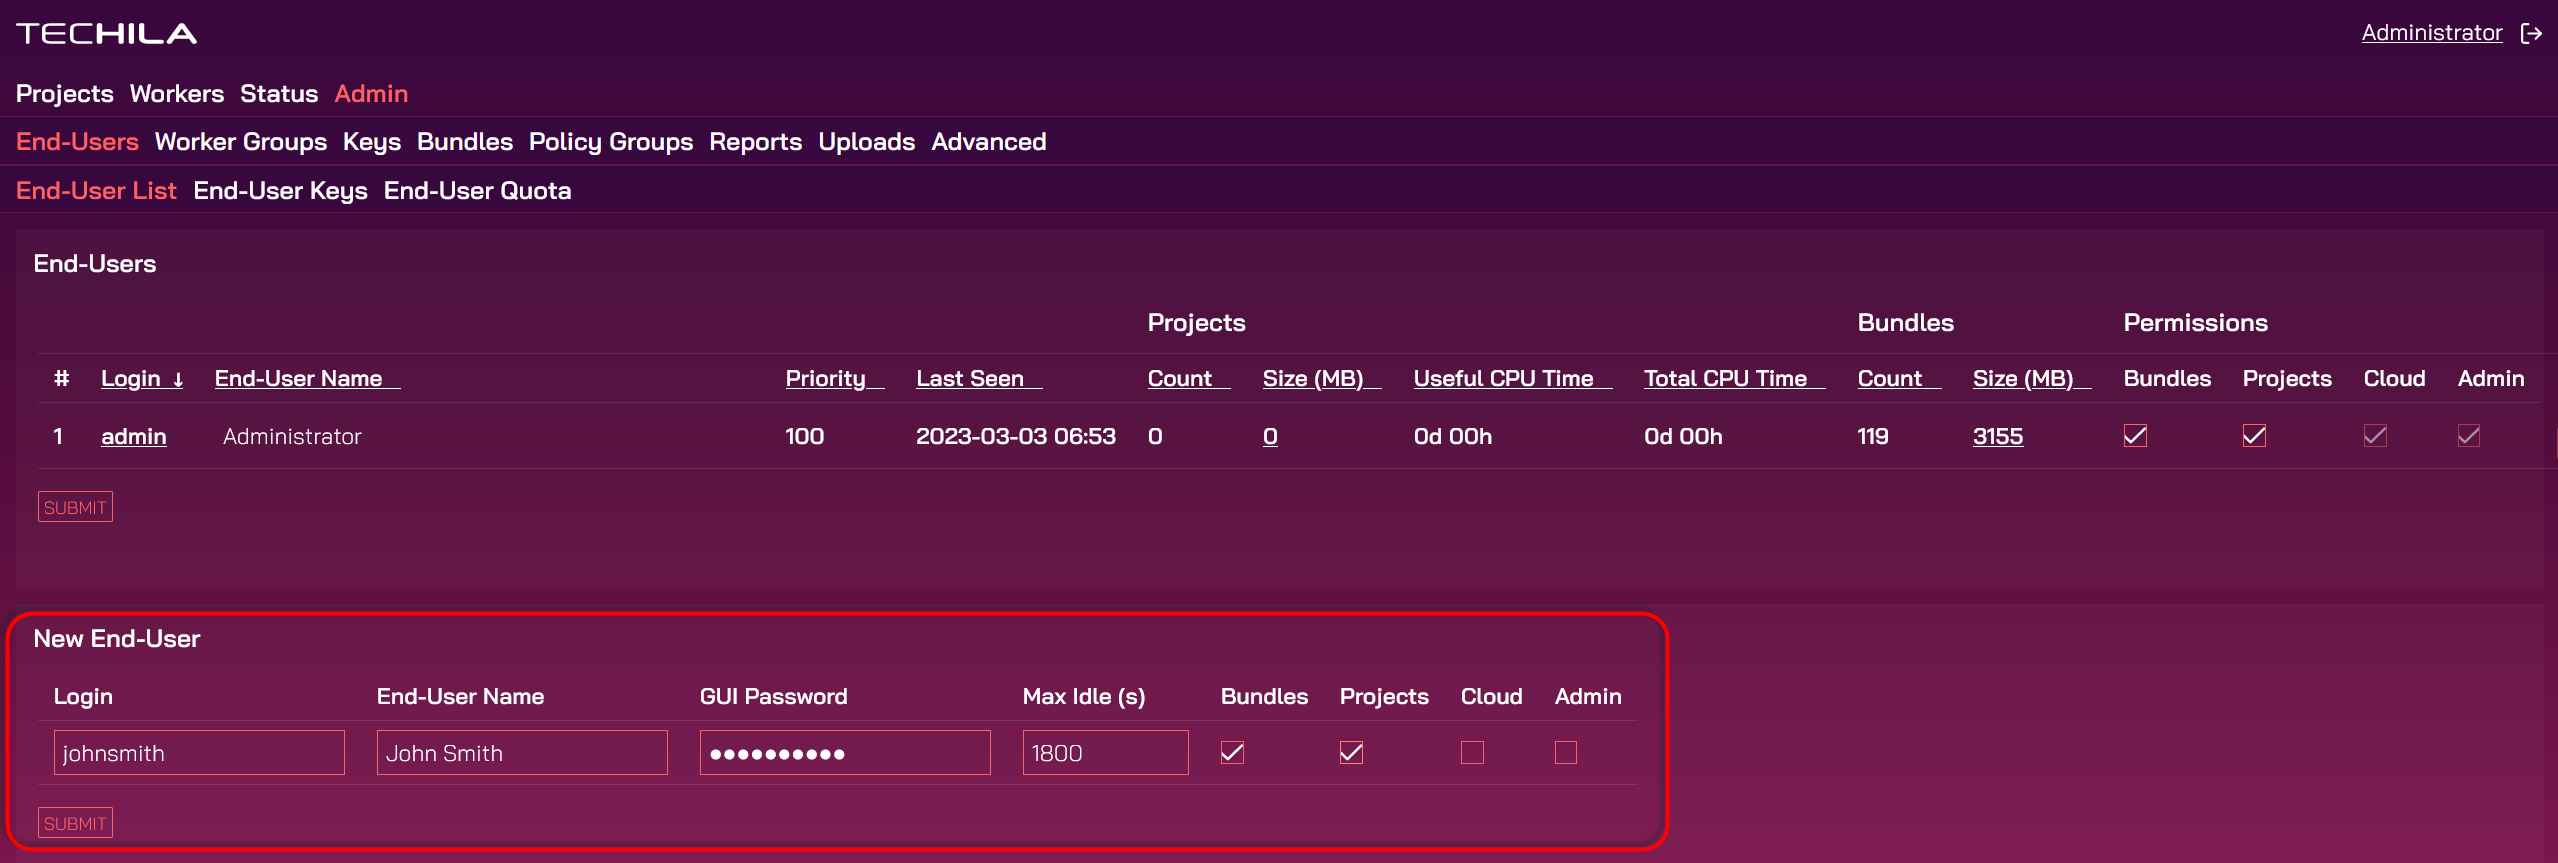
-
The new user should now be visible in the list.
-
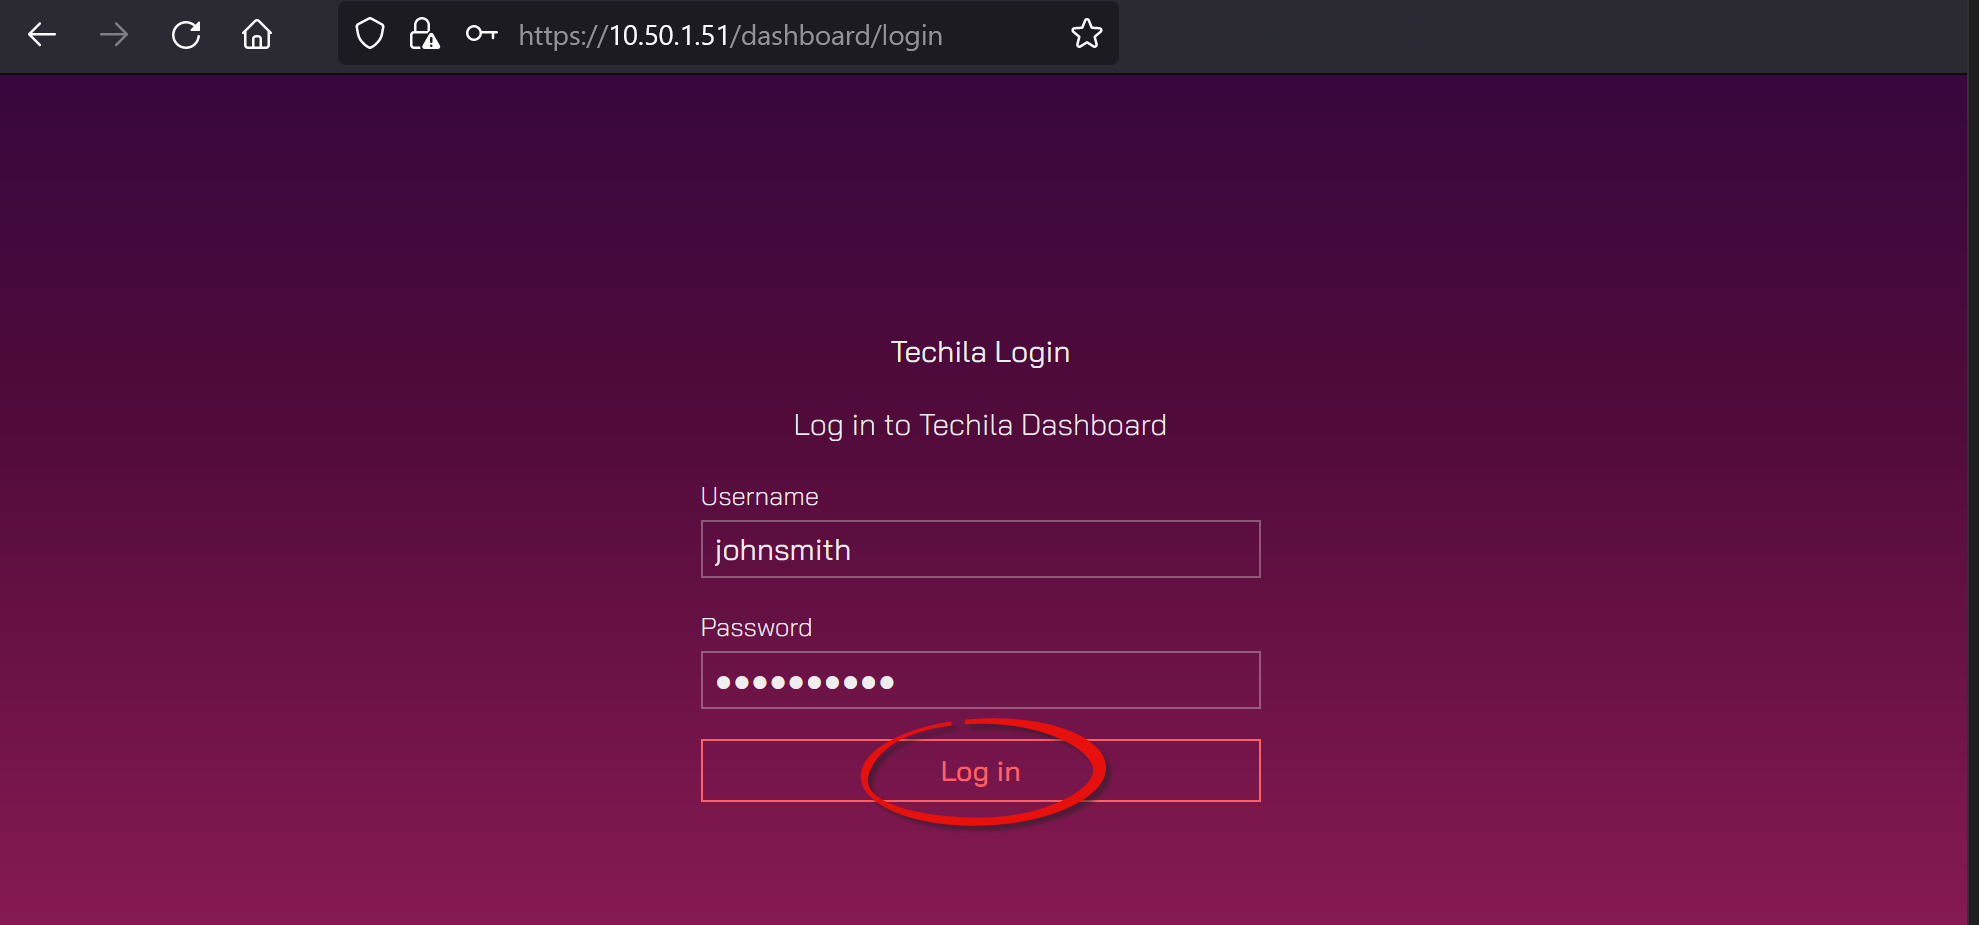
The new user can now log in to the Techila Dashboard to download their Techila SDK.
The URL will be https://<serverip>/dashboard/wizard
Log in as the new user.
-
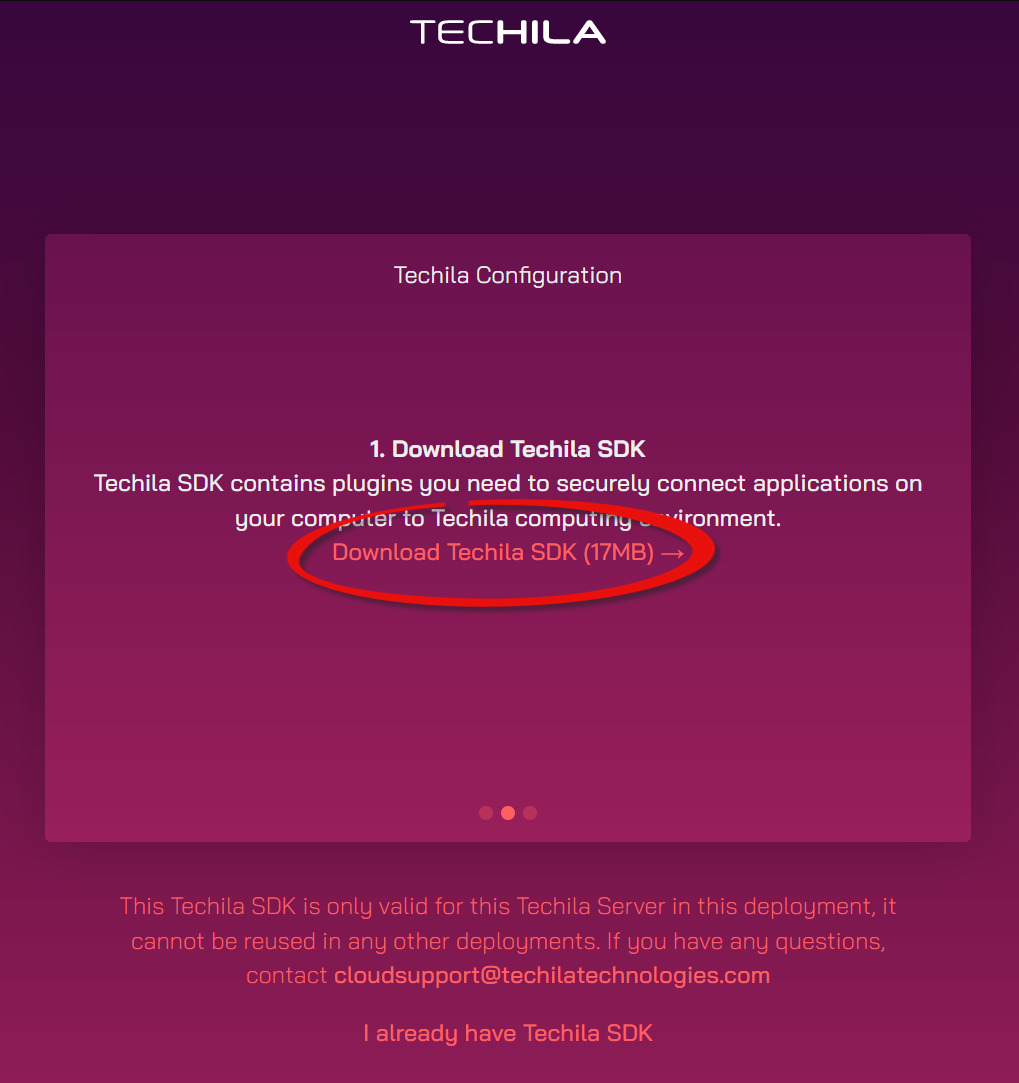
After logging in, download the TechilaSDK.
-
Extract the zip file to the development machine. Extracting the zip-file will create a directory named
techilawhich has several subfolders as shown below.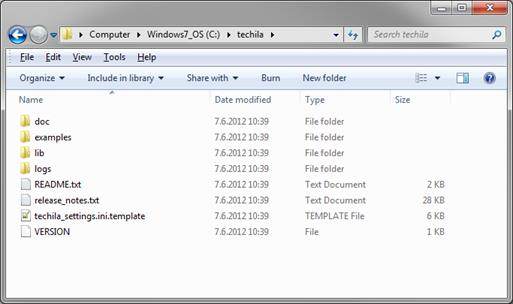
-
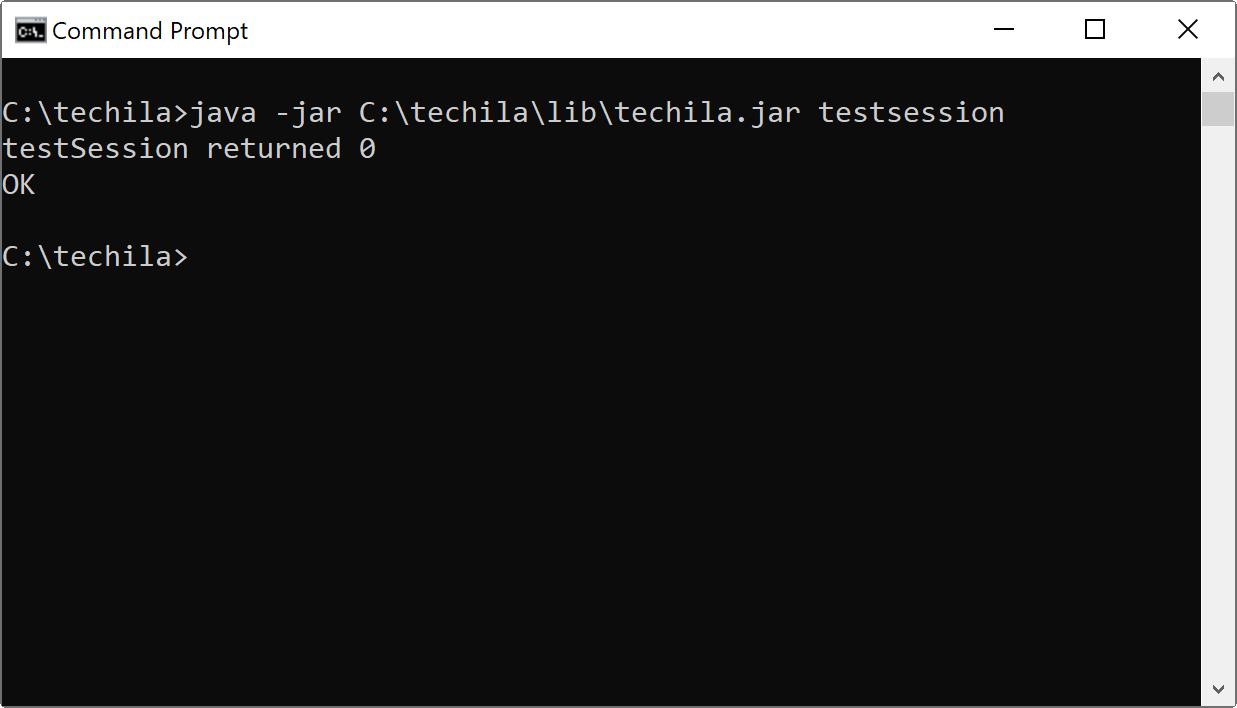
You have now configured the Techila SDK. Next, you can run a command line command that tests network connectivity between the Techila SDK the Techila Server.
You can test network connectivity with the following command:
java -jar C:\techila\lib\techila.jar testsession
-
After a successful connection test the output should resemble the one illustrated below. Next, you can continue with Creating a Test Project
8. Creating a Test Project
This Chapter contains a walkthrough how you can create a simple test Project for testing purposes by using the End-User Key created in Adding End-Users.
Note! In order for the test Project to be completed successfully, at least one Techila Worker with a Microsoft Windows or Linux operating system must be available. At least one Techila Worker also must be in the Running state. The statuses of active Techila Workers can be viewed in the Techila Web Interface in the Workers → All Workers page. The screenshot below illustrates a valid test environment.
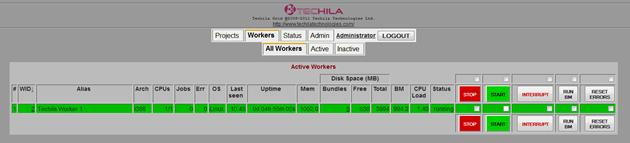
Running status are highlighted with green.Note! The paths used in the example commands in this chapter assume that the path to your Techila SDK techila directory is C:\techila. If the path is different on your machine, please modify the paths accordingly.
-
Launch a command prompt/terminal and cd into the
C:\techila\examples\CLI\Tutorial\1_distribution.cd C:\techila\examples\CLI\Tutorial\1_distribution
-
Create the test Project using command:
java -jar C:/techila/lib/techila.jar read < commands
If prompted, enter your keystore password.
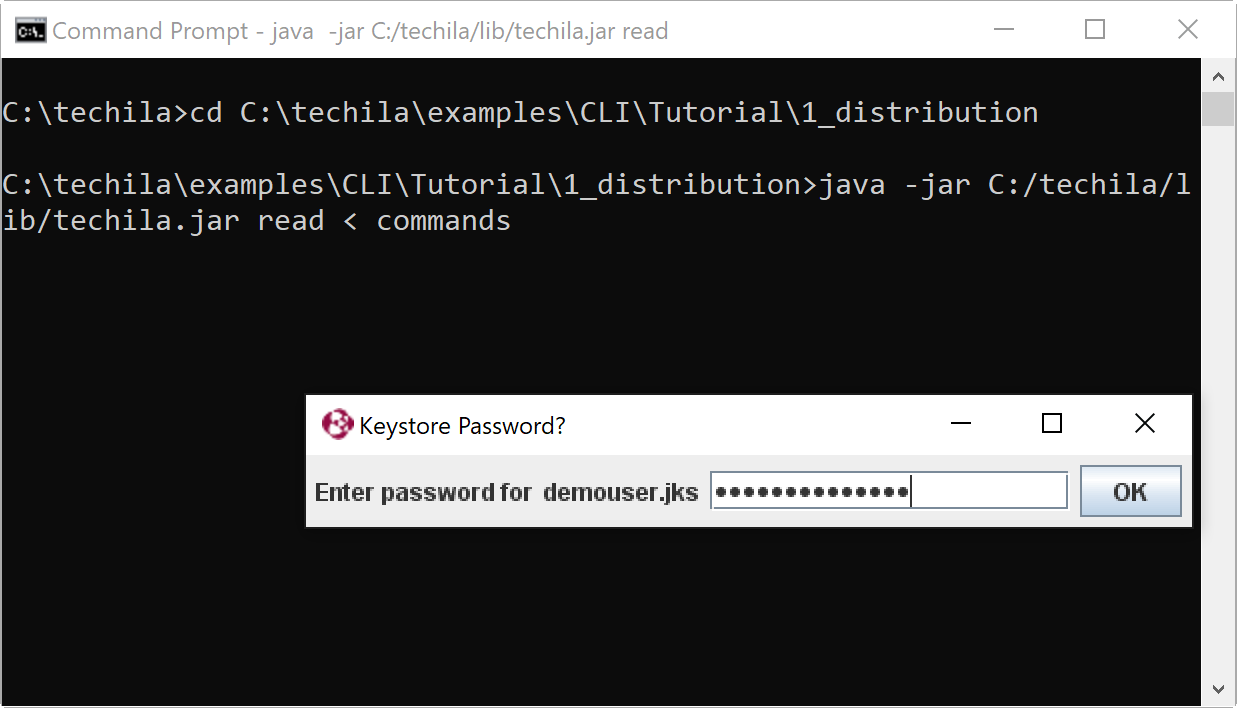 Figure 28. The test Project can be created by running one of the Techila Command Line Interface examples. More information on the example material under the
CLIfolder can be found in the documentTechila Distributed Computing Engine with Command Line Interface. -
After the Project has been completed, statistics will be displayed in the command prompt and should resemble the one shown below.
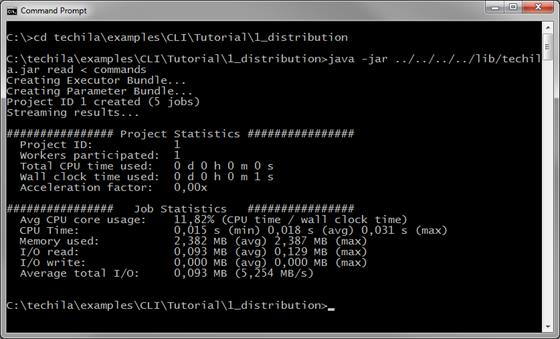 Figure 29. Information on the Project will be displayed in the command prompt. The test Project is computationally very light, which means that the Project will be completed in a very short amount of time.
Congratulations! You have successfully completed a computational Project in the Techila Distributed Computing Engine environment.
9. Creating Runtime Bundles
Language-specific Runtime Bundles are required to perform computations on Techila Workers with various programming languages. The Techila Server includes several versions of Runtime Bundles for Python and R and the version details can be found in the techila_settings.ini file.
MATLAB MCR components can be uploaded manually via the Techila web interface. This Chapter provides an example flow how to upload the required runtime components for running MATLAB workloads on Techila Workers that have a Microsoft Windows operating system.
Information on how to create runtime Bundles for other programming languages can be found in the document Bundle Guide.
-
Locate your MATLAB Compiler Runtime (MCR) installer that you want to upload to the Techila Server. MCR installers are included with MATLAB installations that have the Compiler toolbox. MCR installers can also be downloaded from the Mathworks website. Please note that MCR files are version specific, meaning you will need to upload the MCR installer corresponding to the MATLAB version you are using.
The screenshot shows how you can use the
mcrinstallercommand to determine the location of the MCR installer.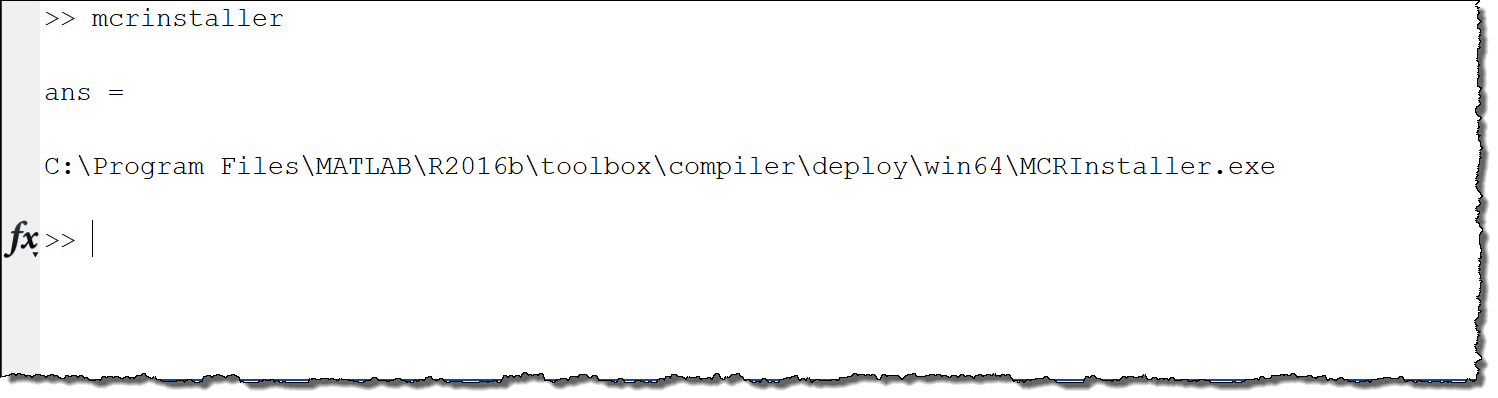
-
Upload the MCR installer using the web interface by clicking
Admin→Uploads→ ClickBrowse…→ Select the MCR installer → ClickUpload.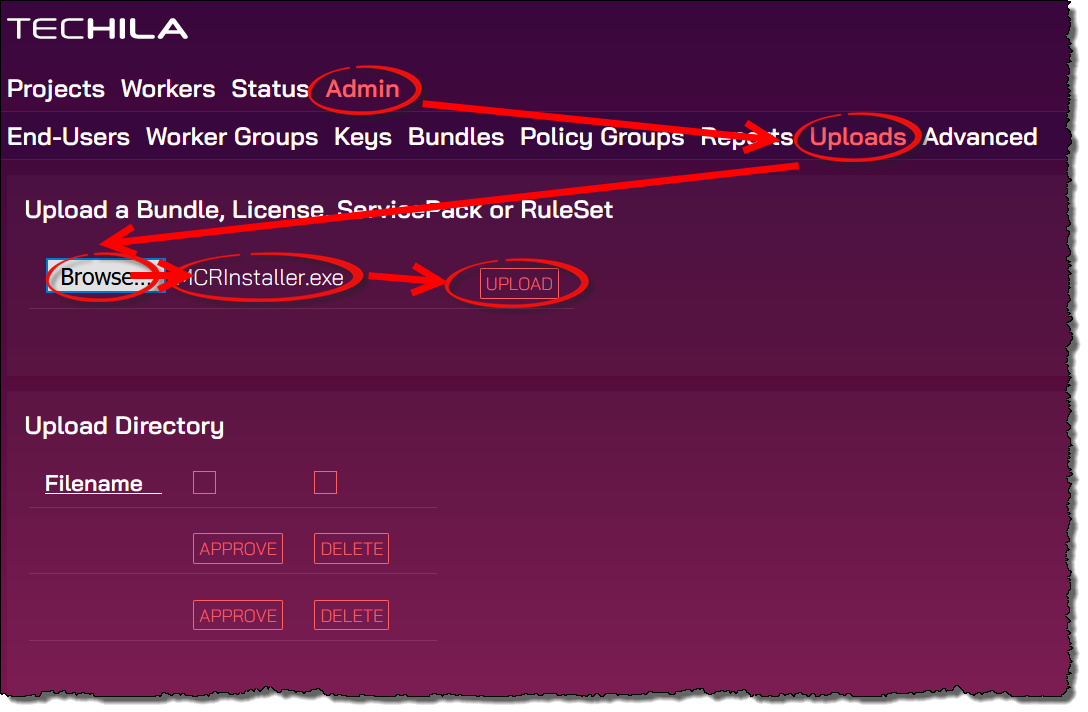
-
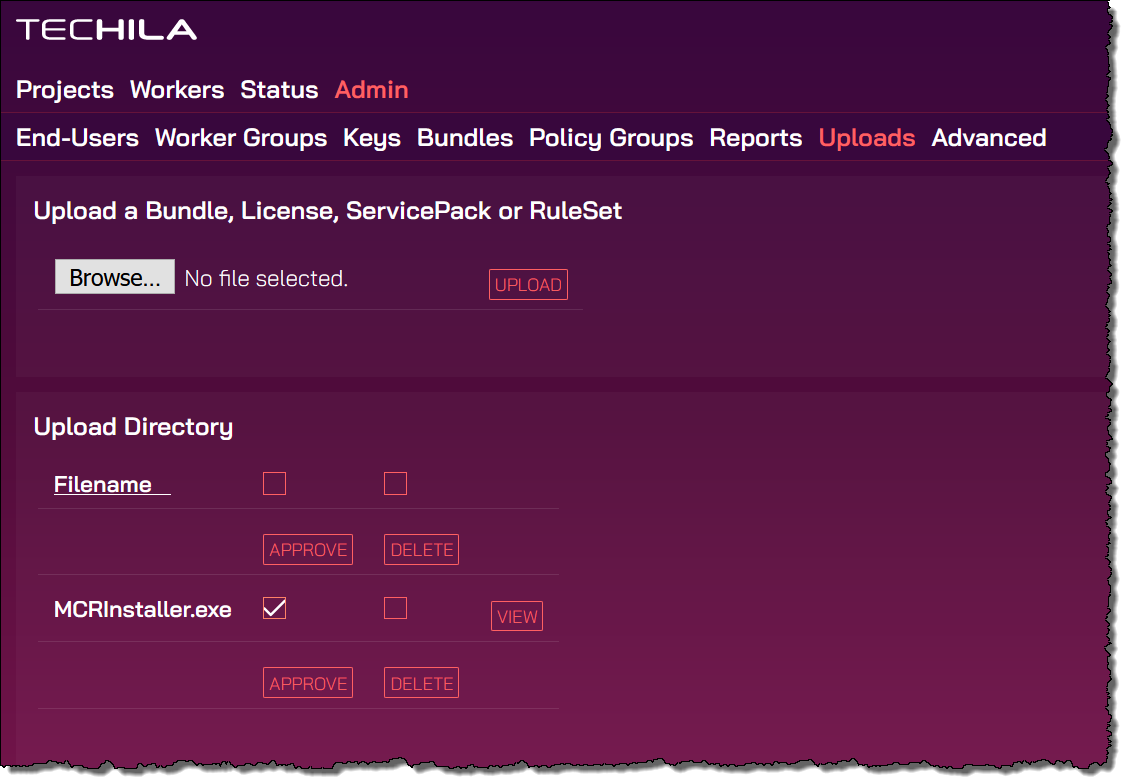
Tick the checkbox and click Approve. This approval process might take several seconds.
-
After the bundle has been approved, check that the Bundle is visible in the
Admin→Bundles→DB Bundlesview.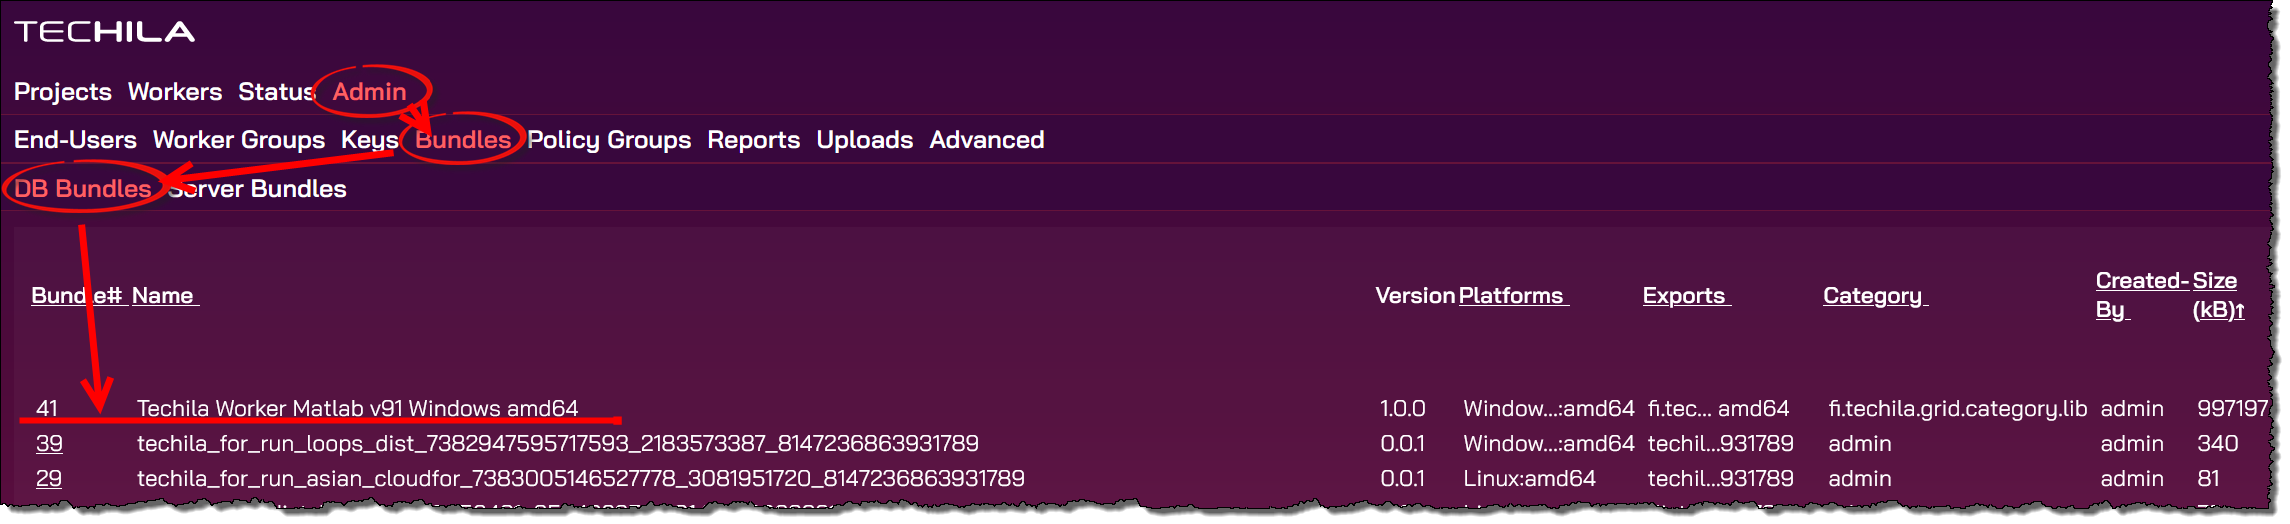
10. Appendix
10.1. Techila Web Interface Login Credentials
The login credentials for the Techila Web Interface are shown below:
| Techila Web Interface | |
|---|---|
Login |
admin |
Password |
adminpass |
Note! It is strongly recommended that you change the default password as soon as possible.
10.2. Master Administrator Keystore Information
Information on the Master Administrator keystore is shown below:
| Master Administrator keystore | |
|---|---|
Location of the Master Administrator keystore |
/home/techila-admin/admin/admin.jks |
Master Administrator Key alias |
admin |
Master Administrator Key password |
adminpass |
Note! It is recommended that you change the default password after completing the installation.
10.3. admin Keystore Information
Information on the End-User keystore is shown below:
| End-User keystore | |
|---|---|
Location of the End-User keystore |
/home/techila-admin/userkeys/subadmin1.jks |
End-User Key alias |
admin |
End-User Key password |
adminpass |
Note! It is recommended that you change the default password after completing the installation.
10.4. User techila-admin Login Credentials
The login credentials for the user techila-admin user on the Techila Virtual Server are shown below:
| Techila Virtual Server | |
|---|---|
Login |
techila-admin |
Password |
eizolee0 |
Note! It is recommended that you change the default password after completing the installation.
10.5. Configuring a Static IP Address for the Techila Server
By default, the Techila Server is configured to obtain the IP address from the DHCP server. This Chapter contains instructions on how to configure a static IP address for the Techila Server.
Procedure
-
Log in to the Techila Server as
techila-admin -
Open file
/etc/network/interfaceswith a text editor (as root via sudo) e.g. by using command:sudo nano /etc/network/interfaces
-
If needed, remove the lines containing the dhcp configuration and replace with the following parameters:
iface eth0 inet static
  address <IP address of the Techila Server>
  netmask <netmask value>
  broadcast <broadcast address>
  network <network address>
  gateway <gateway address>
Below is an example static IP address configuration for eth0.
iface eth0 inet static
  address 10.50.1.3
  netmask 255.255.255.0
  broadcast 10.50.1.255
  network 10.50.1.0
  gateway 10.50.1.4
More information on configuring the network address of a Debian operating system can be found from the following address:
-
Save changes and exit the editor.
-
Reboot the Techila Server with command:
sudo reboot
10.6. Disabling the Automatic Trusting of Techila Worker Keys
The following procedure describes how you can disable the automatic trusting of Techila Worker Keys.
-
Log in as an administrator to the Techila Web Interface
-
Click
Admin -
Click
Advanced -
Click
Config -
Scroll down the page and locate the table titled
Techila Server Security X509DB -
Uncheck the checkbox on following line
Workers: Trust Keys Automatically -
Click the
Submitbutton
10.7. Modifying the Size of the Data Hard Disk
This Chapter contains instructions on how to modify the size of the data hard disk before powering on the Techila Virtual Server.
Note! The procedures described in this Chapter cannot be applied if you have already started the Techila Virtual Server.
-
Select the Techila Virtual Server and click the
Edit Settingsbutton.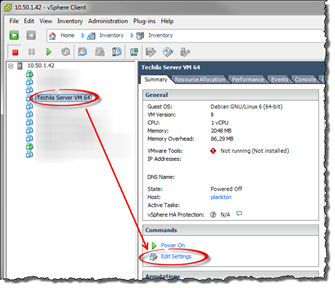 Figure 30. Open the virtual machine properties window by clicking the
Edit Settingsbutton. -
Select "Hard disk 2" and delete it by clicking the
Removebutton.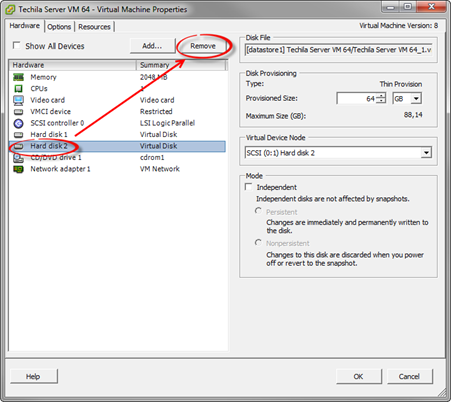 Figure 31. Select "Hard disk 2" and click the
Removebutton. -
Mark files to be removed from the disk in the
Removal Optionssection. Click theAdd…button to add a new hard disk.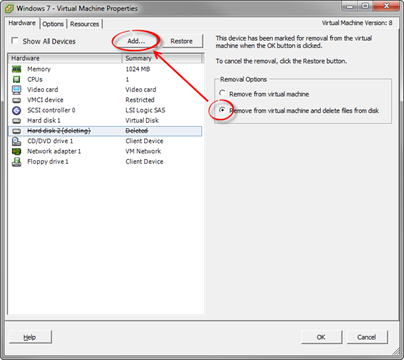 Figure 32. Mark the old hard disk file to be removed and click the
Add…button to add a new data hard disk. -
A new "Add Hardware" window will be displayed that can be used to add the new data hard disk. Select Hard Disk as the device type and click
Next.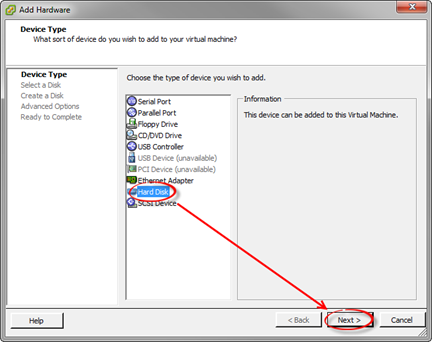 Figure 33. Selecting the Device Type.
 -
Select Create a new virtual disk and click
Next.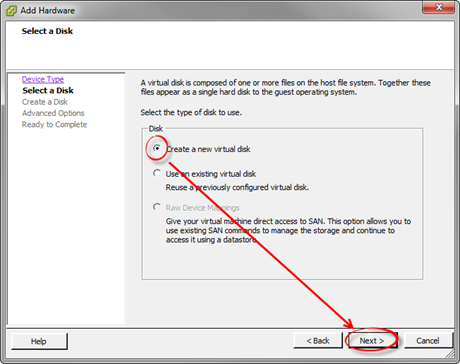 Figure 34. Specifying that a new hard disk should be created.
 -
Specify the size of the new hard disk and other properties. Click
Nextto continue.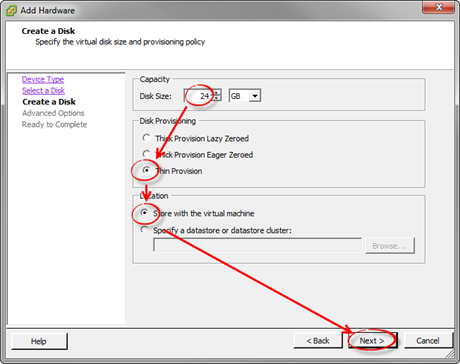 Figure 35. Specify the properties of the new data hard disk. In this example, the size has been set to 24 GB and Disk Provisioning has been set to "Thin".
 -
In the Advanced Options view, ensure that the Virtual Device Node is set to SCSI (0:1). Click Next to continue.
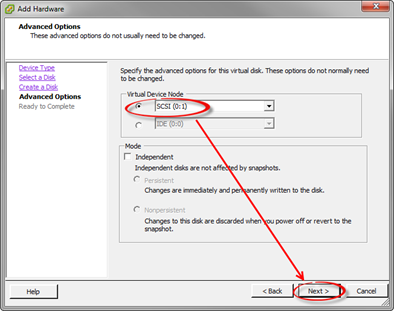 Figure 36. Ensure that the Virtual Device Node field matches the one illustrated here.
 -
Create the hard disk by clicking the
Finishbutton. The view will change back to the virtual machine properties view and should resemble the one shown below. ClickOKto close the virtual machine properties view.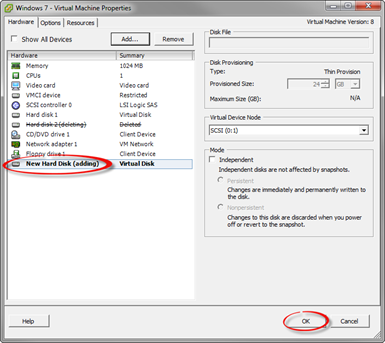 Figure 37. After adding the new hard disk, click
OKto close the virtual machine properties view.
10.8. Configuring the Techila Server Firewall
The Techila Server firewall configuration is located in the following directory:
-
/etc/firewall/
This directory contains the following firewall configuration files:
-
config_allow_port20001
-
config_allow_port20002
-
config_allow_port25001
-
config_allow_port443
-
config_allow_port80
-
config_allow_snmp
-
config_allow_ssh
Each of these files contains the allowed IP address range definition in CIDR format for the port specified in the file name. Please see below table for a description of the files.
| File | Default Allowed IP Address Range (CIDR) | Description |
|---|---|---|
config_allow_port20001 |
0/0 |
Defines IP range from where Signal Channel connections can be established from. Connections are established by Techila Techila Workers |
config_allow_port20002 |
0/0 |
Defines IP range from where Data Channel connections can be established from. Connections are established by Techila Workers |
config_allow_port25001 |
0/0 |
Defines IP range from where Management Channel connection can be established from. Connections established by End-Users via Techila SDK. |
config_allow_port443 |
0/0 |
Defines IP range from where Techila Web Interface can be accessed from. Connections established by End-Users and Administrators via web browser using https protocol. |
config_allow_port80 |
No external connections allowed. |
Defines IP range from where http requests can be performed. Port not used in the current Techila Virtual Server. |
config_allow_snmp |
No external connections allowed. |
Defines IP range from where SNMP connections can be established from using UDP port 161. Default only allows connections from localhost. |
config_allow_ssh |
0/0 |
Defines IP range from where SSH connections can be established from using TCP port 22. Connections established by Techila Administrators. |
After modifying the firewall configuration files described above, the changes will need to be applied by executing the firewall configuration update script. The location of the firewall configuration script is:
-
/etc/firewall/iptables-firewall.sh
Note! When executing the configuration update script, your current working directory must be set to /etc/firewall
The example procedure in this Chapter illustrates how the Techila Server firewall can be configured to only allow SSH connections from a specific IP address range.
The procedure is similar for all port configurations, only the file names will be different. Please replace the filenames to match the firewall configuration you are modifying.
-
Establish a SSH connection to the Techila Server. When prompted for login credentials, use login credentials described in User techila-admin Login Credentials.
-
Change your current working directory to directory
/etc/firewall.cd /etc/firewall
-
Open the file
config_allow_sshwith a text editor using sudo.sudo nano config_allow_ssh
-
When prompted for the
techila-adminpassword, enter the password defined in User techila-admin Login Credentials. -
Replace the line
0/0with the IP address CIDR range of your choosing. In the example below, the IP range has been changed to10.50.1.0/24.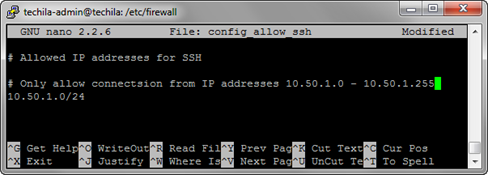 Figure 38. Specifying the IP address range using CIDR format.
 -
Save the changes that you made to the file and exit the text editor.
-
Update the changes to the firewall by executing the script
iptables-ssh.shusing the command shown below:sudo ./iptables-ssh.sh
-
After executing the command, information about the new IP address range should be displayed as shown below.
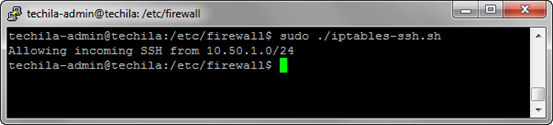 Figure 39. After executing the configuration update script, the new allowed IP address range will be displayed.